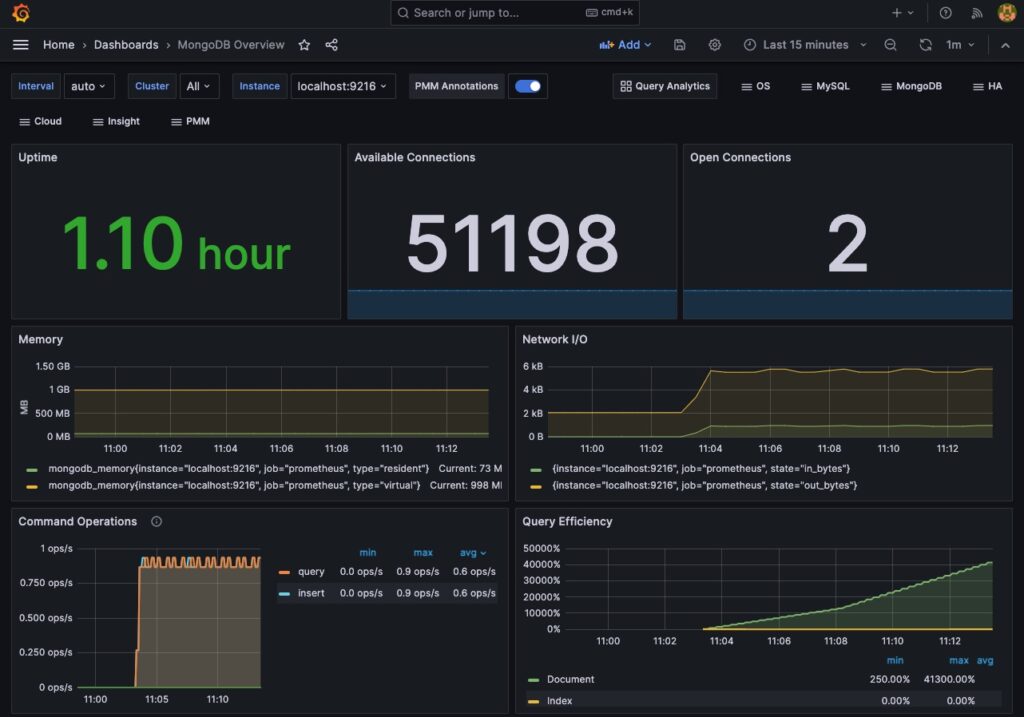
1. Lời nói đầu.
Trong bài hướng dẫn này, bạn sẽ thiết lập một database MongoDB và giám sát nó bằng Grafana sử dụng Prometheus là nguồn dữ liệu. Để thực hiện điều này, bạn sẽ cấu hình MongoDB exporter như một Prometheus target để Prometheus có thể thu thập các thông số đo của database và làm cho chúng có sẵn cho Grafana. Dưới đây là các bước chi tiết:
- Cài đặt MongoDB: Bạn có thể cài đặt MongoDB trên máy tính hoặc sử dụng một container Docker để chạy MongoDB. Truy cập trang web chính thức của MongoDB hoặc tài liệu Docker để biết thêm thông tin về cách cài đặt và chạy MongoDB.
- Cài đặt Prometheus: Truy cập trang web chính thức của Prometheus và tải xuống phiên bản phù hợp với hệ điều hành của bạn. Sau khi tải xuống, giải nén và thiết lập các tùy chọn cấu hình cho Prometheus.
- Cài đặt MongoDB exporter: MongoDB exporter là một ứng dụng được sử dụng để thu thập các thông số đo từ MongoDB và chuyển chúng thành dạng Prometheus metrics. Bạn có thể tải xuống MongoDB exporter từ trang GitHub chính thức của dự án và làm theo hướng dẫn cài đặt và cấu hình.
- Cấu hình Prometheus: Sửa đổi file config của Prometheus (
prometheus.yml) để thêm MongoDB exporter làm target. Bạn cần chỉ định địa chỉ và cổng của MongoDB exporter để Prometheus có thể truy vấn dữ liệu từ nó. - Cài đặt Grafana: Truy cập trang web chính thức của Grafana và tải xuống phiên bản phù hợp với hệ điều hành của bạn. Sau khi tải xuống, giải nén và thiết lập Grafana.
- Cấu hình Grafana: Truy cập web interface Grafana và thêm Prometheus làm nguồn dữ liệu. Bạn cần chỉ định địa chỉ và cổng của Prometheus để Grafana có thể truy vấn dữ liệu từ nó. Sau đó, bạn có thể tạo các biểu đồ và bảng điều khiển trong Grafana để hiển thị các thông số đo từ MongoDB.
- Tùy chỉnh và theo dõi: Sử dụng Grafana, bạn có thể tùy chỉnh giao diện và thiết kế biểu đồ theo ý muốn. Bạn cũng có thể thiết lập các cảnh báo để nhận thông báo khi các thông số đo vượt quá ngưỡng cho phép.
Thông qua việc sử dụng Prometheus và Grafana để giám sát MongoDB, bạn có thể theo dõi hiệu suất của database, phát hiện vấn đề nhanh chóng và thực hiện các tương tác phù hợp để cải thiện hiệu suất và khả năng của MongoDB.
2. Yêu cầu hệ thống.
Để theo dõi MongoDB bằng Grafana, bạn cần chuẩn bị các điều kiện tiên quyết sau:
- Một server Ubuntu 20.04 với một người dùng không phải là người dùng root có quyền sudo và có firewall được cấu hình bằng ufw.
- Đã cài đặt MongoDB trên server Ubuntu 20.04.
- Đã cài đặt Grafana trên server Ubuntu 20.04.
3. Triển khai.
Bước 1 — Cài đặt và Cấu hình Prometheus.
Prometheus là một bộ công cụ mã nguồn mở để giám sát và cảnh báo hệ thống, thu thập và lưu trữ các số liệu thống kê dưới dạng chuỗi thời gian. Các thông tin số liệu được lưu trữ kèm theo thời điểm ghi nhận. Trong bước này, bạn sẽ cài đặt Prometheus và cấu hình để chạy như một dịch vụ.
Cài đặt Prometheus Trước tiên, bạn cần cài đặt Prometheus. Bắt đầu bằng cách cập nhật danh sách gói như sau:
sudo apt updateTạo thư mục lưu trữ các file config của Prometheus.
sudo mkdir -p /etc/prometheusTạo thư mục lưu trữ data Prometheus.
sudo mkdir -p /var/lib/prometheusTải file cài đặt Prometheus về máy.
wget https://github.com/prometheus/prometheus/releases/download/v2.31.0/prometheus-2.31.0.linux-amd64.tar.gzGiải nén file vừa tải về.
tar -xvf prometheus-2.31.0.linux-amd64.tar.gzDi chuyển vào thư mục vừa giải nén xong.
cd prometheus-2.31.0.linux-amd64Di chuyển 2 thư mục prometheus và promtool vào trong thư mục /usr/local/bin/.
sudo mv prometheus promtool /usr/local/bin/Di chuyển consoles/ và console_libraries/ vào trong thư mục /etc/prometheus/.
sudo mv consoles/ console_libraries/ /etc/prometheus/Di chuyển file config prometheus.yml vào thư mục /etc/prometheus/.
sudo mv prometheus.yml /etc/prometheus/prometheus.ymlBây giờ bạn có thể kiếm tra phiên bản Prometheus bằng lệnh dưới.
prometheus --versionKết quả đầu ra khi kiểm tra phiên bản.
$ prometheus --version
prometheus, version 2.31.0 (branch: HEAD, revision: d4c83da6d252d4edfdbd639fb817ebdb8e9ab2e4)
  build user:       root@395d507f537a
  build date:       20211102-10:28:54
  go version:       go1.17.2
  platform:         linux/amd64
root@ubuntu1804:~/prometheus-2.3
Tạo dịch vụ Prometheus để khởi động nó.
Sau khi bạn đã cài đặt Prometheus, bạn hãy tạo file config để nó chạy như một dịch vụ của hệ thống.
Để thực hiện điều này, bạn cần tạo một nhóm và người dùng Prometheus. Bạn sẽ cần một người dùng riêng với quyền sở hữu đối với các thư mục cần thiết. Để tạo nhóm prometheus, chạy lệnh sau:
sudo groupadd --system prometheusGán cho nó vào nhóm prometheus mà bạn vừa tạo:
sudo useradd -s /sbin/nologin --system -g prometheus prometheusThay đổi sở hữu và quyền truy cập của thư mục như sau để người dùng chuyên dụng có quyền truy cập đúng:
sudo chown -R prometheus:prometheus /etc/prometheus/ /var/lib/prometheus/
sudo chmod -R 775 /etc/prometheus/ /var/lib/prometheus/
Tạo và thêm đoạn config dưới vào file /etc/systemd/system/prometheus.service. Đoạn cấu hình này là một file systemd unit để cấu hình và quản lý dịch vụ Prometheus. Dưới đây là giải thích từng phần trong đoạn cấu hình:
- [Unit]
- Description: Mô tả ngắn gọn về dịch vụ Prometheus.
- network-online.target: Xác định rằng dịch vụ Prometheus cần được khởi động sau khi mạng đã hoạt động. Điều này đảm bảo rằng Prometheus sẽ có kết nối mạng khi khởi động.
- network-online.target: Xác định rằng dịch vụ Prometheus sẽ được khởi động sau khi mạng đã hoạt động. Điều này đảm bảo rằng Prometheus sẽ có kết nối mạng khi khởi động.
- [Service]
- User: Người dùng được sử dụng để chạy dịch vụ Prometheus. Trong trường hợp này, người dùng là “prometheus”.
- Group: Nhóm của người dùng prometheus.
- Restart: Chế độ khởi động lại dịch vụ. Trong trường hợp này, dịch vụ sẽ được khởi động lại luôn khi cần thiết.
- Type: Loại dịch vụ. Ở đây, nó được đặt thành “simple” để chỉ định rằng quá trình chạy của dịch vụ sẽ được theo dõi bởi systemd.
- ExecStart: Lệnh khởi chạy dịch vụ. Trong trường hợp này, Prometheus được khởi chạy với các cờ cấu hình như
--config.file,--storage.tsdb.path,--web.console.templates,--web.console.librariesvà--web.listen-address
- [Install]
- WantedBy: Mục tiêu cài đặt của dịch vụ. Trong trường hợp này, dịch vụ sẽ được cài đặt trong
multi-user.target, nghĩa là dịch vụ sẽ được chạy khi hệ thống chuyển sang chế độ đa người dùng.
- WantedBy: Mục tiêu cài đặt của dịch vụ. Trong trường hợp này, dịch vụ sẽ được cài đặt trong
File config này giúp systemd quản lý và khởi động lại dịch vụ Prometheus theo cấu hình đã chỉ định.
cat > /etc/systemd/system/prometheus.service << 'OEF'
[Unit]
Description=Prometheus
Wants=network-online.target
After=network-online.target

[Service]
User=prometheus
Group=prometheus
Restart=always
Type=simple
ExecStart=/usr/local/bin/prometheus \
    --config.file=/etc/prometheus/prometheus.yml \
    --storage.tsdb.path=/var/lib/prometheus/ \
    --web.console.templates=/etc/prometheus/consoles \
    --web.console.libraries=/etc/prometheus/console_libraries \
    --web.listen-address=0.0.0.0:9090

[Install]
WantedBy=multi-user.target
OEF
Khởi động và bật tính năng khởi động theo OS dịch vụ Prometheus vừa tạo.
sudo systemctl start prometheus
sudo systemctl enable prometheus
Kiểm tra lại trạng thái của Prometheus.
sudo systemctl status prometheusĐầu ra của lệnh systemctl status prometheus.
● prometheus.service - Prometheus
     Loaded: loaded (/etc/systemd/system/prometheus.service; enabled; vendor preset: enabled)
     Active: active (running) since Fri 2022-08-05 18:06:05 UTC; 13s ago
   Main PID: 7177 (prometheus)
      Tasks: 6 (limit: 527)
     Memory: 21.0M
     CGroup: /system.slice/prometheus.service
             └─7177 /usr/local/bin/prometheus --config.file=/etc/prometheus/prometheus.yml --storage.tsdb.path=/var/lib/prometheus/ --web.console.template>
Kết quả truy cập url của Prometheus http://<ipaddr>:9090.

Bước 2 — Cài đặt MongoDB.
Tôi sẽ cài đặt MongoDB chung với Server chạy Prometheus luôn nhé. Để cài đặt MongoDB trên Ubuntu, bạn có thể làm theo các bước sau:
Cập nhật các gói phần mềm:
sudo apt updateCài đặt gói MongoDB:
sudo apt install mongodb -ySau khi quá trình cài đặt hoàn tất, MongoDB sẽ được khởi động mặc định. Bạn có thể kiểm tra trạng thái của dịch vụ MongoDB bằng lệnh:
sudo systemctl status mongodbNếu dịch vụ đang chạy, bạn sẽ thấy thông báo “active (running)”.
● mongodb.service - An object/document-oriented database
   Loaded: loaded (/lib/systemd/system/mongodb.service; enabled; vendor preset: enabled)
   Active: active (running) since Tue 2023-06-20 03:07:02 UTC; 7s ago
     Docs: man:mongod(1)
 Main PID: 2970 (mongod)
    Tasks: 23 (limit: 4915)
   CGroup: /system.slice/mongodb.service
           └─2970 /usr/bin/mongod --unixSocketPrefix=/run/mongodb --config /etc/mongodb.conf

Jun 20 03:07:02 ubuntu1804 systemd[1]: Started An object/document-oriented database.
Bước 3 — Cài đặt MongoDB Exporter.
Tạo thư mục lưu source code của MongoDB Exporter và di chuyển vào nó.
mkdir mongodb-exporter
cd mongodb-exporter
Tạo thư mục này hãy tải file MongoDB Exporter về máy.
wget https://github.com/percona/mongodb_exporter/releases/download/v0.7.1/mongodb_exporter-0.7.1.linux-amd64.tar.gzSau khi tải xong bạn hãy giải nén nó.
tar xvzf mongodb_exporter-0.7.1.linux-amd64.tar.gzGiải nén xong hãy di chuyển thư mục mongodb_exporter vào thư mục /usr/local/bin/.
sudo mv mongodb_exporter /usr/local/bin/Bước 4 — Kích hoạt xác thực MongoDB.
Trong phần này, bạn sẽ thiết lập xác thực MongoDB cho MongoDB exporter và tạo người dùng để giám sát các chỉ số của cluster.
Bắt đầu bằng việc kết nối đến MongoDB instance bằng lệnh mongo:
mongoSau đó, bạn sẽ tạo một tài khoản quản trị cho exporter với vai trò cluster monitor. Chuyển sang database admin:
use adminSau khi chuyển sang database admin, tạo một người dùng với vai trò clusterMonitor:
db.createUser({user: "test",pwd: "testing",roles: [{ role: "clusterMonitor", db: "admin" },{ role: "read", db: "local" }]})Bạn sẽ nhận được đầu ra như sau:
Successfully added user: {
        "user" : "test",
        "roles" : [
                {
                        "role" : "clusterMonitor",
                        "db" : "admin"
                },
                {
                        "role" : "read",
                        "db" : "local"
                }
        ]
}
Cuối cùng bạn gõ lệnh exit để thoát khỏi MongoDB.
exitTheo dõi lại quá trình chạy các lệnh trên của tôi.
$ mongo
MongoDB shell version v3.6.3
connecting to: mongodb://127.0.0.1:27017
MongoDB server version: 3.6.3
Welcome to the MongoDB shell.
For interactive help, type "help".
For more comprehensive documentation, see
        http://docs.mongodb.org/
Questions? Try the support group
        http://groups.google.com/group/mongodb-user
Server has startup warnings:
2023-06-20T03:07:02.990+0000 I STORAGE  [initandlisten]
2023-06-20T03:07:02.990+0000 I STORAGE  [initandlisten] ** WARNING: Using the XFS filesystem is strongly recommended with the WiredTiger storage engine
2023-06-20T03:07:02.990+0000 I STORAGE  [initandlisten] **          See http://dochub.mongodb.org/core/prodnotes-filesystem
2023-06-20T03:07:03.856+0000 I CONTROL  [initandlisten]
2023-06-20T03:07:03.856+0000 I CONTROL  [initandlisten] ** WARNING: Access control is not enabled for the database.
2023-06-20T03:07:03.856+0000 I CONTROL  [initandlisten] **          Read and write access to data and configuration is unrestricted.
2023-06-20T03:07:03.856+0000 I CONTROL  [initandlisten]
> use admin
switched to db admin
> use admin
switched to db admin
> db.createUser({user: "test",pwd: "testing",roles: [{ role: "clusterMonitor", db: "admin" },{ role: "read", db: "local" }]})
Successfully added user: {
        "user" : "test",
        "roles" : [
                {
                        "role" : "clusterMonitor",
                        "db" : "admin"
                },
                {
                        "role" : "read",
                        "db" : "local"
                }
        ]
}
> exit
bye
Tiếp theo, thiết lập biến môi trường MONGODB_URI với thông tin xác thực phù hợp. Ở bước này bạn đã thiết lập biến MONGODB_URI để chỉ định mongodb instance sử dụng thông tin xác thực mà bạn đã thiết lập trước đó (người dùng test và mật khẩu testing). 27017 là cổng mặc định cho một mongodb instance. Khi bạn thiết lập biến môi trường này, nó sẽ được ưu tiên hơn các cấu hình lưu trong tệp cấu hình.
export MONGODB_URI=mongodb://test:testing@localhost:27017Để kiểm tra xem biến môi trường MONGODB_URI đã được thiết lập đúng, chạy lệnh sau:
env | grep mongodbBạn sẽ nhận được đầu ra sau:
MONGODB_URI=mongodb://mongodb_exporter:password@localhost:27017Trong phần này, bạn đã tạo một người dùng MongoDB với vai trò clusterMonitor, giúp giám sát các chỉ số của cluster. Tiếp theo, bạn sẽ cấu hình MongoDB exporter để chạy như một dịch vụ.
Bước 5 – Tạo dịch vụ cho MongoDB exporter.
Trong phần này, bạn sẽ tạo một tệp dịch vụ cho MongoDB exporter và chạy nó như một dịch vụ.
Di chuyển đến thư mục /lib/systemd/system và tạo một tệp dịch vụ mới cho exporter.
cd /lib/systemd/system/
Thêm nội dung dưới vào file /lib/systemd/system/mongodb_exporter.service. File này cho biết systemd sẽ chạy MongoDB exporter như một dịch vụ dưới tài khoản prometheus. ExecStart sẽ chạy tệp nhị phân mongodb_exporter từ đường dẫn /usr/local/bin/.
Chi tiết các trường mình có giải thích ở phần tạo dịch vụ cho Prometheus ở trên, bạn có thể kéo lên trên để xem lại.
cat > /lib/systemd/system/mongodb_exporter.service << 'OEF'
[Unit]
Description=MongoDB Exporter
User=prometheus

[Service]
Type=simple
Restart=always
ExecStart=/usr/local/bin/mongodb_exporter

[Install]
WantedBy=multi-user.target
OEF
Tiếp theo, khởi động lại trình nền hệ thống của bạn để tải lại các tệp đơn vị:
sudo systemctl daemon-reloadKhởi động dịch vụ MongoDB exporter vừa tạo xong.
sudo systemctl start mongodb_exporter.serviceKiểm tra lại trạng thái của dịch vụ.
sudo systemctl status mongodb_exporter.serviceĐây là đầu ra của lệnh sudo systemctl status mongodb_exporter.service.
● mongodb_exporter.service - MongoDB Exporter
     Loaded: loaded (/lib/systemd/system/mongodb_exporter.service; disabled; vendor preset: enabled)
     Active: active (running) since Fri 2022-08-05 18:18:38 UTC; 1 weeks 3 days ago
   Main PID: 7352 (mongodb_exporte)
      Tasks: 5 (limit: 527)
     Memory: 14.2M
     CGroup: /system.slice/mongodb_exporter.service
             └─7352 /usr/local/bin/mongodb_exporter
Để đảm bảo mọi thứ hoạt động như mong đợi hãy chạy lệnh curl trên cổng 9216, đây là cổng mà exporter chạy:
sudo curl http://localhost:9216/metricsLệnh này sẽ gửi một yêu cầu HTTP tới địa chỉ localhost trên cổng 9216 và yêu cầu các metrics từ MongoDB exporter. Kết quả sẽ hiển thị các metrics được trả về từ exporter. Việc chạy lệnh curl này giúp bạn kiểm tra xem exporter đã hoạt động và trả về các metrics từ MongoDB instance của bạn chưa.
Output
# HELP go_gc_duration_seconds A summary of the GC invocation durations.
# TYPE go_gc_duration_seconds summary
go_gc_duration_seconds{quantile="0"} 0
go_gc_duration_seconds{quantile="0.25"} 0
go_gc_duration_seconds{quantile="0.5"} 0
go_gc_duration_seconds{quantile="0.75"} 0
go_gc_duration_seconds{quantile="1"} 0
go_gc_duration_seconds_sum 0
go_gc_duration_seconds_count 0
# HELP go_goroutines Number of goroutines that currently exist.
# TYPE go_goroutines gauge
go_goroutines 11
# HELP go_memstats_alloc_bytes Number of bytes allocated and still in use.
# TYPE go_memstats_alloc_bytes gauge
go_memstats_alloc_bytes 1.253696e+06
# HELP go_memstats_alloc_bytes_total Total number of bytes allocated, even if freed.
# TYPE go_memstats_alloc_bytes_total counter
go_memstats_alloc_bytes_total 1.253696e+06
# HELP go_memstats_buck_hash_sys_bytes Number of bytes used by the profiling bucket hash table.
# TYPE go_memstats_buck_hash_sys_bytes gauge
go_memstats_buck_hash_sys_bytes 3054
# HELP go_memstats_frees_total Total number of frees.
# TYPE go_memstats_frees_total counter
go_memstats_frees_total 2866
# HELP go_memstats_gc_sys_byte
.
.
.
# HELP mongodb_asserts_total The asserts document reports the number of asserts on the database. While assert errors are typically uncommon, if there are non-zero values for the asserts, you should check the log file for the mongod process for more information. In many cases these errors are trivial, but are worth investigating.
# TYPE mongodb_asserts_total counter
mongodb_asserts_total{type="msg"} 0
mongodb_asserts_total{type="regular"} 0
mongodb_asserts_total{type="rollovers"} 0
mongodb_asserts_total{type="user"} 19
mongodb_asserts_total{type="warning"} 0
# HELP mongodb_connections The connections sub document data regarding the current status of incoming connections and availability of the database server. Use these values to assess the current load and capacity requirements of the server
# TYPE mongodb_connections gauge
mongodb_connections{state="available"} 51198
mongodb_connections{state="current"} 2
# HELP mongodb_connections_metrics_created_total totalCreated provides a count of all incoming connections created to the server. This number includes connections that have since closed
# TYPE mongodb_connections_metrics_created_total counter
mongodb_connections_metrics_created_total 6
# HELP mongodb_exporter_build_info A metric with a constant '1' value labeled by version, revision, branch, and goversion from which mongodb_exporter was built.
# TYPE mongodb_exporter_build_info gauge
mongodb_exporter_build_info{branch="v0.7.1",goversion="go1.11.10",revision="3002738d50f689c8204f70f6cceb8150b98fa869",version="0.7.1"} 1
# HELP mongodb_exporter_last_scrape_duration_seconds Duration of the last scrape of metrics from MongoDB.
# TYPE mongodb_exporter_last_scrape_duration_seconds gauge
mongodb_exporter_last_scrape_duration_seconds 0.003641888
# HELP mongodb_exporter_last_scrape_error Whether the last scrape of metrics from MongoDB resulted in an error (1 for error, 0 for success).
# TYPE mongodb_exporter_last_scrape_error gauge
mongodb_exporter_last_scrape_error 0
.
.
.
...
Đầu ra xác nhận rằng MongoDB exporter đang thu thập các metrics như phiên bản MongoDB, metrics-document và chi tiết kết nối.
Trong phần này, bạn đã cấu hình xong dịch vụ MongoDB exporter và thu thập các metrics từ MongoDB. Tiếp theo, bạn sẽ cấu hình exporter như một target cho Prometheus.
Bước 6 – Cấu hình Prometheus Target Exporter MongoDB.
Trong phần này, bạn sẽ cấu hình MongoDB exporter như một target cho Prometheus. Điều hướng đến thư mục chứa tệp cấu hình Prometheus:
cd /etc/prometheus/Sử dụng vi hoặc trình chỉnh sửa văn bản yêu thích của bạn để mở file config để chỉnh sửa:
sudo vi prometheus.ymlThêm MongoDB exporter target bằng cách bạn chỉ cần thêm <ipaddr_mongodb_exporter>:9216 vào targets của Prometheus Job là được rồi. Ví dụ dưới của mình ipaddr_mongodb_exporterchính là địa chỉ localhost đặt chung với targets của Prometheus.
- targets: ["localhost:9090", "localhost:9216"]Sau khi thêm xong, file của bạn sẽ có config gần giống như vậy.
# my global config
global:
  scrape_interval: 15s # Set the scrape interval to every 15 seconds. Default is every 1 minute.
  evaluation_interval: 15s # Evaluate rules every 15 seconds. The default is every 1 minute.
  # scrape_timeout is set to the global default (10s).

# Alertmanager configuration
alerting:
  alertmanagers:
    - static_configs:
        - targets:
          # - alertmanager:9093

# Load rules once and periodically evaluate them according to the global 'evaluation_interval'.
rule_files:
  # - "first_rules.yml"
  # - "second_rules.yml"

# A scrape configuration containing exactly one endpoint to scrape:
# Here it's Prometheus itself.
scrape_configs:
  # The job name is added as a label `job=<job_name>` to any timeseries scraped from this config.
  - job_name: "prometheus"

    # metrics_path defaults to '/metrics'
    # scheme defaults to 'http'.

    static_configs:
      - targets: ["localhost:9090", "localhost:9216"
Sau khi thêm target, khởi động lại Prometheus:
sudo systemctl restart prometheusKiếm tra lại trạng thái Prometheus.
$ sudo systemctl status prometheus
● prometheus.service - Prometheus
   Loaded: loaded (/etc/systemd/system/prometheus.service; enabled; vendor preset: enabled)
   Active: active (running) since Tue 2023-06-20 03:36:43 UTC; 24s ago
 Main PID: 3350 (prometheus)
    Tasks: 13 (limit: 4915)
   CGroup: /system.slice/prometheus.service
           └─3350 /usr/local/bin/prometheus --config.file=/etc/prometheus/prometheus.yml --storage.tsdb.path=/var/lib/prometheus/ --web.console.templates=/etc/prometheus/consoles --web.console.libraries=/etc/prometheus/console_libraries --web.listen-address=0.0.0.0:9090

Jun 20 03:36:43 ubuntu1804 prometheus[3350]: ts=2023-06-20T03:36:43.460Z caller=head.go:513 level=info component=tsdb msg="On-disk memory mappable chunks replay completed" duration=507.34µs
Jun 20 03:36:43 ubuntu1804 prometheus[3350]: ts=2023-06-20T03:36:43.460Z caller=head.go:519 level=info component=tsdb msg="Replaying WAL, this may take a while"
Jun 20 03:36:43 ubuntu1804 prometheus[3350]: ts=2023-06-20T03:36:43.468Z caller=head.go:590 level=info component=tsdb msg="WAL segment loaded" segment=0 maxSegment=1
Jun 20 03:36:43 ubuntu1804 prometheus[3350]: ts=2023-06-20T03:36:43.468Z caller=head.go:590 level=info component=tsdb msg="WAL segment loaded" segment=1 maxSegment=1
Jun 20 03:36:43 ubuntu1804 prometheus[3350]: ts=2023-06-20T03:36:43.468Z caller=head.go:596 level=info component=tsdb msg="WAL replay completed" checkpoint_replay_duration=83.175µs wal_replay_duration=8.017062ms total_replay_duration=8.681226ms
Jun 20 03:36:43 ubuntu1804 prometheus[3350]: ts=2023-06-20T03:36:43.470Z caller=main.go:866 level=info fs_type=EXT4_SUPER_MAGIC
Jun 20 03:36:43 ubuntu1804 prometheus[3350]: ts=2023-06-20T03:36:43.470Z caller=main.go:869 level=info msg="TSDB started"
Jun 20 03:36:43 ubuntu1804 prometheus[3350]: ts=2023-06-20T03:36:43.470Z caller=main.go:996 level=info msg="Loading configuration file" filename=/etc/prometheus/prometheus.yml
Jun 20 03:36:43 ubuntu1804 prometheus[3350]: ts=2023-06-20T03:36:43.538Z caller=main.go:1033 level=info msg="Completed loading of configuration file" filename=/etc/prometheus/prometheus.yml totalDuration=68.704462ms db_storage=885ns remote_storage=6.946µs web_handler=35
Jun 20 03:36:43 ubuntu1804 prometheus[3350]: ts=2023-06-20T03:36:43.539Z caller=main.go:811 level=info msg="Server is ready to receive web requests
Truy cập vào http://<ipaddr_prometheus>:9090/targets để xác minh rằng Prometheus đang scrape MongoDB exporter mới được thêm vào.
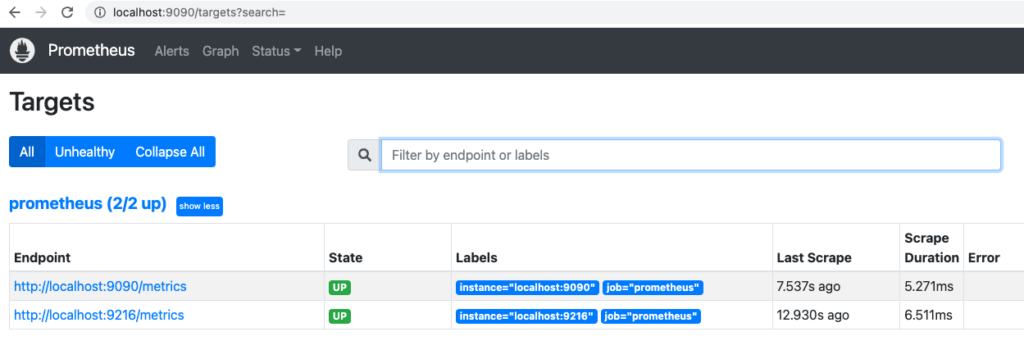
Bạn có thể dùng script này để push data vào MongoDB để test nhé. Nhớ thay đổi thông tin cho đúng với Server của bạn rồi chạy.
#!/bin/bash

# Cài đặt các gói cần thiết (ví dụ: pymongo)
# Thực hiện các bước cài đặt tương ứng với hệ điều hành của bạn

# Thiết lập thông tin kết nối tới MongoDB
MONGO_HOST="localhost"
MONGO_PORT="27017"
MONGO_DB="mydatabase"
MONGO_COLLECTION="mycollection"

# Số lượng session cần tạo
NUM_SESSIONS=1000
# Số lượng truy vấn liên tục
NUM_QUERIES=1000

# Hàm để kiểm tra và tạo MONGO_DB nếu chưa tồn tại
create_database_if_not_exists() {
    # Kết nối tới MongoDB admin database
    mongo_uri="mongodb://${MONGO_HOST}:${MONGO_PORT}/admin"
    echo "Connecting to MongoDB admin database: ${mongo_uri}"

    # Kiểm tra xem MONGO_DB đã tồn tại chưa
    echo "Checking if database exists: ${MONGO_DB}"
    database_exists=$(mongo ${mongo_uri} --quiet --eval "db.getMongo().getDBNames().indexOf('${MONGO_DB}') > -1")

    if [[ ${database_exists} -eq 0 ]]; then
        # MONGO_DB chưa tồn tại, tạo mới
        echo "Creating database: ${MONGO_DB}"
        mongo ${mongo_uri} --eval "use ${MONGO_DB}"
    else
        echo "Database already exists: ${MONGO_DB}"
    fi

    # Đóng kết nối tới MongoDB admin database
    echo "Closing connection to MongoDB admin database"
}

# Hàm để đẩy dữ liệu vào MongoDB
push_data() {
    # Kết nối tới MongoDB
    mongo_uri="mongodb://${MONGO_HOST}:${MONGO_PORT}/${MONGO_DB}"
    echo "Connecting to MongoDB: ${mongo_uri}"

    # Đẩy dữ liệu liên tục
    for ((i=1; i<=NUM_SESSIONS; i++))
    do
        # Tạo một tài liệu ngẫu nhiên
        name="User$i"
        age=$((RANDOM % 50 + 20))
        document="{ 'name': '${name}', 'age': ${age} }"

        # Đẩy tài liệu vào collection
        echo "Pushing document ${i}: ${document}"
        mongo ${mongo_uri} --eval "db.${MONGO_COLLECTION}.insertOne(${document})"

        # Thực hiện truy vấn ngay sau khi ghi dữ liệu
        echo "Executing query ${i}: ${document}"
        mongo ${mongo_uri} --eval "db.${MONGO_COLLECTION}.find(${document})"

        # Tạm ngừng trong 1 giây trước khi đẩy tài liệu và truy vấn tiếp theo
        sleep 1
    done

    # Đóng kết nối tới MongoDB
    echo "Closing connection to MongoDB"
}

# Chạy script
create_database_if_not_exists
push_data
Bước 7 – Cài đặt Grafana.
Bước cuối cùng để có một dashboard thì mình sử dụng Grafana, dưới đây là các bước cài đặt Grafana cho Ubuntu.
Các lệnh sau được sử dụng để cài đặt và kiểm tra trạng thái của Grafana trên Ubuntu:
Tải xuống và thêm khóa GPG của Grafana vào hệ thống để xác minh tính toàn vẹn của các gói được cung cấp bởi Grafana.
wget -q -O - https://packages.grafana.com/gpg.key | sudo apt-key add -Thêm kho lưu trữ Grafana vào danh sách kho lưu trữ của hệ thống.
sudo add-apt-repository "deb https://packages.grafana.com/oss/deb stable main"Cập nhật danh sách gói và thông tin cập nhật mới nhất từ các kho lưu trữ.
sudo apt updateCài đặt gói grafana trên hệ thống.
sudo apt install grafana -yKhởi động dịch vụ Grafana Server.
sudo systemctl start grafana-serverBật tính năng tự khởi động dịch vụ Grafana Server khi khởi động lại OS.
sudo systemctl enable grafana-serverDưới đây là kết quả đầu ra khi chạy lệnh systemctl enable grafana-server.
Synchronizing state of grafana-server.service with SysV service script with /lib/systemd/systemd-sysv-install.
Executing: /lib/systemd/systemd-sysv-install enable grafana-server
Created symlink /etc/systemd/system/multi-user.target.wants/grafana-server.service → /usr/lib/systemd/system/grafana-server.service.
Hiển thị trạng thái hiện tại của dịch vụ Grafana Server, cho biết liệu dịch vụ đã đang hoạt động hay không.
sudo systemctl status grafana-serverKết quả đầu ra cho Grafana đã cài đặt và chạy thành công.
● grafana-server.service - Grafana instance
     Loaded: loaded (/lib/systemd/system/grafana-server.service; disabled; vendor preset: enabled)
   Active: active (running) since Thu 2020-05-21 08:08:10 UTC; 4s ago
     Docs: http://docs.grafana.org
 Main PID: 15982 (grafana-server)
    Tasks: 7 (limit: 1137)
...
Sau khi cài đặt xong, hãy login vào URL http://<ipaddr_grafana>:3000. Thông tin login mặc định là Admin/admin.

Lần đầu login bạn sẽ được yêu cầu đổi mật khẩu, nếu bạn không muốn đổi thì bấm skip để bỏ qua.

Và kết quả sau khi login thành công.

Bước 8 – Cấu hình thêm Datasource của Prometheus và Dashboard cho MongoDB.
Muốn xem được thông tin metric của MongoDB Exporter thì đầu tiên bạn phải thêm Datasource của Prometheus vào Grafana trước, các bước theo trình tự như dưới.

Bấm Add data source.

Chọn Datasource là Prometheus, đặt tên cho Datasource và điền thông tin url của Prometheus vào Prometheus server URL.
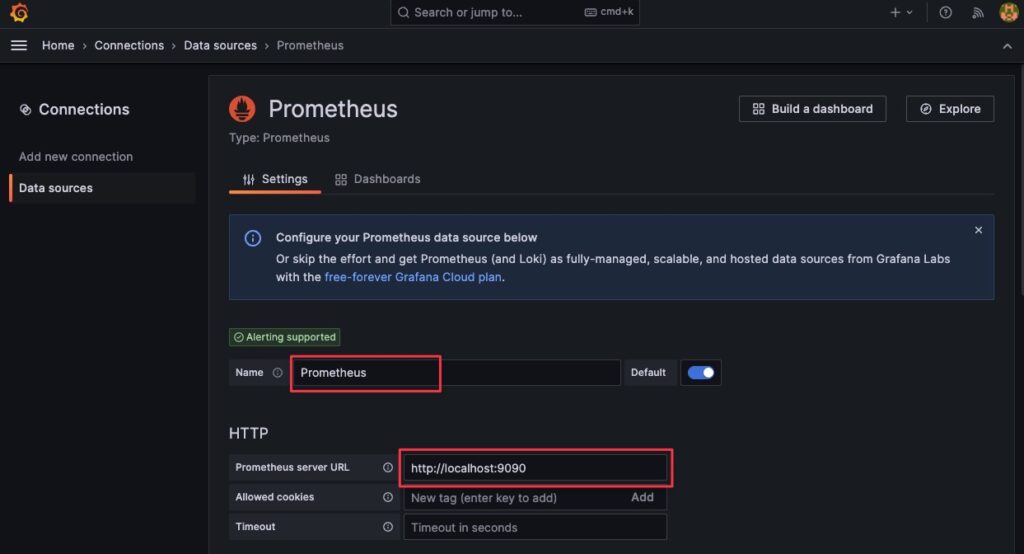
Kéo xuống dưới cùng và bấm Save and test (1), bạn nhận được thông báo (2) tức là đã thành công.
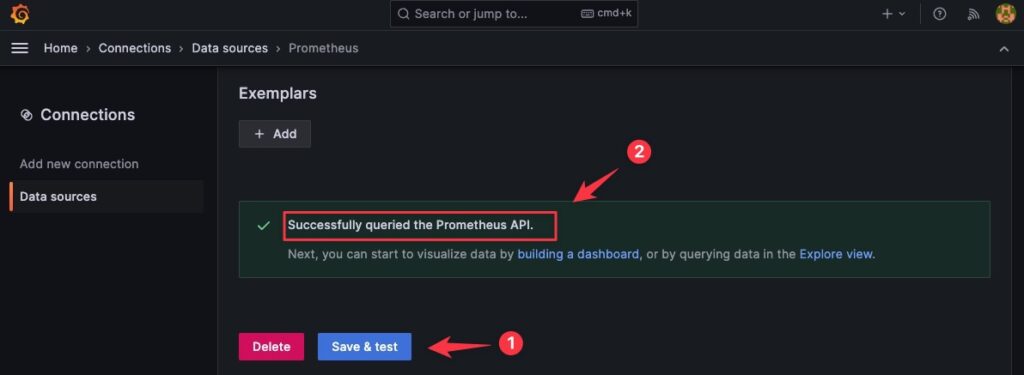
Tiếp theo bạn vào Dashboards.

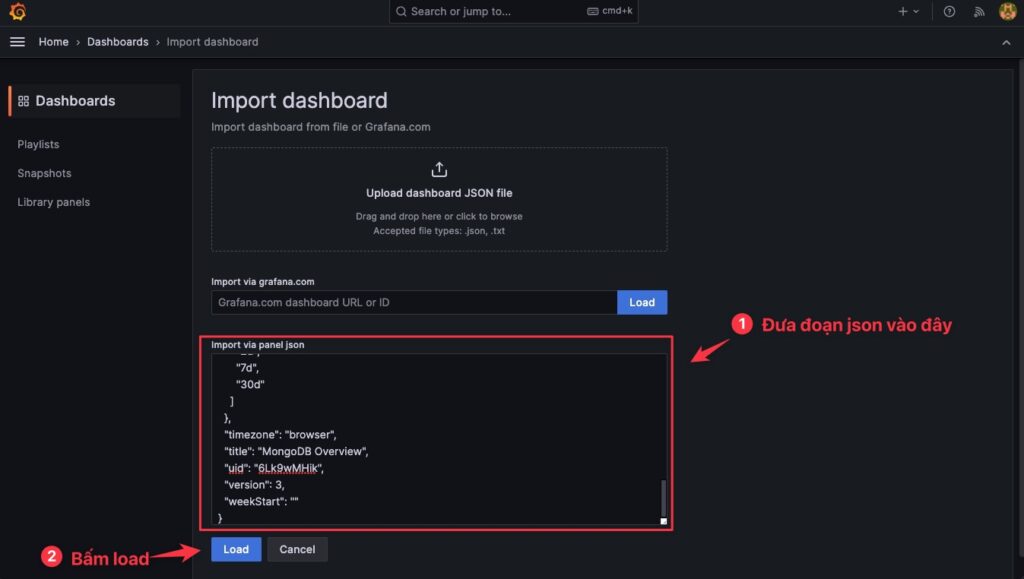
Vào Import một Dashboard dành cho MongoDB.

Thông tin để import bạn lấy ở url này https://wiki.hoanghd.com/wp-content/uploads/codes/grafana-dashboard-mongodb-exporter.yml.
Bấm Import.
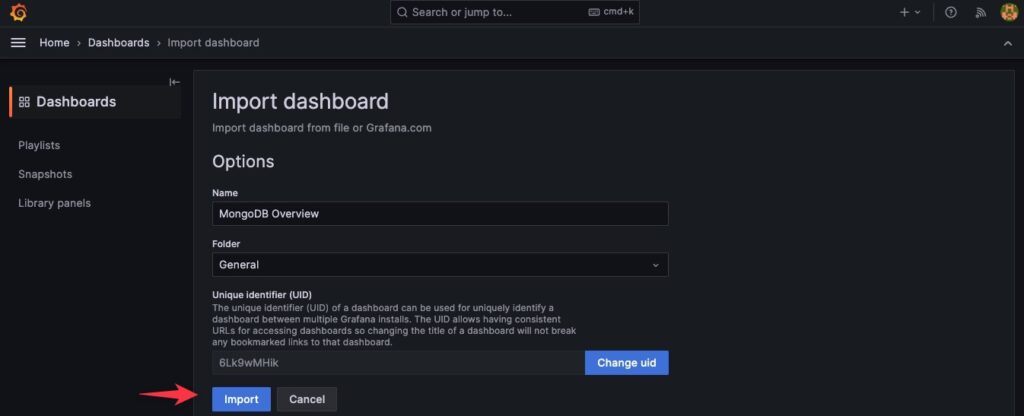
Bạn nhận được kết quả như dưới.
