Hướng dẫn này cung cấp những kiến thức cơ bản về một cụm Kubernetes. Mỗi mô-đun chứa một số thông tin cơ bản về các tính năng cũng như khái niệm chính của Kubernetes, đồng thời bao gồm một hướng dẫn tương tác trực tuyến. Các hướng dẫn tương tác này giúp bạn quản lý một cluster đơn giản và các ứng dụng được đóng gói của bạn.
1. Cập nhật hệ thống, tắt tường lửa, cài đặt containerd cho tất cả các node.
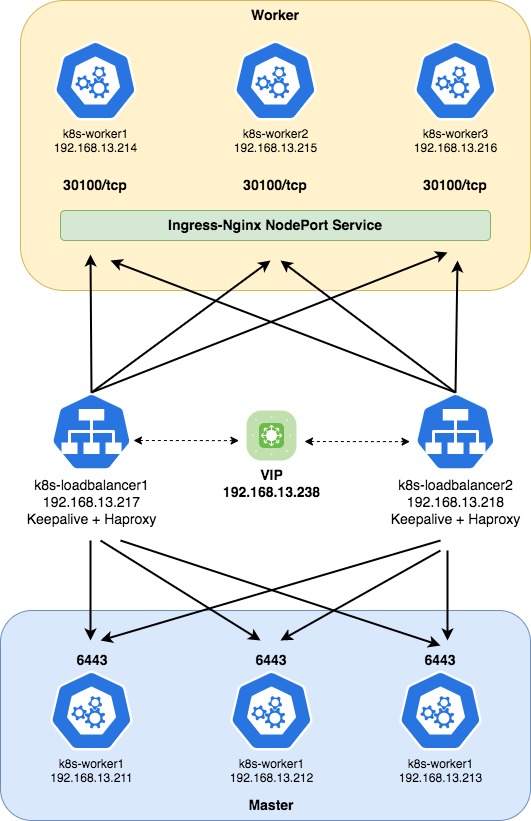
Sơ đồ triển khai:

Như thường lệ, bạn hãy update cho hệ thống
sudo apt-get update
sudo apt-get upgrade -y
Khởi động lại OS
init 6Nếu có tường lửa, tạm thời hãy tắt nó
sudo ufw disable
sudo systemctl stop ufw
sudo systemctl disable ufw
Cài đặt containerd
sudo apt-get install ca-certificates curl gnupg lsb-release -y
curl -fsSL https://download.docker.com/linux/ubuntu/gpg | sudo gpg --dearmor -o /usr/share/keyrings/docker-archive-keyring.gpg
echo "deb [arch=$(dpkg --print-architecture) signed-by=/usr/share/keyrings/docker-archive-keyring.gpg] https://download.docker.com/linux/ubuntu $(lsb_release -cs) stable" | sudo tee /etc/apt/sources.list.d/docker.list
sudo apt-get update -y
sudo apt-get upgrade -y
sudo apt-get install containerd.io -y
Verify
$ containerd  --version
containerd containerd.io 1.6.9 1c90a442489720eec95342e1789ee8a5e1b9536f
2. Cài đặt Kubernetes cho tất cả master node và worker node.
Nếu bạn muốn cài bản mới nhất, hãy chạy các dòng lệnh dưới đây
sudo apt-get install ca-certificates curl gnupg lsb-release -y
curl -fsSL https://download.docker.com/linux/ubuntu/gpg | sudo gpg --dearmor -o /usr/share/keyrings/docker-archive-keyring.gpg
echo "deb [arch=$(dpkg --print-architecture) signed-by=/usr/share/keyrings/docker-archive-keyring.gpg] https://download.docker.com/linux/ubuntu $(lsb_release -cs) stable" | sudo tee /etc/apt/sources.list.d/docker.list
sudo apt-get update -y
sudo apt-get upgrade -y
sudo apt-get install containerd.io -y
Nếu bạn muốn cài bản tuỳ chỉnh, hãy chạy các dòng lệnh dưới đây, ví dụ mình chọn bản 1.23.8
curl -s https://packages.cloud.google.com/apt/dists/kubernetes-xenial/main/binary-amd64/Packages | grep Version | tail -5
curl -s https://packages.cloud.google.com/apt/doc/apt-key.gpg | sudo apt-key add - && \
echo 'deb http://apt.kubernetes.io/ kubernetes-xenial main' | sudo tee /etc/apt/sources.list.d/kubernetes.list && \
sudo apt-get update -y
sudo apt-get upgrade -y
sudo apt-get install -y kubelet=1.23.8-00 kubectl=1.23.8-00 kubeadm=1.23.8-00
Verify
$ kubectl version --short
Client Version: v1.23.8
Server Version: v1.23.8
Tạo file kubernetes.conf có nội dung như dưới
sudo tee /etc/sysctl.d/kubernetes.conf<<EOF
net.bridge.bridge-nf-call-ip6tables = 1
net.bridge.bridge-nf-call-iptables = 1
net.ipv4.ip_forward = 1
EOF
Thêm net.netfilter.nf_conntrack_max=1000000 vào /etc/sysctl.conf và cập nhật lại sysctl
echo "net.netfilter.nf_conntrack_max=1000000" >> /etc/sysctl.conf
sudo sysctl --system
Tạo file containerd.conf và thêm các nội dung dưới
sudo tee /etc/modules-load.d/containerd.conf <<EOF
overlay
br_netfilter
EOF
Cập nhật các thay đổi
sudo modprobe overlay
sudo modprobe br_netfilter
sudo sysctl --system
Tắt swap
sudo sed -i "/ swap / s/^\(.*\)$/#\1/g" /etc/fstab || sudo sed -i '/swap/d' /etc/fstab
sudo swapoff -a
Tạo file config.toml bằng lệnh dưới
sudo mkdir -p /etc/containerd
sudo containerd config default > /etc/containerd/config.toml
Khởi động lại containerd
sudo systemctl enable containerd
sudo systemctl restart containerd
Tải xuống các image cần thiết
sudo kubeadm config images pull3. Cài đặt keepalived trên các loadbalancer node
Đối với những mô hình dịch vụ cần đảm bảo tính sẵn sàng cao (High Availability – HA), thì việc hệ thống bị down là không thể chấp nhận được. Hiện có rất nhiều phần mềm, giải pháp để đảm bảo tính HA cho các hệ thống nhưng mình sẽ giới thiệu phần mềm đơn giản nhất là Keepalived với tính năng tự động chuyển đổi Virtual IP (VIP) giữa các máy chủ theo mô hình Active/Passive.
Cài đặt keepalived
apt-get install linux-headers-$(uname -r)
sudo apt-get update -y
sudo apt-get upgrade -y
apt-get install keepalived -y
Tạo và chỉnh sửa /etc/keepalived/keepalived.conf với thông tin như sau:
interface: interface name của node loadbalancer
virtual_router_id: lựa chọn 1 id định danh, id này chung cho tất cả các loadbalancer
priority: giá trị priority của loadbalancer nào lớn hơn thì sẽ ưu tiên loadbalancer đó
auth_pass: mật khẩu xác thực, mật khẩu này chung cho tất cả các loadbalancer
virtual_ipaddress: sẽ là ip loadbalancer đại diện cho các node loadbalancer
cat >  /etc/keepalived/keepalived.conf << 'OEF'
vrrp_instance VI_1 {
        state MASTER
        interface ens192
        virtual_router_id 101
        priority 108
        advert_int 1
        authentication {
            auth_type PASS
            auth_pass mb@834228
        }
        virtual_ipaddress {
            192.168.13.238
        }
    }
OEF
Khởi động lại keepalived và enable tự khởi động cho nó
sudo systemctl restart keepalived
sudo systemctl status keepalived
sudo systemctl enable keepalived
Verify lại kết quả ta thấy ens192 đã có thêm 1 ip mới đó là 192.168.13.238, nếu node loadbalancer này bị chết thì ip 192.168.13.238 tự động chuyển qua node loadbalancer còn lại để chạy tiếp, đảm bảo dịch vụ không bị gián đoạn.
Tham khảo thêm https://keepalived.readthedocs.io/en/latest/
$ ip addr show ens192
2: ens192: <BROADCAST,MULTICAST,UP,LOWER_UP> mtu 1500 qdisc mq state UP group default qlen 1000
    link/ether 00:50:56:ad:78:a2 brd ff:ff:ff:ff:ff:ff
    inet 192.168.13.218/23 brd 192.168.13.255 scope global ens192
       valid_lft forever preferred_lft forever
    inet 192.168.13.238/32 scope global ens192
       valid_lft forever preferred_lft forever
    inet6 fe80::250:56ff:fead:78a2/64 scope link
       valid_lft forever preferred_lft forever
4. Cài đặt Haproxy trên tất cả các Loadbalancer node
HAProxy (High Availability Proxy) là một công cụ mã nguồn mở ứng dụng cho giải pháp cần bằng tải TCP và HTTP. Người dùng có thể sử dụng HAProxy để cải thiện suất hoàn thiện của các trang web và ứng dụng bằng cách phân tán khối lượng công việc của chúng trên nhiều máy chủ. Cải thiện hiệu suất bao gồm giảm phản hồi thời gian và tăng thông lượng. HAProxy cũng được sử dụng trong các hệ thống lớn có lưu lượng truy cập cao như GitHub, Twitter, Reddit, Bitbucket, Stack Overflow,…
Xem thêm https://www.haproxy.com/documentation/
Cài đặt HAProxy
sudo apt-get update -y
sudo apt-get upgrade -y
apt-get install haproxy -y
Tạo và chỉnh sửa /etc/haproxy/haproxy.cfg
cat > /etc/haproxy/haproxy.cfg << 'OEF'
frontend stats
    bind *:8080
    mode http
    stats enable
    stats uri /stats
    stats refresh 10s
    stats admin if LOCALHOST

frontend fe-apiserver
    bind 0.0.0.0:6443
    mode tcp
    option tcplog
    default_backend be-apiserver

backend be-apiserver
    mode tcp
    option tcplog
    option tcp-check
    balance roundrobin
    default-server inter 10s downinter 5s rise 2 fall 2 slowstart 60s maxconn 250 maxqueue 256 weight 100
    server k8s-master1 192.168.13.211:6443 check
    server k8s-master2 192.168.13.212:6443 check
    server k8s-master3 192.168.13.213:6443 check
OEF
Khởi động lại Haproxy và enable tự khởi động cho nó
sudo systemctl enable haproxy
sudo systemctl restart haproxy
sudo systemctl status haproxy
4. Khởi tạo Kubernetes Cluster
Bạn hãy lựa chọn 1 master node để khởi tạo cluster ban đầu, mình sẽ lựa chọn master node đầu tiên có ip là 192.168.13.211.
Hãy sử dụng lệnh dưới để khởi tạo cluster ban đầu với ip_vip_keepalived chính là ip đại diện đã được tạo ra bởi keepalived 192.168.13.238
kubeadm init –control-plane-endpoint “<ip_vip_keepalived>:6443” –upload-certs –pod-network-cidr=<pod_subnet>
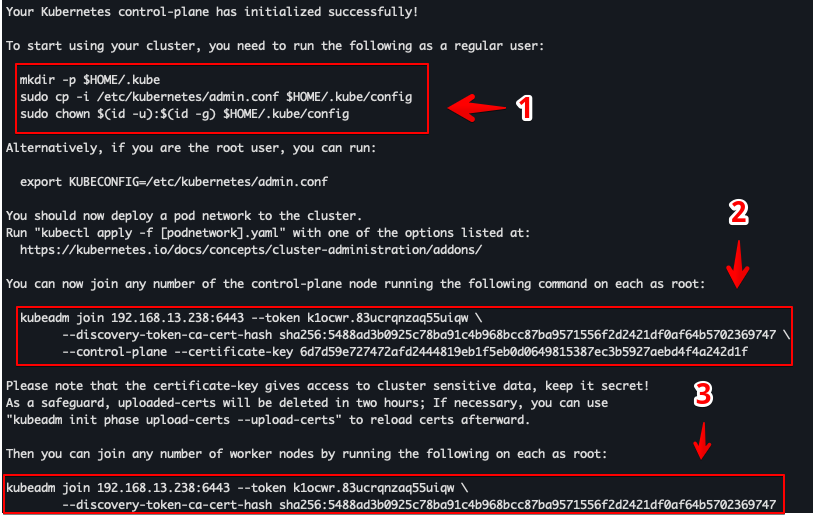
kubeadm init --control-plane-endpoint "192.168.13.238:6443" --upload-certs --pod-network-cidr="10.244.0.0/16"Sau khi khởi tạo xong chúng ta nhận được thông báo như dưới. Ở nội dung này ta để ý tới các chỉ mục mà mình đã khoanh dấu.

– Ta thực hiện các lệnh theo yêu cầu như mục 1 để có thể sử dụng cluster
mkdir -p $HOME/.kube
sudo cp -i /etc/kubernetes/admin.conf $HOME/.kube/config
sudo chown $(id -u):$(id -g) $HOME/.kube/config
Nếu không thực hiện yêu cầu ở mục 1 thì khi chúng ta thực hiện 1 lệnh bất kỳ của Kubernetes sẽ báo lỗi như dưới
$ kubectl get node -A
The connection to the server localhost:8080 was refused - did you specify the right host or port?
Và sau khi thực hiện config theo yêu cầu ta check lại kết quả ta có 1 master node có tên master1, lý do status NotReady ta sẽ xử lý tiếp ở phần tiếp theo.
$ kubectl get node -A
NAME             STATUS     ROLES                  AGE     VERSION
master1   NotReady   control-plane,master   7m58s   v1.23.8
– Để Join thêm master ta sử dụng lệnh (2) trên node master mới như yêu cầu ở trên.
kubeadm join 192.168.13.238:6443 --token k1ocwr.83ucrqnzaq55uiqw \
    --discovery-token-ca-cert-hash sha256:5488ad3b0925c78ba91c4b968bcc87ba9571556f2d2421df0af64b5702369747 \
    --control-plane --certificate-key 6d7d59e727472afd2444819eb1f5eb0d0649815387ec3b5927aebd4f4a242d1f
– Tương tự để join thêm worker thì sử dụng lệnh (3) trên node worker mới
kubeadm join 192.168.13.238:6443 --token k1ocwr.83ucrqnzaq55uiqw \
    --discovery-token-ca-cert-hash sha256:5488ad3b0925c78ba91c4b968bcc87ba9571556f2d2421df0af64b5702369747
5. Triển khai Calico network lên cụm
– Như lúc nãy mình có nói, khi triển khai xong thì node k8s-standalone có trạng thái NotReady và thẩm chí là các port liên quan đến coredns cũng bị pending, vậy để node này có thể Ready chúng ta cần triển khai network cho cụm, mình sẽ sử dụng Calico để triển khai network cho cụm.
kubectl get node,pods -A
NAME                  STATUS     ROLES                  AGE   VERSION
node/master1   NotReady   control-plane,master   14m   v1.23.8

NAMESPACE     NAME                                         READY   STATUS    RESTARTS   AGE
kube-system   pod/coredns-64897985d-2vvw5                  0/1     Pending   0          14m
kube-system   pod/coredns-64897985d-cd274                  0/1     Pending   0          14m
– Tải file calico.yaml về máy
wget https://docs.projectcalico.org/v3.21/manifests/calico.yaml– Mở file vừa tải về lên và sửa đổi nội dung như sau
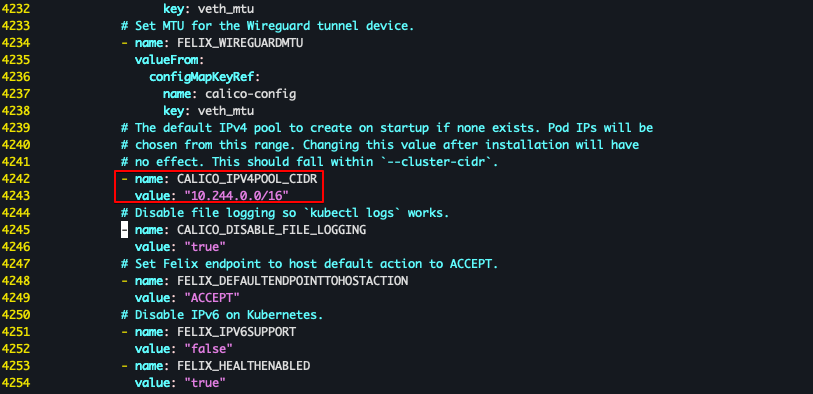
+ Tìm đến # – name: CALICO_IPV4POOL_CIDR và bỏ comment cho nó
sudo sed -i 's/# - name: CALICO_IPV4POOL_CIDR/- name: CALICO_IPV4POOL_CIDR/' calico.yaml+ Thay đổi pod network cidr
sudo sed -i 's|# value:.*| value: "10.244.0.0/16"|g' calico.yamlTùy thời điểm thì file calico.yaml có thể đổi format, nếu file đổi format có thể command sed sẽ chạy không thành công, bạn có thể vào tự thay đổi như mình đã khoanh đỏ ở dưới nhé

+ Triển khai file vừa chỉnh sửa
$ kubectl apply -f calico.yaml
configmap/calico-config created
customresourcedefinition.apiextensions.k8s.io/bgpconfigurations.crd.projectcalico.org created
customresourcedefinition.apiextensions.k8s.io/bgppeers.crd.projectcalico.org created
customresourcedefinition.apiextensions.k8s.io/blockaffinities.crd.projectcalico.org created
customresourcedefinition.apiextensions.k8s.io/caliconodestatuses.crd.projectcalico.org created
customresourcedefinition.apiextensions.k8s.io/clusterinformations.crd.projectcalico.org created
customresourcedefinition.apiextensions.k8s.io/felixconfigurations.crd.projectcalico.org created
customresourcedefinition.apiextensions.k8s.io/globalnetworkpolicies.crd.projectcalico.org created
customresourcedefinition.apiextensions.k8s.io/globalnetworksets.crd.projectcalico.org created
customresourcedefinition.apiextensions.k8s.io/hostendpoints.crd.projectcalico.org created
customresourcedefinition.apiextensions.k8s.io/ipamblocks.crd.projectcalico.org created
customresourcedefinition.apiextensions.k8s.io/ipamconfigs.crd.projectcalico.org created
customresourcedefinition.apiextensions.k8s.io/ipamhandles.crd.projectcalico.org created
customresourcedefinition.apiextensions.k8s.io/ippools.crd.projectcalico.org created
customresourcedefinition.apiextensions.k8s.io/ipreservations.crd.projectcalico.org created
customresourcedefinition.apiextensions.k8s.io/kubecontrollersconfigurations.crd.projectcalico.org created
customresourcedefinition.apiextensions.k8s.io/networkpolicies.crd.projectcalico.org created
customresourcedefinition.apiextensions.k8s.io/networksets.crd.projectcalico.org created
clusterrole.rbac.authorization.k8s.io/calico-kube-controllers created
clusterrolebinding.rbac.authorization.k8s.io/calico-kube-controllers created
clusterrole.rbac.authorization.k8s.io/calico-node created
clusterrolebinding.rbac.authorization.k8s.io/calico-node created
daemonset.apps/calico-node created
serviceaccount/calico-node created
deployment.apps/calico-kube-controllers created
serviceaccount/calico-kube-controllers created
poddisruptionbudget.policy/calico-kube-controllers created
– Sau khi triển khai xong network ta có thể thấy các pod đang từ từ được khởi tạo, chờ trong giây lát chúng ta sẽ có 1 cluster k8s để sử dụng.
– Kiểm tra các node sau khi join vào cluster và triển khai xong network ta thấy tất cả các node đã ở trạng thái ready.
$ kubectl get node -A -o wide
NAME          STATUS   ROLES                  AGE   VERSION   INTERNAL-IP      EXTERNAL-IP   OS-IMAGE             KERNEL-VERSION       CONTAINER-RUNTIME
k8s-master1   Ready    control-plane,master   9h    v1.23.8   192.168.13.211   <none>        Ubuntu 18.04.6 LTS   4.15.0-194-generic   containerd://1.6.9
k8s-master2   Ready    control-plane,master   9h    v1.23.8   192.168.13.212   <none>        Ubuntu 18.04.6 LTS   4.15.0-194-generic   containerd://1.6.9
k8s-master3   Ready    control-plane,master   9h    v1.23.8   192.168.13.213   <none>        Ubuntu 18.04.6 LTS   4.15.0-194-generic   containerd://1.6.9
k8s-worker1   Ready    <none>                 9h    v1.23.8   192.168.13.214   <none>        Ubuntu 18.04.6 LTS   4.15.0-194-generic   containerd://1.6.9
k8s-worker2   Ready    <none>                 9h    v1.23.8   192.168.13.215   <none>        Ubuntu 18.04.6 LTS   4.15.0-194-generic   containerd://1.6.9
k8s-worker3   Ready    <none>                 9h    v1.23.8   192.168.13.216   <none>        Ubuntu 18.04.6 LTS   4.15.0-194-generic   containerd://1.6.9
– Kiểm tra các pods
$ kubectl get pods -A -o wide
NAMESPACE     NAME                                       READY   STATUS    RESTARTS     AGE   IP               NODE          NOMINATED NODE   READINESS GATES
kube-system   calico-kube-controllers-7f76d48f74-rxp8r   1/1     Running   0            9h    10.244.100.194   k8s-worker3   <none>           <none>
kube-system   calico-node-55rdg                          1/1     Running   0            9h    192.168.13.212   k8s-master2   <none>           <none>
kube-system   calico-node-8mft5                          1/1     Running   0            9h    192.168.13.215   k8s-worker2   <none>           <none>
kube-system   calico-node-c5x99                          1/1     Running   0            9h    192.168.13.211   k8s-master1   <none>           <none>
kube-system   calico-node-cgh4t                          1/1     Running   0            9h    192.168.13.216   k8s-worker3   <none>           <none>
kube-system   calico-node-flhhb                          1/1     Running   0            9h    192.168.13.214   k8s-worker1   <none>           <none>
kube-system   calico-node-vr4qz                          1/1     Running   0            9h    192.168.13.213   k8s-master3   <none>           <none>
kube-system   coredns-64897985d-n8znh                    1/1     Running   0            9h    10.244.100.195   k8s-worker3   <none>           <none>
kube-system   coredns-64897985d-zjf8n                    1/1     Running   0            9h    10.244.100.193   k8s-worker3   <none>           <none>
kube-system   etcd-k8s-master1                           1/1     Running   0            9h    192.168.13.211   k8s-master1   <none>           <none>
kube-system   etcd-k8s-master2                           1/1     Running   0            9h    192.168.13.212   k8s-master2   <none>           <none>
kube-system   etcd-k8s-master3                           1/1     Running   0            9h    192.168.13.213   k8s-master3   <none>           <none>
kube-system   kube-apiserver-k8s-master1                 1/1     Running   0            9h    192.168.13.211   k8s-master1   <none>           <none>
kube-system   kube-apiserver-k8s-master2                 1/1     Running   0            9h    192.168.13.212   k8s-master2   <none>           <none>
kube-system   kube-apiserver-k8s-master3                 1/1     Running   0            9h    192.168.13.213   k8s-master3   <none>           <none>
kube-system   kube-controller-manager-k8s-master1        1/1     Running   1 (9h ago)   9h    192.168.13.211   k8s-master1   <none>           <none>
kube-system   kube-controller-manager-k8s-master2        1/1     Running   0            9h    192.168.13.212   k8s-master2   <none>           <none>
kube-system   kube-controller-manager-k8s-master3        1/1     Running   0            9h    192.168.13.213   k8s-master3   <none>           <none>
kube-system   kube-proxy-22642                           1/1     Running   0            9h    192.168.13.215   k8s-worker2   <none>           <none>
kube-system   kube-proxy-2j5gv                           1/1     Running   0            9h    192.168.13.212   k8s-master2   <none>           <none>
kube-system   kube-proxy-4h7hj                           1/1     Running   0            9h    192.168.13.213   k8s-master3   <none>           <none>
kube-system   kube-proxy-542h7                           1/1     Running   0            9h    192.168.13.211   k8s-master1   <none>           <none>
kube-system   kube-proxy-7l8jz                           1/1     Running   0            9h    192.168.13.216   k8s-worker3   <none>           <none>
kube-system   kube-proxy-8sgcp                           1/1     Running   0            9h    192.168.13.214   k8s-worker1   <none>           <none>
kube-system   kube-scheduler-k8s-master1                 1/1     Running   1 (9h ago)   9h    192.168.13.211   k8s-master1   <none>           <none>
kube-system   kube-scheduler-k8s-master2                 1/1     Running   0            9h    192.168.13.212   k8s-master2   <none>           <none>
kube-system   kube-scheduler-k8s-master3                 1/1     Running   0            9h    192.168.13.213   k8s-master3   <none>           <none>
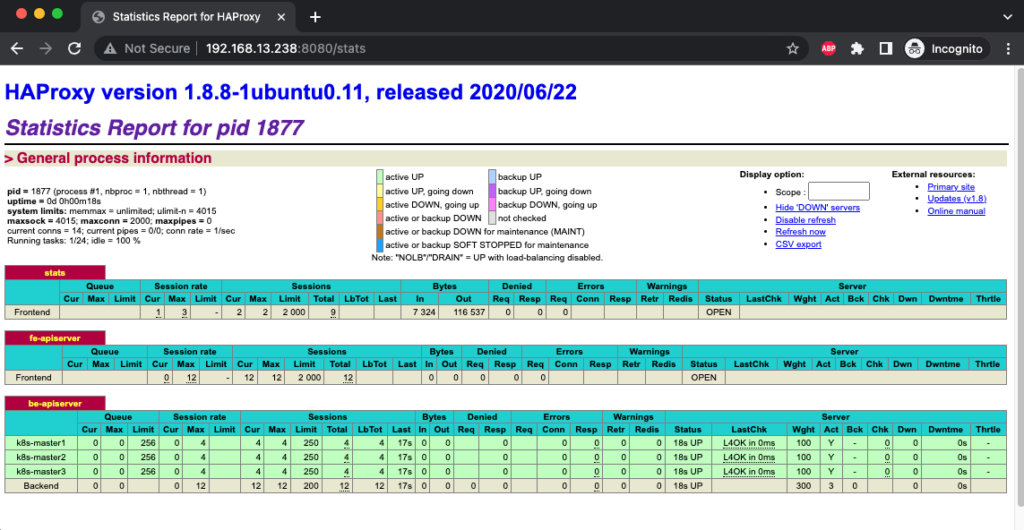
Dùng trình duyệt web login vào http://192.168.13.238:8080/stats để monitor apiserver mà bạn đã thiết lập ở trong file config haproxy.

Như vậy tới đây bạn đã có 1 cụm kubernetes nhiều master node có tính khả dụng cao, bài tiếp theo mình sẽ hướng dẫn cho các bạn cách triển khai cân bằng tải và chịu lỗi với dịch vụ Ingress trên cụm Kubernetes multiple node này nhé.
Chúc các bạn thành công.
