1. Tổng quan.
Rclone là một công cụ dòng lệnh mạnh mẽ và đa nền tảng được sử dụng để đồng bộ, sao chép và quản lý dữ liệu trên nhiều dịch vụ lưu trữ cloud khác nhau. Nó hỗ trợ nhiều dịch vụ như Google Drive, Dropbox, Amazon S3, Microsoft OneDrive và nhiều hơn nữa. Rclone cung cấp các lệnh để thực hiện các hoạt động như copy file, xóa tệp, tạo thư mục, đồng bộ hóa dữ liệu giữa các remote và nhiều tác vụ khác.
Google Drive là một dịch vụ lưu trữ cloud được cung cấp bởi Google. Nó cho phép người dùng lưu trữ, chia sẻ và truy cập dữ liệu từ bất kỳ đâu thông qua internet. Google Drive cung cấp không gian lưu trữ trực tuyến miễn phí và có thể được truy cập từ các thiết bị di động và máy tính.
Việc sử dụng rclone để đồng bộ dữ liệu lên Google Drive mang lại nhiều lợi ích, bao gồm:
- Sao lưu dữ liệu: Rclone cho phép bạn sao lưu các tệp và thư mục từ máy tính của bạn lên Google Drive. Điều này giúp bảo vệ dữ liệu quan trọng khỏi mất mát do hỏng hóc thiết bị hoặc sự cố không mong muốn.
- Truy cập từ xa: Khi dữ liệu được đồng bộ lên Google Drive, bạn có thể truy cập và tải xuống dữ liệu từ bất kỳ đâu thông qua bất kỳ thiết bị nào có kết nối internet. Điều này mang lại tính linh hoạt và tiện lợi trong việc truy cập vào dữ liệu của bạn.
- Chia sẻ và hợp tác: Google Drive cung cấp tính năng chia sẻ dữ liệu, cho phép bạn chia sẻ tệp và thư mục với người khác. Bằng cách sử dụng rclone, bạn có thể dễ dàng đồng bộ và chia sẻ dữ liệu của mình với đồng nghiệp, bạn bè hoặc đối tác kinh doanh.
- Dễ dàng quản lý dữ liệu: Rclone cung cấp các lệnh và tùy chọn quản lý mạnh mẽ để thực hiện các tác vụ như tìm kiếm, xóa, di chuyển và đồng bộ hóa dữ liệu giữa máy tính và Google Drive. Điều này giúp bạn dễ dàng tổ chức và quản lý dữ liệu của mình.
- Tăng khả năng lưu trữ: Bằng cách sử dụng Google Drive thông qua rclone, bạn có thể mở rộng khả năng lưu trữ của mình. Google Drive cung cấp không gian lưu trữ trực tuyến rộng lớn, cho phép bạn lưu trữ nhiều tệp và dữ liệu mà không cần lo lắng về không gian lưu trữ trên máy tính cá nhân.
2. Thực hành đồng bộ dữ liệu từ server Ubuntu Server lên Google Drive.
Để đồng bộ dữ liệu từ một server Ubuntu lên Google Drive, bạn có thể sử dụng Google Drive API và một số công cụ hỗ trợ. Dưới đây là một phương pháp sử dụng gói công cụ “rclone” trên Ubuntu Server để đồng bộ dữ liệu với Google Drive:
Bước 1 – Cài đặt Rclone vào server Ubuntu.
Truy cập vào server Ubuntu thông qua SSH hoặc cli và tải rclone bằng cách chạy lệnh sudo -v ; curl https://rclone.org/install.sh | sudo bash:
$ sudo -v ; curl https://rclone.org/install.sh | sudo bash
  % Total    % Received % Xferd  Average Speed   Time    Time     Time  Current
                                 Dload  Upload   Total   Spent    Left  Speed
100  4707  100  4707    0     0   4040      0  0:00:01  0:00:01 --:--:--  4040
Archive:  rclone-current-linux-amd64.zip
   creating: rclone-v1.63.0-linux-amd64/
  inflating: rclone-v1.63.0-linux-amd64/rclone
  inflating: rclone-v1.63.0-linux-amd64/README.txt
  inflating: rclone-v1.63.0-linux-amd64/git-log.txt
  inflating: rclone-v1.63.0-linux-amd64/rclone.1
  inflating: rclone-v1.63.0-linux-amd64/README.html
Purging old database entries in /usr/share/man...
Processing manual pages under /usr/share/man...
Purging old database entries in /usr/share/man/de...
Processing manual pages under /usr/share/man/de...
...
< Đã loại bỏ bớt một số thành phần >
...
1 man subdirectory contained newer manual pages.
1 manual page was added.
0 stray cats were added.
0 old database entries were purged.

rclone v1.63.0 has successfully installed.
Now run "rclone config" for setup. Check https://rclone.org/docs/ for more details.
Sau khi cài đặt xong, bạn hãy xác nhận lại phiên bản của nó.
$ rclone -V
rclone v1.63.0
- os/version: ubuntu 18.04 (64 bit)
- os/kernel: 4.15.0-212-generic (x86_64)
- os/type: linux
- os/arch: amd64
- go/version: go1.20.5
- go/linking: static
- go/tags: none
Tham khảo thêm tài liệu cài đặt chính chủ https://rclone.org/install/.
Bước 2 – Cấu hình phase 1 Rclone.
Để bắt đầu config đồng bộ dữ liệu lên Google Drive sử dụng Rclone bạn hãy chạy rclone config và lần lượt thực hiện các bước như dưới.
$ rclone config
No remotes found, make a new one?
n) New remote
s) Set configuration password
q) Quit config
n/s/q> n

Enter name for new remote.
name> mygoogledrive

Option Storage.
Type of storage to configure.
Choose a number from below, or type in your own value.
 1 / 1Fichier
   \ (fichier)
 2 / Akamai NetStorage
   \ (netstorage)
 3 / Alias for an existing remote
   \ (alias)
 4 / Amazon Drive
   \ (amazon cloud drive)
 5 / Amazon S3 Compliant Storage Providers including AWS, Alibaba, ArvanCloud, Ceph, China Mobile, Cloudflare, GCS, DigitalOcean, Dreamhost, Huawei OBS, IBM COS, IDrive e2, IONOS Cloud, Liara, Lyve Cloud, Minio, Netease, Petabox, RackCorp, Scaleway, SeaweedFS, StackPath, Storj, Tencent COS, Qiniu and Wasabi
   \ (s3)
 6 / Backblaze B2
   \ (b2)
 7 / Better checksums for other remotes
   \ (hasher)
 8 / Box
   \ (box)
 9 / Cache a remote
   \ (cache)
10 / Citrix Sharefile
   \ (sharefile)
11 / Combine several remotes into one
   \ (combine)
12 / Compress a remote
   \ (compress)
13 / Dropbox
   \ (dropbox)
14 / Encrypt/Decrypt a remote
   \ (crypt)
15 / Enterprise File Fabric
   \ (filefabric)
16 / FTP
   \ (ftp)
17 / Google Cloud Storage (this is not Google Drive)
   \ (google cloud storage)
18 / Google Drive
   \ (drive)
19 / Google Photos
   \ (google photos)
20 / HTTP
   \ (http)
21 / Hadoop distributed file system
   \ (hdfs)
22 / HiDrive
   \ (hidrive)
23 / In memory object storage system.
   \ (memory)
24 / Internet Archive
   \ (internetarchive)
25 / Jottacloud
   \ (jottacloud)
26 / Koofr, Digi Storage and other Koofr-compatible storage providers
   \ (koofr)
27 / Local Disk
   \ (local)
28 / Mail.ru Cloud
   \ (mailru)
29 / Mega
   \ (mega)
30 / Microsoft Azure Blob Storage
   \ (azureblob)
31 / Microsoft OneDrive
   \ (onedrive)
32 / OpenDrive
   \ (opendrive)
33 / OpenStack Swift (Rackspace Cloud Files, Blomp Cloud Storage, Memset Memstore, OVH)
   \ (swift)
34 / Oracle Cloud Infrastructure Object Storage
   \ (oracleobjectstorage)
35 / Pcloud
   \ (pcloud)
36 / PikPak
   \ (pikpak)
37 / Put.io
   \ (putio)
38 / QingCloud Object Storage
   \ (qingstor)
39 / SMB / CIFS
   \ (smb)
40 / SSH/SFTP
   \ (sftp)
41 / Sia Decentralized Cloud
   \ (sia)
42 / Storj Decentralized Cloud Storage
   \ (storj)
43 / Sugarsync
   \ (sugarsync)
44 / Transparently chunk/split large files
   \ (chunker)
45 / Union merges the contents of several upstream fs
   \ (union)
46 / Uptobox
   \ (uptobox)
47 / WebDAV
   \ (webdav)
48 / Yandex Disk
   \ (yandex)
49 / Zoho
   \ (zoho)
50 / premiumize.me
   \ (premiumizeme)
51 / seafile
   \ (seafile)
Storage> 18

Option client_id.
Google Application Client Id
Setting your own is recommended.
See https://rclone.org/drive/#making-your-own-client-id for how to create your own.
If you leave this blank, it will use an internal key which is low performance.
Enter a value. Press Enter to leave empty.
client_id>

Option client_secret.
OAuth Client Secret.
Leave blank normally.
Enter a value. Press Enter to leave empty.
client_secret>

Option scope.
Scope that rclone should use when requesting access from drive.
Choose a number from below, or type in your own value.
Press Enter to leave empty.
 1 / Full access all files, excluding Application Data Folder.
   \ (drive)
 2 / Read-only access to file metadata and file contents.
   \ (drive.readonly)
   / Access to files created by rclone only.
 3 | These are visible in the drive website.
   | File authorization is revoked when the user deauthorizes the app.
   \ (drive.file)
   / Allows read and write access to the Application Data folder.
 4 | This is not visible in the drive website.
   \ (drive.appfolder)
   / Allows read-only access to file metadata but
 5 | does not allow any access to read or download file content.
   \ (drive.metadata.readonly)
scope> 1

Option service_account_file.
Service Account Credentials JSON file path.
Leave blank normally.
Needed only if you want use SA instead of interactive login.
Leading `~` will be expanded in the file name as will environment variables such as `${RCLONE_CONFIG_DIR}`.
Enter a value. Press Enter to leave empty.
service_account_file>

Edit advanced config?
y) Yes
n) No (default)
y/n> n

Use web browser to automatically authenticate rclone with remote?
 * Say Y if the machine running rclone has a web browser you can use
 * Say N if running rclone on a (remote) machine without web browser access
If not sure try Y. If Y failed, try N.

y) Yes (default)
n) No
y/n> n

Option config_token.
For this to work, you will need rclone available on a machine that has
a web browser available.
For more help and alternate methods see: https://rclone.org/remote_setup/
Execute the following on the machine with the web browser (same rclone
version recommended):
	rclone authorize "drive" "eyJzY29wZSI6ImRyaXZlIn0"
Then paste the result.
Enter a value.
config_token>
Bước 3 – Lấy Token từ Google.
Để làm đoạn này bạn cần lấy mã Token của Google và truyền vào <config_token>. Để làm được điều này bạn cần có một máy tính có cài đặt Rclone và một trình duyệt Website để truy cập vào trang của Google.
Như vậy hiện tại mình đang sử dụng một máy Macbook nên mình sẽ cài Rclone lên máy Macbook của mình trước.
Trên hệ điều hành của Macbook bạn sử dụng lệnh dưới dưới để cài đặt Rclone.
brew install rcloneSau khi cài đặt xong bạn hãy xác nhận phiên bản của nó.
$ rclone -V
rclone v1.62.2
- os/version: darwin 10.15.7 (64 bit)
- os/kernel: 19.6.0 (x86_64)
- os/type: darwin
- os/arch: amd64
- go/version: go1.20.5
- go/linking: dynamic
- go/tags: none
Tiếp theo bạn hãy chạy lệnh rclone authorize "drive" "eyJzY29wZSI6ImRyaXZlIn0" như theo yêu cầu ở trên để lấy token Google Drive.
$ rclone authorize "drive" "eyJzY29wZSI6ImRyaXZlIn0"
2023/07/02 19:55:05 NOTICE: Config file "/Users/hoanghd/.config/rclone/rclone.conf" not found - using defaults
2023/07/02 19:55:05 NOTICE: If your browser doesn't open automatically go to the following link: http://127.0.0.1:53682/auth?state=FO36GodvkP5zpkE2S1vC1A
2023/07/02 19:55:05 NOTICE: Log in and authorize rclone for access
2023/07/02 19:55:05 NOTICE: Waiting for code...
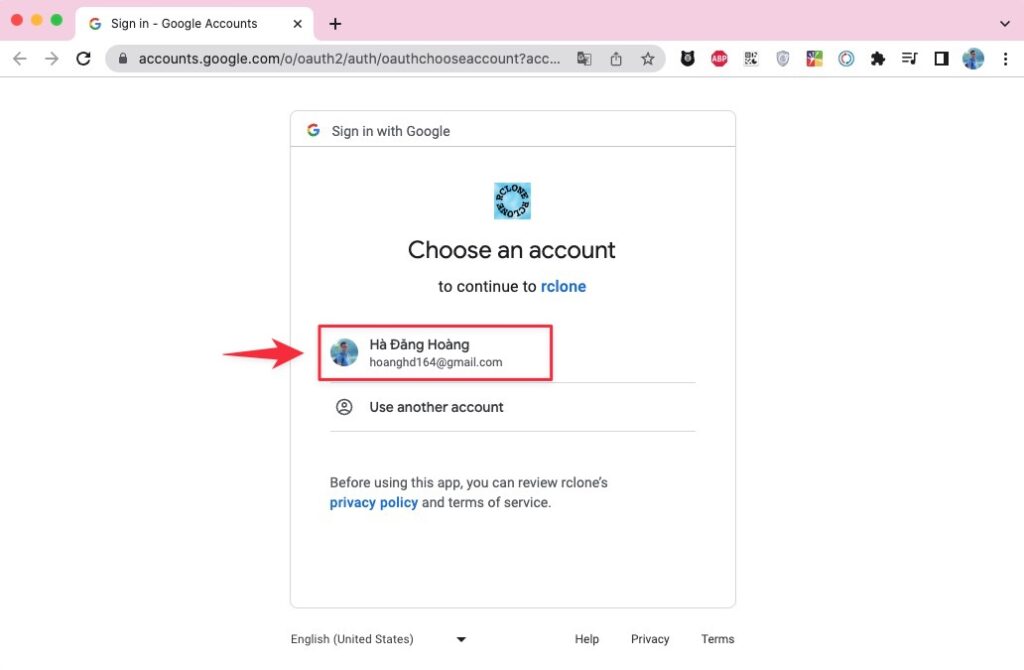
Sau khi bạn bấm Enter để chạy lệnh, trình duyệt sẽ tự động mở và chạy vào một đường link liên kết với Google để xác nhận đăng nhập, hãy bấm chọn vào tài khoản Google mà bạn muốn sử dụng đồng bộ cho Rclone.

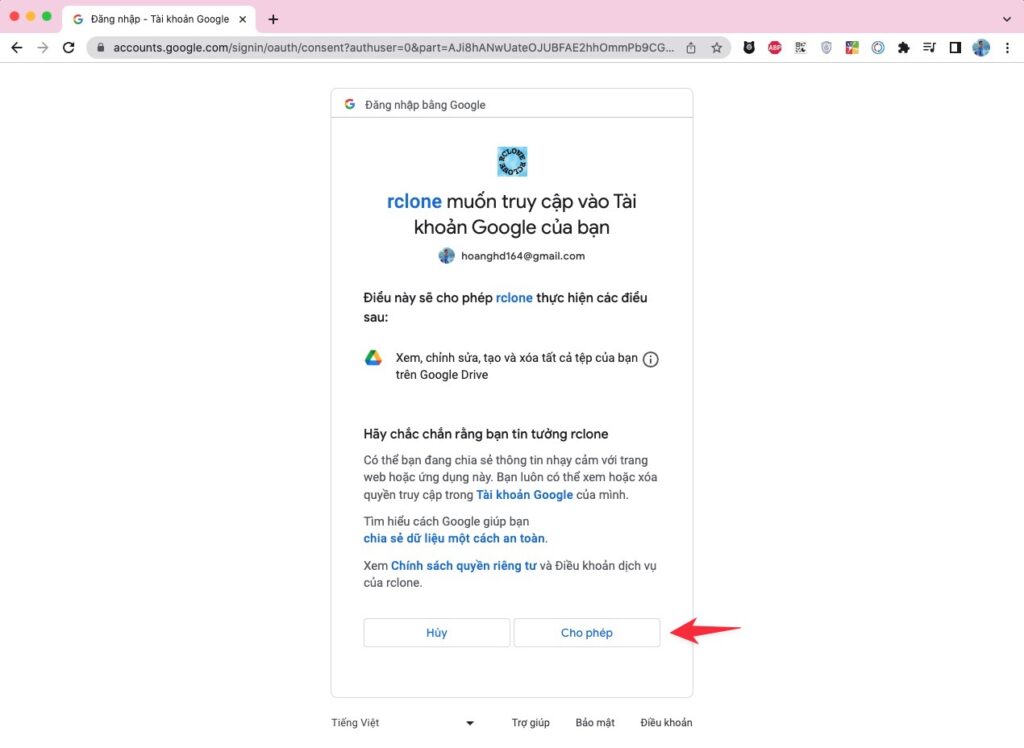
Bấm cho phép để đồng ý.

Và thông báo dưới cho thấy bạn đã cho phép Rclone login thành công.

Lúc này bạn quay lại màn hình dòng lệnh, bạn sẽ thấy mã token xác thực với Google xuất hiện như dưới.
$ rclone authorize "drive" "eyJzY29wZSI6ImRyaXZlIn0"
2023/07/02 19:55:05 NOTICE: Config file "/Users/hoanghd/.config/rclone/rclone.conf" not found - using defaults
2023/07/02 19:55:05 NOTICE: If your browser doesn't open automatically go to the following link: http://127.0.0.1:53682/auth?state=FO36GodvkP5zpkE2S1vC1A
2023/07/02 19:55:05 NOTICE: Log in and authorize rclone for access
2023/07/02 19:55:05 NOTICE: Waiting for code...
2023/07/02 19:56:48 NOTICE: Got code
Paste the following into your remote machine --->
eyJ0b2tlbiI6IntcImFjY2Vzc191b2tlblwiOlwieWEyOS5hMEFiVmJZNk5WWGFuQlJJUi1mYWhENUI5NFFKZlNQa2lkOHlRRTdaRG5Nck4xN1RhSkVKdl9JOUJYWE0zdTBKaGF0MnhVMjBTeVdTOW02YzFVcUFteTZsQncyXzg4cU5RckZmTlROaS1SU0tHdkFpNWJLcm5ZRlBuV3QzSVhlWmE2NjU4dEtVRm1xY2tFb2dvb2t4Tl9qZGZGWDhZdWFDZ1lLQWRjU0FSQVNGUUZXS3ZQbEM4NTFhcmZ3Szk0dmtmWmc0bXNkckEwMTYzXCIsXCJ0b2tlbl90eXBlXCI6XCJCZWFyZXJcIixcInJlZnJlc2hfdG9rZW5cIjpcIjEvLzBlY3g3cUR3ZVB6WFFDZ1lJQVJBQUdBNFNOd0YtTDlJclB1NVp5dWhqLU5ldTNqQ0ZLbDNXbmp0OEZTYTctWU1ycHlYdWcya2ljUW84WGJjaVp1UWNNamwzb0RnZkdFNWdsVHdcIixcImV4cGlyeVwiOlwiMjAyMy0wNy0wMlQyMDo1Njo0Ny4yNTEyMzkrMDc6MDBcIn0ifQ
<---End paste
Bước 4 – Cấu hình phase 2 Rclone.
Hãy nhập mã Token này vào phần <config_token> như dưới và hãy tiếp tục thực hiện cấu hình cho đến khi kết thúc theo quy trình ở dưới nhé.
Option config_token.
For this to work, you will need rclone available on a machine that has
a web browser available.
For more help and alternate methods see: https://rclone.org/remote_setup/
Execute the following on the machine with the web browser (same rclone
version recommended):
	rclone authorize "drive" "eyJzY29wZSI6ImRyaXZlIn0"
Then paste the result.
Enter a value.
config_token> eyJ0b2tlbiI6IntcImFjY2Vzc191b2tlblwiOlwieWEyOS5hMEFiVmJZNk5WWGFuQlJJUi1mYWhENUI5NFFKZlNQa2lkOHlRRTdaRG5Nck4xN1RhSkVKdl9JOUJYWE0zdTBKaGF0MnhVMjBTeVdTOW02YzFVcUFteTZsQncyXzg4cU5RckZmTlROaS1SU0tHdkFpNWJLcm5ZRlBuV3QzSVhlWmE2NjU4dEtVRm1xY2tFb2dvb2t4Tl9qZGZGWDhZdWFDZ1lLQWRjU0FSQVNGUUZXS3ZQbEM4NTFhcmZ3Szk0dmtmWmc0bXNkckEwMTYzXCIsXCJ0b2tlbl90eXBlXCI6XCJCZWFyZXJcIixcInJlZnJlc2hfdG9rZW5cIjpcIjEvLzBlY3g3cUR3ZVB6WFFDZ1lJQVJBQUdBNFNOd0YtTDlJclB1NVp5dWhqLU5ldTNqQ0ZLbDNXbmp0OEZTYTctWU1ycHlYdWcya2ljUW84WGJjaVp1UWNNamwzb0RnZkdFNWdsVHdcIixcImV4cGlyeVwiOlwiMjAyMy0wNy0wMlQyMDo1Njo0Ny4yNTEyMzkrMDc6MDBcIn0ifQ

Configure this as a Shared Drive (Team Drive)?

y) Yes
n) No (default)
y/n> n

Configuration complete.
Options:
- type: drive
- scope: drive
- token: {"access_token":"ya29.a0AbVbY6NVXanBRIR-fahD5B94QJfSPkid8yQE7ZDnMrN17TaJEJv_I9BXXM3u0Jhat2xU20SyWS9m6c1UqAmy6lBw2_88qNQrFfNTNi-RSKGvAi5bKrnYFPnWt3IXeZa6658tKUFmqckEogookxN_jdfFX8YuaCgYKAdcSARASFQFWKvPlC851arfwK94vkfZg4msdrA0163","token_type":"Bearer","refresh_token":"1//0ecx7qDwePzXQCgYIARAAGA4SNwF-L9IrPu5Zyuhj-Neu3jCFKl3Wnjt8FSa7-YMrpyXug2kicQo8XbciZuQcMjl3oDgfGE5glTw","expiry":"2023-07-02T20:56:47.251239+07:00"}
- team_drive:
Keep this "mygoogledrive" remote?
y) Yes this is OK (default)
e) Edit this remote
d) Delete this remote
y/e/d> y

Current remotes:

Name                 Type
====                 ====
mygoogledrive        drive

e) Edit existing remote
n) New remote
d) Delete remote
r) Rename remote
c) Copy remote
s) Set configuration password
q) Quit config
e/n/d/r/c/s/q> q
Vậy là quá trình config Rclone đã cơ bản hoàn tất, để liệt kê danh sách các remote đã cấu hình trong rclone, bạn có thể sử dụng lệnh sau:
$ rclone listremotes
mygoogledrive:
Bước 5 – Đồng bộ dữ liệu lên Google Drive sử dụng Rclone
Giờ bạn có thể copy một file bất kỳ lên googledriver và kiểm tra trực tiếp bằng câu lệnh trên server:
$ tree /home/tf-proxmox
/home/tf-proxmox
├── main.tf
└── vars.tf

0 directories, 2 files
Để đồng bộ hoàn toàn một thư mục từ máy tính của bạn lên Google Drive, bạn có thể sử dụng lệnh sync trong rclone. Lệnh này sẽ đồng bộ hóa tất cả các file và thư mục con của thư mục nguồn với thư mục đích trên Google Drive.
Ví dụ, nếu bạn muốn đồng bộ toàn bộ nội dung của thư mục /home/user/myfolder lên thư mục mygoogledrive:/backup trên Google Drive, bạn có thể sử dụng lệnh sau:
rclone sync /home/user/myfolder mygoogledrive:/backupLệnh trên sẽ đồng bộ hoá toàn bộ nội dung của myfolder trên máy tính của bạn với thư mục backup trên Google Drive. Nếu có bất kỳ thay đổi nào trong thư mục nguồn, rclone sẽ tự động cập nhật và đồng bộ lại các thay đổi đó lên Google Drive.
Lưu ý rằng việc đồng bộ hoàn toàn có thể mất thời gian phụ thuộc vào số lượng và kích thước của file và thư mục trong thư mục nguồn của bạn.
Ví dụ
rclone sync /home/tf-proxmox mygoogledrive:/backup/tf-proxmoxLệnh trên sẽ đồng bộ hoá toàn bộ nội dung của /home/tf-proxmox trên máy tính của bạn với thư mục /backup/tf-proxmox trên Google Drive.
Bước 6 – Kiếm tra kết quả.
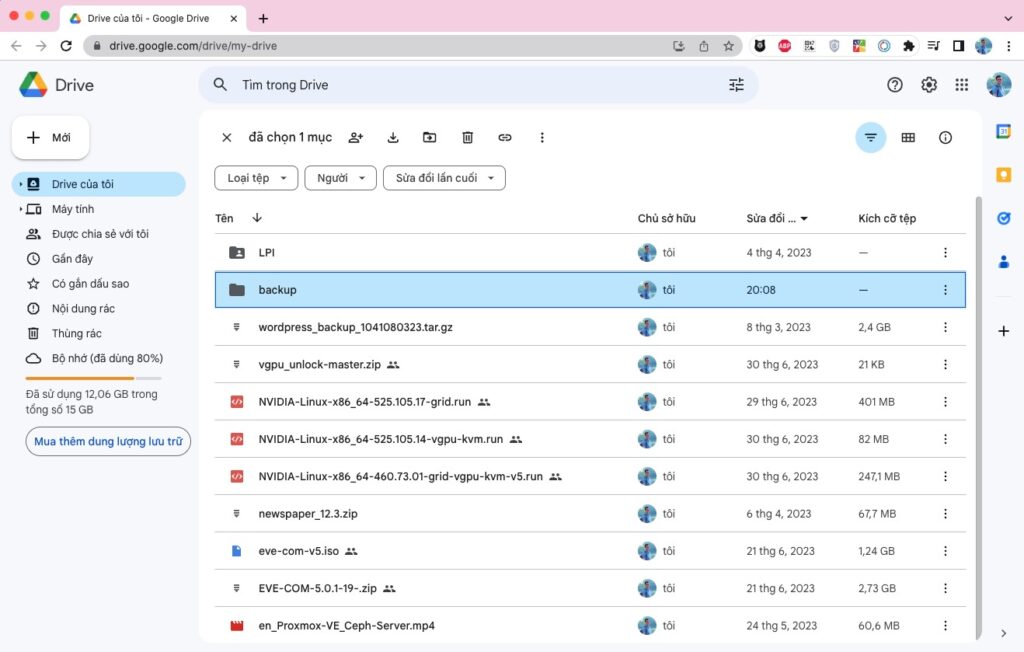
Và đây là kết quả trên Drive của bạn sau khi đồng bộ hoá toàn bộ nội dung xong.

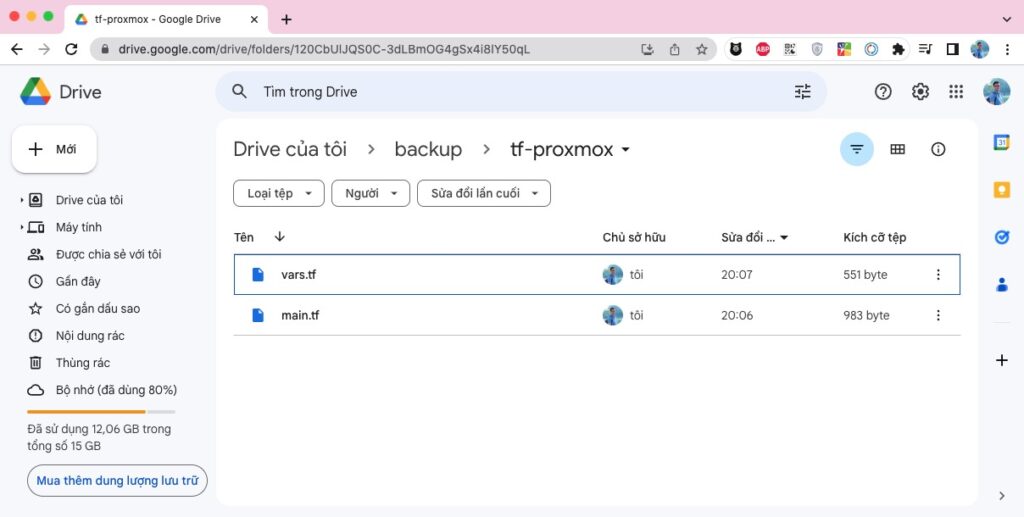
Nếu bạn vào sâu trong thư mục /home/tf-proxmox, bạn sẽ thấy 2 file tương ứng như bạn đã tạo ở phần trên.

Nếu bạn muốn đẩy một file bất kỳ lên Google Drive bằng rclone, bạn có thể sử dụng lệnh sau:
rclone copy /đường_dẫn_đến_tệp_tin mygoogledrive:/Trong đó:
/đường_dẫn_đến_tệp_tinlà đường dẫn tới file bạn muốn đẩy lên Google Drive.mygoogledrive:là tên remote bạn đã cấu hình cho Google Drive.
3. Nhìn lại toàn bộ quá trình cấu hình Rclone.
Do đoạn cấu hình khá dài và chắp vá nhiều chỗ nên mình sẽ copy toàn bộ các bước cấu hình để các bạn có thể nhìn lại dễ hơn.
$ rclone config
Current remotes:

Name                 Type
====                 ====
mygoogledrive        drive

e) Edit existing remote
n) New remote
d) Delete remote
r) Rename remote
c) Copy remote
s) Set configuration password
q) Quit config
e/n/d/r/c/s/q> d

Select remote.
Choose a number from below, or type in an existing value.
 1 > mygoogledrive
remote> 1


No remotes found, make a new one?
n) New remote
s) Set configuration password
q) Quit config
n/s/q> ^C
root@ubuntu1804:~# clear
root@ubuntu1804:~# rclone config
No remotes found, make a new one?
n) New remote
s) Set configuration password
q) Quit config
n/s/q> n

Enter name for new remote.
name> mygoogledrive

Option Storage.
Type of storage to configure.
Choose a number from below, or type in your own value.
 1 / 1Fichier
   \ (fichier)
 2 / Akamai NetStorage
   \ (netstorage)
 3 / Alias for an existing remote
   \ (alias)
 4 / Amazon Drive
   \ (amazon cloud drive)
 5 / Amazon S3 Compliant Storage Providers including AWS, Alibaba, ArvanCloud, Ceph, China Mobile, Cloudflare, GCS, DigitalOcean, Dreamhost, Huawei OBS, IBM COS, IDrive e2, IONOS Cloud, Liara, Lyve Cloud, Minio, Netease, Petabox, RackCorp, Scaleway, SeaweedFS, StackPath, Storj, Tencent COS, Qiniu and Wasabi
   \ (s3)
 6 / Backblaze B2
   \ (b2)
 7 / Better checksums for other remotes
   \ (hasher)
 8 / Box
   \ (box)
 9 / Cache a remote
   \ (cache)
10 / Citrix Sharefile
   \ (sharefile)
11 / Combine several remotes into one
   \ (combine)
12 / Compress a remote
   \ (compress)
13 / Dropbox
   \ (dropbox)
14 / Encrypt/Decrypt a remote
   \ (crypt)
15 / Enterprise File Fabric
   \ (filefabric)
16 / FTP
   \ (ftp)
17 / Google Cloud Storage (this is not Google Drive)
   \ (google cloud storage)
18 / Google Drive
   \ (drive)
19 / Google Photos
   \ (google photos)
20 / HTTP
   \ (http)
21 / Hadoop distributed file system
   \ (hdfs)
22 / HiDrive
   \ (hidrive)
23 / In memory object storage system.
   \ (memory)
24 / Internet Archive
   \ (internetarchive)
25 / Jottacloud
   \ (jottacloud)
26 / Koofr, Digi Storage and other Koofr-compatible storage providers
   \ (koofr)
27 / Local Disk
   \ (local)
28 / Mail.ru Cloud
   \ (mailru)
29 / Mega
   \ (mega)
30 / Microsoft Azure Blob Storage
   \ (azureblob)
31 / Microsoft OneDrive
   \ (onedrive)
32 / OpenDrive
   \ (opendrive)
33 / OpenStack Swift (Rackspace Cloud Files, Blomp Cloud Storage, Memset Memstore, OVH)
   \ (swift)
34 / Oracle Cloud Infrastructure Object Storage
   \ (oracleobjectstorage)
35 / Pcloud
   \ (pcloud)
36 / PikPak
   \ (pikpak)
37 / Put.io
   \ (putio)
38 / QingCloud Object Storage
   \ (qingstor)
39 / SMB / CIFS
   \ (smb)
40 / SSH/SFTP
   \ (sftp)
41 / Sia Decentralized Cloud
   \ (sia)
42 / Storj Decentralized Cloud Storage
   \ (storj)
43 / Sugarsync
   \ (sugarsync)
44 / Transparently chunk/split large files
   \ (chunker)
45 / Union merges the contents of several upstream fs
   \ (union)
46 / Uptobox
   \ (uptobox)
47 / WebDAV
   \ (webdav)
48 / Yandex Disk
   \ (yandex)
49 / Zoho
   \ (zoho)
50 / premiumize.me
   \ (premiumizeme)
51 / seafile
   \ (seafile)
Storage> 18

Option client_id.
Google Application Client Id
Setting your own is recommended.
See https://rclone.org/drive/#making-your-own-client-id for how to create your own.
If you leave this blank, it will use an internal key which is low performance.
Enter a value. Press Enter to leave empty.
client_id>

Option client_secret.
OAuth Client Secret.
Leave blank normally.
Enter a value. Press Enter to leave empty.
client_secret>

Option scope.
Scope that rclone should use when requesting access from drive.
Choose a number from below, or type in your own value.
Press Enter to leave empty.
 1 / Full access all files, excluding Application Data Folder.
   \ (drive)
 2 / Read-only access to file metadata and file contents.
   \ (drive.readonly)
   / Access to files created by rclone only.
 3 | These are visible in the drive website.
   | File authorization is revoked when the user deauthorizes the app.
   \ (drive.file)
   / Allows read and write access to the Application Data folder.
 4 | This is not visible in the drive website.
   \ (drive.appfolder)
   / Allows read-only access to file metadata but
 5 | does not allow any access to read or download file content.
   \ (drive.metadata.readonly)
scope> 1

Option service_account_file.
Service Account Credentials JSON file path.
Leave blank normally.
Needed only if you want use SA instead of interactive login.
Leading `~` will be expanded in the file name as will environment variables such as `${RCLONE_CONFIG_DIR}`.
Enter a value. Press Enter to leave empty.
service_account_file>

Edit advanced config?
y) Yes
n) No (default)
y/n> n

Use web browser to automatically authenticate rclone with remote?
 * Say Y if the machine running rclone has a web browser you can use
 * Say N if running rclone on a (remote) machine without web browser access
If not sure try Y. If Y failed, try N.

y) Yes (default)
n) No
y/n> n

Option config_token.
For this to work, you will need rclone available on a machine that has
a web browser available.
For more help and alternate methods see: https://rclone.org/remote_setup/
Execute the following on the machine with the web browser (same rclone
version recommended):
	rclone authorize "drive" "eyJzY29wZSI6ImRyaXZlIn0"
Then paste the result.
Enter a value.
config_token> eyJ0b2tlbiI6IntcImFjY2Vzc191b2tlblwiOlwieWEyOS5hMEFiVmJZNk5WWGFuQlJJUi1mYWhENUI5NFFKZlNQa2lkOHlRRTdaRG5Nck4xN1RhSkVKdl9JOUJYWE0zdTBKaGF0MnhVMjBTeVdTOW02YzFVcUFteTZsQncyXzg4cU5RckZmTlROaS1SU0tHdkFpNWJLcm5ZRlBuV3QzSVhlWmE2NjU4dEtVRm1xY2tFb2dvb2t4Tl9qZGZGWDhZdWFDZ1lLQWRjU0FSQVNGUUZXS3ZQbEM4NTFhcmZ3Szk0dmtmWmc0bXNkckEwMTYzXCIsXCJ0b2tlbl90eXBlXCI6XCJCZWFyZXJcIixcInJlZnJlc2hfdG9rZW5cIjpcIjEvLzBlY3g3cUR3ZVB6WFFDZ1lJQVJBQUdBNFNOd0YtTDlJclB1NVp5dWhqLU5ldTNqQ0ZLbDNXbmp0OEZTYTctWU1ycHlYdWcya2ljUW84WGJjaVp1UWNNamwzb0RnZkdFNWdsVHdcIixcImV4cGlyeVwiOlwiMjAyMy0wNy0wMlQyMDo1Njo0Ny4yNTEyMzkrMDc6MDBcIn0ifQ

Configure this as a Shared Drive (Team Drive)?

y) Yes
n) No (default)
y/n> n

Configuration complete.
Options:
- type: drive
- scope: drive
- token: {"access_token":"ya29.a0AbVbY6NVXanBRIR-fahD5B94QJfSPkid8yQE7ZDnMrN17TaJEJv_I9BXXM3u0Jhat2xU20SyWS9m6c1UqAmy6lBw2_88qNQrFfNTNi-RSKGvAi5bKrnYFPnWt3IXeZa6658tKUFmqckEogookxN_jdfFX8YuaCgYKAdcSARASFQFWKvPlC851arfwK94vkfZg4msdrA0163","token_type":"Bearer","refresh_token":"1//0ecx7qDwePzXQCgYIARAAGA4SNwF-L9IrPu5Zyuhj-Neu3jCFKl3Wnjt8FSa7-YMrpyXug2kicQo8XbciZuQcMjl3oDgfGE5glTw","expiry":"2023-07-02T20:56:47.251239+07:00"}
- team_drive:
Keep this "mygoogledrive" remote?
y) Yes this is OK (default)
e) Edit this remote
d) Delete this remote
y/e/d> y

Current remotes:

Name                 Type
====                 ====
mygoogledrive        drive

e) Edit existing remote
n) New remote
d) Delete remote
r) Rename remote
c) Copy remote
s) Set configuration password
q) Quit config
e/n/d/r/c/s/q> q
4. Và cuối cùng là mô tả chức năng về một số lệnh trong Rclone.
about: Lấy thông tin hạn ngạch từ remote.authorize: Xác thực remote để có quyền truy cập.backend: Chạy một lệnh cụ thể cho backend.bisync: Thực hiện đồng bộ hai chiều giữa hai đường dẫn.cat: Ghép các tệp lại và gửi đến stdout.check: Kiểm tra xem các tệp trong nguồn và đích khớp nhau.checksum: Kiểm tra xem các tệp trong nguồn khớp với một tệp SUM.cleanup: Dọn dẹp remote nếu có thể.completion: Xuất tập lệnh hoàn thành cho một shell cụ thể.config: Mở phiên cấu hình tương tác để cấu hình và quản lý các remote.copyvàcopyto: Copy file từ nguồn đến đích, bỏ qua các tệp giống nhau.copyurl: Sao chép nội dung từ URL vào đích.cryptcheck: Kiểm tra tính toàn vẹn của remote được mã hóa.cryptdecode: Trả về tên tệp không được mã hóa.dedupe: Tìm kiếm tương tác các tên tệp trùng lặp và xóa/đổi tên chúng.delete: Xóa các tệp trong đường dẫn.deletefile: Xóa một tệp duy nhất từ remote.gendocs: Xuất tài liệu dạng markdown cho rclone vào thư mục cung cấp.hashsum: Tạo tệp hashsum cho tất cả các đối tượng trong đường dẫn.help: Hiển thị trợ giúp cho các lệnh, cờ và backends của rclone.link: Tạo liên kết công khai đến tệp/thư mục.listremotes: Liệt kê tất cả các remote trong tệp cấu hình và định nghĩa trong biến môi trường.ls: Liệt kê các đối tượng trong đường dẫn với kích thước và đường dẫn.lsd: Liệt kê tất cả các thư mục/container/bucket trong đường dẫn.lsf: Liệt kê các thư mục và đối tượng trong remote:path định dạng để phân tích cú pháp.lsjson: Liệt kê các thư mục và đối tượng trong đường dẫn dưới dạng JSON.lsl: Liệt kê các đối tượng trong đường dẫn với thời gian sửa đổi, kích thước và đường dẫn.md5sum: Tạo tệp md5sum cho tất cả các đối tượng trong đường dẫn.mkdir: Tạo thư mục nếu nó chưa tồn tại.mount: Mount remote như một hệ thống tệp trên một điểm gắn.movevàmoveto: Di chuyển các tệp từ nguồn đến đích.ncdu: Khám phá remote với user interface dựa trên văn bản.obscure: Mã hóa mật khẩu để sử dụng trong tệp cấu hình rclone.purge: Xóa đường dẫn và tất cả nội dung của nó.rc: Chạy một lệnh trên rclone đang chạy.rcat: Sao chép đầu vào tiêu chuẩn vào tệp trên remote.rcd: Chạy rclone lắng nghe chỉ lệnh kiểm soát từ remote.rmdir: Xóa thư mục trống tại đường dẫn.rmdirs: Xóa các thư mục trống dưới đường dẫn.selfupdate: Cập nhật tệp nhị phân của rclone.serve: Phục vụ remote qua một giao thức.settier: Thay đổi lớp/tầng lưu trữ của các đối tượng trong remote.sha1sum: Tạo tệp sha1sum cho tất cả các đối tượng trong đường dẫn.size: In tổng kích thước và số đối tượng trong remote:path.sync: Làm cho nguồn và đích giống nhau, chỉ sửa đổi đích để khớp với nguồn.test: Chạy một lệnh kiểm tra.touch: Tạo tệp mới hoặc thay đổi thời gian sửa đổi của tệp.tree: Liệt kê nội dung của remote dưới dạng cây.version: Hiển thị số phiên bản của rclone.
Đây là mô tả đầy đủ về các lệnh có sẵn trong rclone. Bạn có thể sử dụng lệnh rclone help <command> để xem thông tin chi tiết về từng lệnh cụ thể.
Tài liệu tham khảo https://rclone.org/docs/.
