Cũng như các nền tảng ảo hoá khác, Virtuozzo cũng cho phép chúng ta tạo các vlan trên interface để phục vụ cho nhu cầu sử dụng nhiều subnet. Để thực hiện việc này trên Virtuozzo, bạn hãy làm theo trình tự sau.
Ở ví dụ này mình sẽ demo ở interface bond1, khi dùng lệnh brctl show | grep bond1 bạn thấy bond1 của mình chỉ có 1 vlan duy nhất là 204.
$ brctl show | grep bond1
br1		8000.ac1f6bacd34a	no		bond1
br2		8000.ac1f6bacd34a	no		bond1.204
Lệnh virsh net-list sẽ list cho bạn các subnet đã tồn tại, hiện tại mình chưa có subnet nào được tạo (Bridged và Host-Only) là 2 subnet mặc định của Virtuozzo.
$ virsh net-list
 Name        State    Autostart   Persistent
----------------------------------------------
 Bridged     active   yes         yes
 Host-Only   active   yes         yes
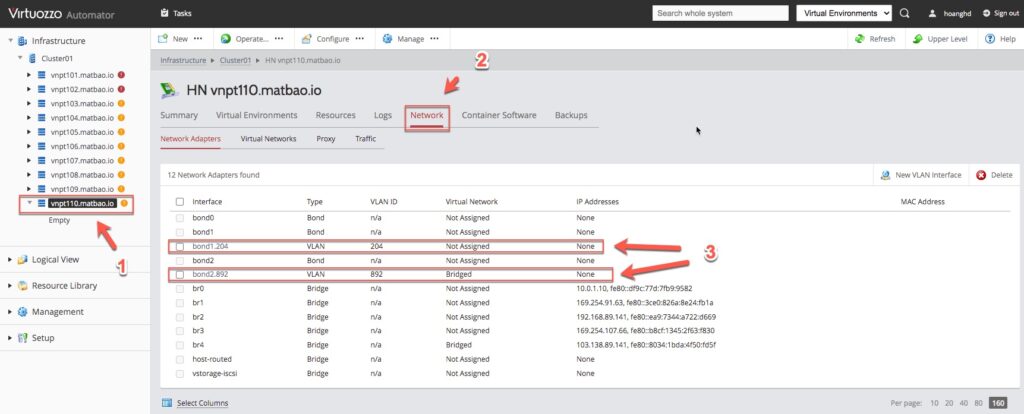
Khi lên PVA Magament Node bạn cũng thấy card bond1 của mình chỉ có mỗi vlan 201, vlan 892 mà bạn thấy là của interface bond2.

Giờ mình sẽ tạo 1 script đơn giản như dưới, việc của bạn chỉ cần thay thế ifwan bằng interface name của bạn (trường hợp của mình là bond1).
Hãy thay thế thông tin ở mảng array, mảng này chứa 1 list nhiều subnet và vlanid của subnet đó. Ví dụ như Private_192.168.20.0|32 thì Private_192.168.20.0 là subnet name và 32 là vlanid.
Mình dùng vi tạo 1 file có tên ./create_network.sh
$ vi ./create_network.shHãy dán nội dung dưới vào file ./create_network.sh
ifwan=bond1
array=('Private_192.168.20.0|32' 'Private_192.168.88.0|201' 'Private_192.168.88.128|202' 'Private_192.168.89.0|203')
# array=('Public_103.138.88.0|881' 'Public_103.138.88.128|882' 'Public_103.138.89.0|891')

for i in ${array[@]}
do
IFS='|' read subnet vlan <<< "$i"

prlsrvctl net add $subnet
vconfig add $ifwan $vlan

cat > /etc/sysconfig/network-scripts/ifcfg-$ifwan.$vlan << EOF
VLAN=yes
TYPE=Vlan
DEVICE=$ifwan.$vlan
PHYSDEV=$ifwan
VLAN_ID=$vlan
REORDER_HDR=yes
GVRP=no
MVRP=no
DEFROUTE=yes
IPV4_FAILURE_FATAL=no
NAME=$ifwan.$vlan
ONBOOT=yes
BRIDGE=br-$ifwan.$vlan
EOF

brctl addbr br-$ifwan.$vlan
brctl addif br-$ifwan.$vlan $ifwan.$vlan

cat > /etc/sysconfig/network-scripts/ifcfg-br-$ifwan.$vlan << EOF
DEVICE=br-$ifwan.$vlan
STP=no
TYPE=Bridge
BOOTPROTO=autoip
DEFROUTE=yes
IPV4_FAILURE_FATAL=no
IPV6INIT=yes
IPV6_AUTOCONF=no
IPV6_DEFROUTE=yes
IPV6_FAILURE_FATAL=no
IPV6_ADDR_GEN_MODE=stable-privacy
NAME=br-$ifwan.$vlan
ONBOOT=yes
EOF

ifup br-$ifwan.$vlan
ifdown br-$ifwan.$vlan
ifup $ifwan.$vlan
ifup br-$ifwan.$vlan
prlsrvctl net set $subnet -t bridged -i $ifwan.$vlan
done
Sau khi tạo file xong, bạn hãy chạy nó như sau . create_network.sh. Theo logs ở dưới thì có 4 vlan được thêm vào.
$ . create_network.sh
Added VLAN with VID == 32 to IF -:bond1:-
Connection successfully activated (D-Bus active path: /org/freedesktop/NetworkManager/ActiveConnection/22)
Added VLAN with VID == 201 to IF -:bond1:-
Connection successfully activated (D-Bus active path: /org/freedesktop/NetworkManager/ActiveConnection/27)
Added VLAN with VID == 202 to IF -:bond1:-
Connection successfully activated (D-Bus active path: /org/freedesktop/NetworkManager/ActiveConnection/32)
Added VLAN with VID == 203 to IF -:bond1:-
Connection successfully activated (D-Bus active path: /org/freedesktop/NetworkManager/ActiveConnection/37)
Hãy dùng lệnh brctl để show thông tin bond1, bạn đã thấy các interface và vlan đã được tạo
$ brctl show | grep bond1
br-bond1.201		8000.ac1f6bacd34a	no		bond1.201
br-bond1.202		8000.ac1f6bacd34a	no		bond1.202
br-bond1.203		8000.ac1f6bacd34a	no		bond1.203
br-bond1.204		8000.ac1f6bacd34a	no		bond1.204
br-bond1.32		8000.ac1f6bacd34a	no		bond1.32
br1		8000.ac1f6bacd34a	no		bond1
Sử dụng lệnh virsh net-list bạn sẽ thấy các subnet đã được thêm vào và đang ở trạng thái sẵn sàng để sử dụng
$ virsh net-list
setlocale: No such file or directory
 Name                     State    Autostart   Persistent
-----------------------------------------------------------
 Host-Only                active   yes         yes
 Private_192.168.20.0     active   yes         yes
 Private_192.168.88.0     active   yes         yes
 Private_192.168.88.128   active   yes         yes
 Private_192.168.89.0     active   yes         yes
 Private_192.168.89.128   active   yes         yes
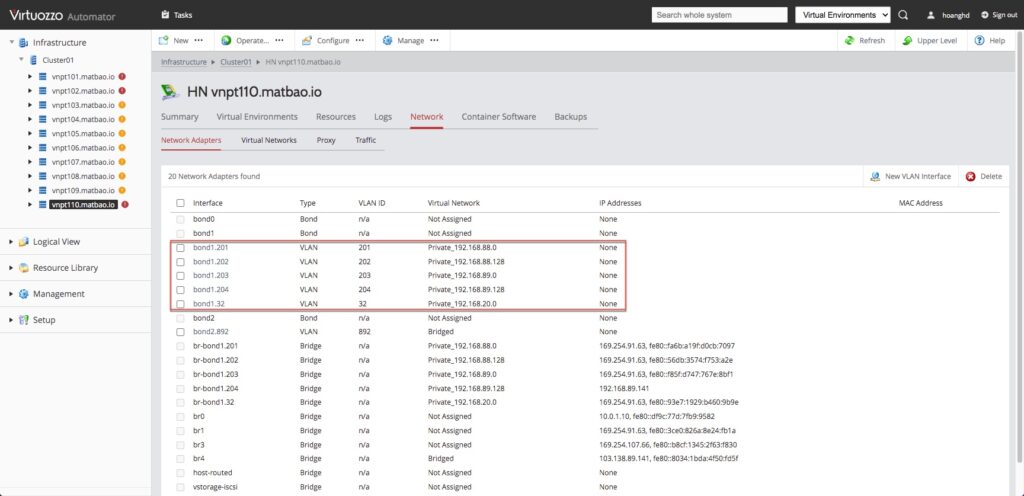
Kết quả trên trang PVA Magament Node

Chúc các bạn thành công
