Trong bài viết này, mình sẽ giới thiệu các bước để cài đặt Asterisk 16 LTS trên Ubuntu 22.04|20.04|18.04. Asterisk là một tổng đài open source với đầy đủ các tính năng của hầu hết các hệ thống tổng đài thương mại hiện có. Nó có hỗ trợ gọi hội nghị, cuộc gọi hàng đợi và nhiều tính năng khác.
Bước 1: Cập nhật hệ thống và khởi động lại máy chủ
sudo apt update && sudo apt -y upgrade
sudo reboot
Bước 2: Cài đặt các phụ thuộc Asterisk 16 LTS
Sau khi hệ thống được thiết lập và cập nhật, hãy cài đặt tất cả các gói phụ thuộc Asterisk cần thiết:
sudo apt -y install git curl wget libnewt-dev libssl-dev libncurses5-dev subversion libsqlite3-dev build-essential libjansson-dev libxml2-dev uuid-devNếu bạn gặp lỗi đối với gói subversion trên Ubuntu như bên dưới:
E: Package 'subversion' has no installation candidateHãy thêm repository subversion và install và cập nhật hệ thống theo lệnh dưới.
sudo add-apt-repository universe
sudo apt update && sudo apt -y install subversion
Bước 3: Tải xuống tarball Asterisk 16 LTS
Vì Asterisk 16 không có sẵn từ cả hai kho lưu trữ của Debian và Ubuntu nên bạn hãy chạy lệnh sudo apt policy asterisk để enables repository bên ngoài.
$ sudo apt policy asterisk
asterisk:
  Installed: (none)
  Candidate: 1:13.14.1~dfsg-2+deb9u3
  Version table:
     1:13.14.1~dfsg-2+deb9u3 500
...

$ sudo apt policy asterisk
asterisk:
  Installed: (none)
  Candidate: 1:13.18.3~dfsg-1ubuntu4
Tải xuống phiên bản mới nhất của Asterisk 16 LTS về máy chủ của bạn để cài đặt.
cd /usr/src/
sudo curl -O http://downloads.asterisk.org/pub/telephony/asterisk/asterisk-16-current.tar.gz
Sau đó giải nén tập tin:
sudo tar xvf asterisk-16-current.tar.gz
cd asterisk-16*/
Chạy lệnh sau để tải bộ giải mã mp3.
$ sudo contrib/scripts/get_mp3_source.sh
A addons/mp3/decode_ntom.c
A addons/mp3/interface.c
A addons/mp3/MPGLIB_README
A addons/mp3/common.c
A addons/mp3/huffman.h
A addons/mp3/tabinit.c
A addons/mp3/Makefile
A addons/mp3/README
A addons/mp3/decode_i386.c
A addons/mp3/dct64_i386.c
A addons/mp3/MPGLIB_TODO
A addons/mp3/mpg123.h
A addons/mp3/layer3.c
A addons/mp3/mpglib.h
Exported revision 202.
Đảm bảo tất cả các thành phần phụ thuộc đã được hoàn thành:
sudo contrib/scripts/install_prereq installNếu thành công bạn sẽ nhận được một thông báo như thế này ở cuối:
#############################################
## install completed successfully
#############################################
Bước 4: Xây dựng và cài đặt Asterisk 16 trên Ubuntu 22.04|20.04|18.04
Khi bạn đã tải xuống Asterisk 16 và cài đặt xong các thành phần phụ thuộc cần thiết, bạn đã có thể sẵn sàng build tổng đài Asterisk, sử dụng lệnh ./configure để bắt đầu quá trình build.
sudo ./configureNếu thành công bạn sẽ nhìn thấy màn hình như dưới đây:
..................
configure: Menuselect build configuration successfully completed

               .$$$$$$$$=..
            .$7$7..          .7$7:.
          .$:.                 ,$7.7
        .$7.     7$$           .$77
     ..$.       $$$            .$$7
    ..7$   .?.   $$$   .?.       7$$.
   $.$.   .$$7. $$7 .7$$.      .$$.
 .777.   .$$$77$$77$$$7.      $$,
 $$~      .7$$$$$$$7.       .$$.
.$7          .7$$$$7:          ?$$.
$$          ?7$$$$$I        .$$7
$$       .7$$$$$$$$      :$$.
$$       $$$7$$$$$$    .$$.
$$        $$   7$$7  .$$    .$$.
$$             $$7         .$$.
7$$7            7$$        7$$
 $$$                        $$
  $$7.                       $  (TM)
   $$$$.           .7$$$  $
     $$$$$$7$$$$$.$$$
       $$$$$$$$.

configure: Package configured for:
configure: OS type  : linux-gnu
configure: Host CPU : x86_64
configure: build-cpu:vendor:os: x86_64 : pc : linux-gnu :
configure: host-cpu:vendor:os: x86_64 : pc : linux-gnu :
Thiết lập các tùy chọn menu bằng cách chạy lệnh sau:
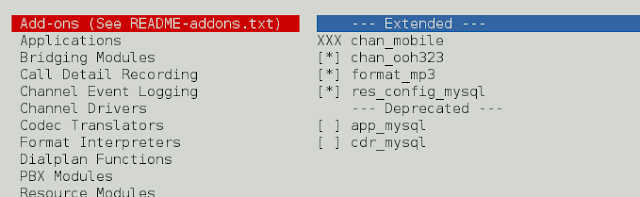
sudo make menuselectchọn chan_ooh323 và format_mp3
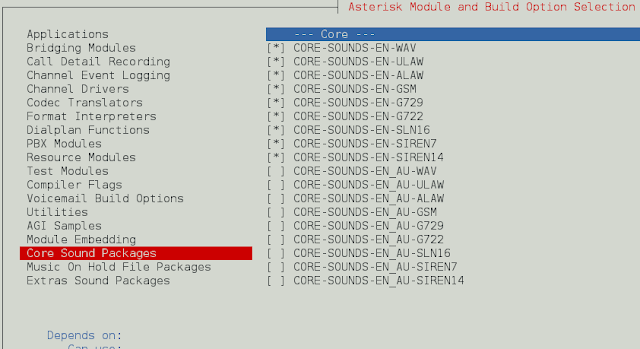
chọn định dạng của gói Audio như bên dưới
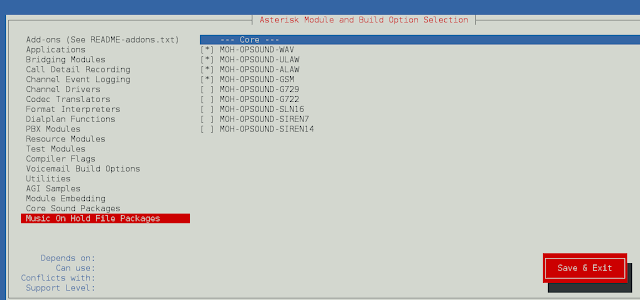
Đối với Music On Hold, chọn các mô-đun sau
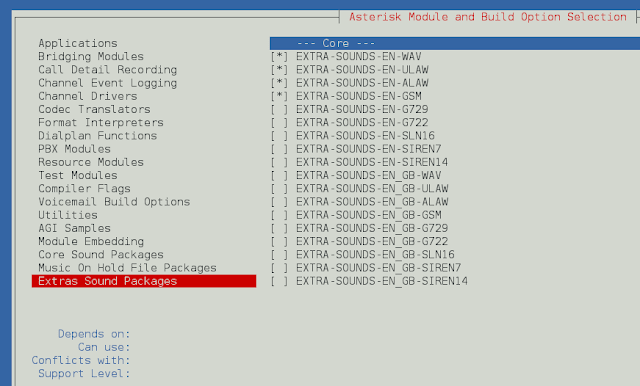
Trên Gói âm thanh bổ sung, chọn như hình dưới đây:
Bật app_macro trong phần Ứng dụng
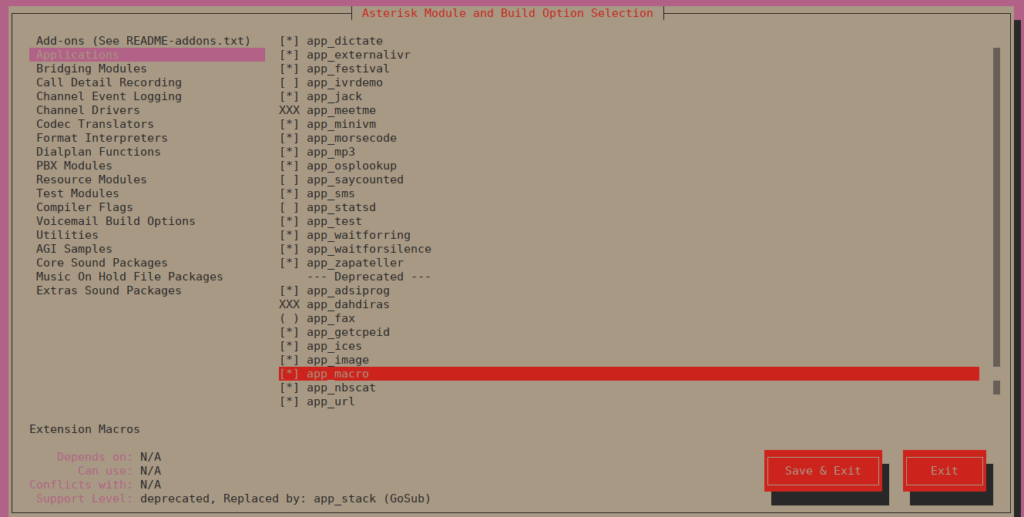
Khi hoàn tất, lưu và thoát và bạn có thể thay đổi các cấu hình khác mà bạn thấy phù hợp. Khi hoàn tất, hãy lưu và thoát, sau đó để cài đặt Asterisk với các mô-đun đã chọn thì bạn hãy chạy:
sudo makeSau khi build đến cuối cùng, bạn sẽ thấy dòng nhắc chạy lệnh make install để tiếp tục.
Building Documentation For: third-party channels pbx apps codecs formats cdr cel bridges funcs tests main res addons
 +--------- Asterisk Build Complete ---------+
 + Asterisk has successfully been built, and +
 + can be installed by running:              +
 +                                           +
 +                make install               +
Vậy để tiếp tục cài đặt Asterisk bạn hãy chạy lệnh:
sudo make installSau khi chạy thành công, nội dung cuối cùng bạn nhận được sẽ giống như vậy.
 +---- Asterisk Installation Complete -------+
 +                                           +
 +    YOU MUST READ THE SECURITY DOCUMENT    +
 +                                           +
 + Asterisk has successfully been installed. +
 + If you would like to install the sample   +
 + configuration files (overwriting any      +
 + existing config files), run:              +
 +                                           +
 + For generic reference documentation:      +
 +    make samples                           +
 +                                           +
 + For a sample basic PBX:                   +
 +    make basic-pbx                         +
 +                                           +
 +                                           +
 +-----------------  or ---------------------+
 +                                           +
 + You can go ahead and install the asterisk +
 + program documentation now or later run:   +
 +                                           +
 +               make progdocs               +
 +                                           +
 + **Note** This requires that you have      +
 + doxygen installed on your local system    +
 +-------------------------------------------+
Bạn có thể tùy chọn cài đặt thêm module progdocs:
sudo make progdocsCuối cùng hãy chạy các lệnh sau.
sudo make samples
sudo make config
sudo ldconfig
Tạo một người dùng và nhóm riêng biệt để chạy các dịch vụ Asterisk và gán quyền chính xác:
groupadd asterisk
useradd -r -d /var/lib/asterisk -g asterisk asterisk
usermod -aG audio,dialout asterisk
chown -R asterisk.asterisk /etc/asterisk
chown -R asterisk.asterisk /var/{lib,log,spool}/asterisk
chown -R asterisk.asterisk /usr/lib64/asterisk
Đặt người dùng mặc định Asterisk:
sudo sed -i 's|;AST_USER="asterisk"|AST_USER="asterisk"|' /etc/sysconfig/asterisk
sudo sed -i 's|;AST_GROUP="asterisk"|AST_GROUP="asterisk"|' /etc/sysconfig/asterisk
sudo sed -i 's|;runuser = asterisk|runuser = asterisk|' /etc/asterisk/asterisk.conf
sudo sed -i 's|;rungroup = asterisk|rungroup = asterisk|' /etc/asterisk/asterisk.conf
Khởi động và enable tự khởi động cho dịch vụ Asterisk.
systemctl restart asterisk
systemctl enable asterisk
Kiểm tra xem bạn có thể kết nối với Asterisk CLI không:
sudo asterisk -rvvNếu output như dưới là bạn đã cài đặt thành công.
$ sudo asterisk -rvv
Asterisk 16.10.0, Copyright (C) 1999 - 2018, Digium, Inc. and others.
Created by Mark Spencer <markster@digium.com>
Asterisk comes with ABSOLUTELY NO WARRANTY; type 'core show warranty' for details.
This is free software, with components licensed under the GNU General Public
License version 2 and other licenses; you are welcome to redistribute it under
certain conditions. Type 'core show license' for details.
=========================================================================
Running as user 'asterisk'
Running under group 'asterisk'
Connected to Asterisk 16.10.0 currently running on ubuntu20 (pid = 88786)
ubuntu-01*CLI> core  show channels
Channel              Location             State   Application(Data)
0 active channels
0 active calls
0 calls processed
ubuntu-01*CLI> exit
Asterisk cleanly ending (0).
Executing last minute cleanups
Như vậy là mình đã hướng dẫn xong cài đặt Asterisk 16 trên Ubuntu, chúc các bạn thành công.
