Zabbix là một phần mềm mã nguồn mã có chức năng giám sát được sử dụng để thu thập các số liệu từ các thiết bị và hệ thống khác nhau như thiết bị mạng, hệ thống VM, hệ thống Linux/Windows và dịch vụ đám mây. Zabbix có thể gửi thông báo thông báo về các vấn đề trong bất kỳ hệ thống được giám sát nào. Baif viết này mình sẽ ướng dẫn chi tiết cách cài đặt Zabbix trên Ubuntu 18.04 và 20.04 giúp giám sát dịch vụ hệ thống với nhiều tính năng độc đáo và khả năng tùy biến cao.
1. Đặt hostname.
sudo hostnamectl set-hostname zabbix-server2. Update hệ thống.
sudo apt update -y
sudo apt upgrade -y
3. Tải và cài đặt repo zabbix.
# Tải xuống gói zabbix-release từ kho lưu trữ Zabbix
sudo wget https://repo.zabbix.com/zabbix/6.0/ubuntu/pool/main/z/zabbix-release/zabbix-release_6.0-1+ubuntu$(lsb_release -rs)_all.deb

# Cài đặt gói zabbix-release
sudo dpkg -i zabbix-release_6.0-1+ubuntu$(lsb_release -rs)_all.deb

# Lệnh này cập nhật danh sách gói phần mềm
sudo apt update -y
4. Khởi động lại Server.
init 65. Cài đặt Zabbix server và các gói liên quan.
sudo apt -y install zabbix-server-mysql zabbix-frontend-php zabbix-apache-conf zabbix-sql-scripts zabbix-agentCác gói zabbix-server-mysql, zabbix-frontend-php, zabbix-apache-conf, zabbix-sql-scripts, và zabbix-agent là các gói cài đặt cho phần mềm giám sát hệ thống Zabbix. Các gói này cung cấp các chức năng khác nhau của Zabbix và là cần thiết để cài đặt và cấu hình Zabbix trên hệ thống của bạn như sau:
zabbix-server-mysql: Đây là gói cài đặt cho Zabbix Server sử dụng MySQL làm cơ sở dữ liệu. Gói này cung cấp chức năng quản lý, giám sát và báo cáo các hoạt động trên mạng và máy chủ của bạn.zabbix-frontend-php: Đây là gói cài đặt cho giao diện web của Zabbix. Gói này cung cấp cho bạn một giao diện web để quản lý và giám sát các hoạt động trên mạng và máy chủ của bạn.zabbix-apache-conf: Đây là gói cài đặt cho cấu hình máy chủ web Apache để chạy giao diện web Zabbix. Gói này cung cấp các file cấu hình Apache cần thiết để chạy giao diện web Zabbix.zabbix-sql-scripts: Đây là gói cài đặt các file lệnh SQL cho Zabbix Server để tạo và quản lý cơ sở dữ liệu Zabbix.zabbix-agent: Đây là gói cài đặt cho Zabbix Agent, một tiến trình chạy trên máy chủ được giám sát để thu thập dữ liệu về tình trạng hệ thống và chuyển tải về Zabbix Server để giám sát và báo cáo.
6. Setup repo cho Database.
# Để sử dụng các tính năng quản lý kho lưu trữ phần mềm của hệ điều hành
sudo apt install software-properties-common -y

# Sử dụng công cụ curl để tải về file mariadb_repo_setup
sudo curl -LsS -O https://downloads.mariadb.com/MariaDB/mariadb_repo_setup

# Để cấu hình kho lưu trữ MariaDB và cài đặt phiên bản MariaDB Server 10.6
sudo bash mariadb_repo_setup --mariadb-server-version=10.6

#Lệnh này cập nhật danh sách gói phần mềm
sudo apt update -y  && sudo apt upgrade  -y
7. Cài đặt Database cho Zabbix server.
sudo apt -y install mariadb-common mariadb-server-10.6 mariadb-client-10.6 Lệnh sudo apt -y install mariadb-common mariadb-server-10.6 mariadb-client-10.6 được sử dụng để cài đặt các gói phần mềm cần thiết để cài đặt và sử dụng MariaDB Server 10.6 trên hệ thống.
Cụ thể, các gói phần mềm được cài đặt là:
mariadb-common: Gói này cung cấp các file và thông tin cấu hình chung cho MariaDB Server và các ứng dụng khác liên quan đến MariaDB.mariadb-server-10.6: Gói này cài đặt MariaDB Server 10.6, cung cấp cơ sở dữ liệu MariaDB và các công cụ quản lý dữ liệu.mariadb-client-10.6: Gói này cung cấp các công cụ dòng lệnh để kết nối và quản lý cơ sở dữ liệu MariaDB Server.
8. Enable và khởi động MariaDB.
sudo systemctl start mariadb && sudo systemctl enable mariadb9. Thiết lập bảo mật cho MariaDB bằng cách dùng command mysql_secure_installation hoặc bạn có thể bỏ qua bước này và thiết lập ở bước 9.1
root@zabbix-server:~# sudo mysql_secure_installation

NOTE: RUNNING ALL PARTS OF THIS SCRIPT IS RECOMMENDED FOR ALL MariaDB
      SERVERS IN PRODUCTION USE!  PLEASE READ EACH STEP CAREFULLY!

In order to log into MariaDB to secure it, we'll need the current
password for the root user. If you've just installed MariaDB, and
haven't set the root password yet, you should just press enter here.

Enter current password for root (enter for none):
OK, successfully used password, moving on...

Setting the root password or using the unix_socket ensures that nobody
can log into the MariaDB root user without the proper authorisation.

You already have your root account protected, so you can safely answer 'n'.

Switch to unix_socket authentication [Y/n] y
Enabled successfully!
Reloading privilege tables..
 ... Success!


You already have your root account protected, so you can safely answer 'n'.

Change the root password? [Y/n] y
New password:
Re-enter new password:
Password updated successfully!
Reloading privilege tables..
 ... Success!


By default, a MariaDB installation has an anonymous user, allowing anyone
to log into MariaDB without having to have a user account created for
them.  This is intended only for testing, and to make the installation
go a bit smoother.  You should remove them before moving into a
production environment.

Remove anonymous users? [Y/n] y
 ... Success!

Normally, root should only be allowed to connect from 'localhost'.  This
ensures that someone cannot guess at the root password from the network.

Disallow root login remotely? [Y/n] n
 ... Success!

By default, MariaDB comes with a database named 'test' that anyone can
access.  This is also intended only for testing, and should be removed
before moving into a production environment.

Remove test database and access to it? [Y/n] y
 - Dropping test database...
 ... Success!
 - Removing privileges on test database...
 ... Success!

Reloading the privilege tables will ensure that all changes made so far
will take effect immediately.

Reload privilege tables now? [Y/n] y
 ... Success!

Cleaning up...

All done!  If you've completed all of the above steps, your MariaDB
installation should now be secure.

Thanks for using MariaDB!
10. Thiết lập MariaDB.
10.1. Thiết lập mật khẩu root.
Nếu bạn bỏ qua bước 8 thì mặc định khi mới cài MariaDB sẽ không có mật khẩu, bạn login vào db bằng command mysql -u root -p và nhớ bấm enter để bỏ qua bước nhập mật khẩu. Nếu login thành công sẽ xuất hiện màn hình như dưới
root@zabbix-server:~# mysql -u root -p
Enter password:
Welcome to the MariaDB monitor.  Commands end with ; or \g.
Your MariaDB connection id is 41
Server version: 10.6.10-MariaDB-1:10.6.10+maria~ubu1804 mariadb.org binary distribution

Copyright (c) 2000, 2018, Oracle, MariaDB Corporation Ab and others.

Type 'help;' or '\h' for help. Type '\c' to clear the current input statement.

MariaDB [(none)]>
Sử dụng command dưới để đặt mật khẩu root với Hoanghd90 là mật khẩu.
ALTER USER 'root'@'localhost' IDENTIFIED BY 'Hoanghd90';10.2. Tạo Zabbix Database và phân quyền cho nó (với tên database là zabbixdb).
create database zabbixdb character set utf8mb4 collate utf8mb4_bin;
grant all privileges on zabbixdb.* to zabbix@localhost identified by 'Hoanghd90';
FLUSH PRIVILEGES;
exit;
11. Import database.
sudo zcat /usr/share/doc/zabbix-sql-scripts/mysql/server.sql.gz | mysql -u root -pHoanghd90 zabbixdb12. Thiết lập cấu hình cho Zabbix server bằng cách vào file /etc/zabbix/zabbix_server.conf sau đó thay đổi các thông tin sau dưới. Lưu ý là do server lab nên mình dùng user root luôn, trong mô hình thực tế các bạn tạo user riêng để nâng cao bảo mật nhé.
DBUser=zabbix
DBName=zabbixdb
DBPassword=Hoanghd90
13. Config firewall.
Các bạn có thể stop firewall bằng lệnh systemctl disable ufw && systemctl stop ufw để đơn giản cho việc cấu hình hoặc nếu các bạn muốn config firewall luôn thì có thể thêm các rule sau (lưu ý chỉ áp dụng cho ufw).
ufw allow 10050/tcp
ufw allow 10051/tcp
ufw allow 80/tcp
ufw reload
14. Khởi động lại các dịch vụ.
sudo systemctl restart zabbix-server zabbix-agent
sudo systemctl enable zabbix-server zabbix-agent
14. Thiết lập timezone mở file /etc/zabbix/apache.conf, bỏ comment và thay thế timezone sang vùng Việt Nam.
php_value date.timezone Asia/Ho_Chi_MinhSau khi thay đổi nó sẽ có định dạng như vậy
    <IfModule mod_php7.c>
        php_value max_execution_time 300
        php_value memory_limit 128M
        php_value post_max_size 16M
        php_value upload_max_filesize 2M
        php_value max_input_time 300
        php_value max_input_vars 10000
        php_value always_populate_raw_post_data -1
        php_value date.timezone Asia/Ho_Chi_Minh
    </IfModule>
Enable và khởi động lại apache.
sudo systemctl restart apache2
sudo systemctl enable apache2
15. Các bạn có thể cài thêm snmp để phục vụ cho việc viết các script monitor sau này.
sudo apt-get install snmp -y16. Config zabbix webinterface.
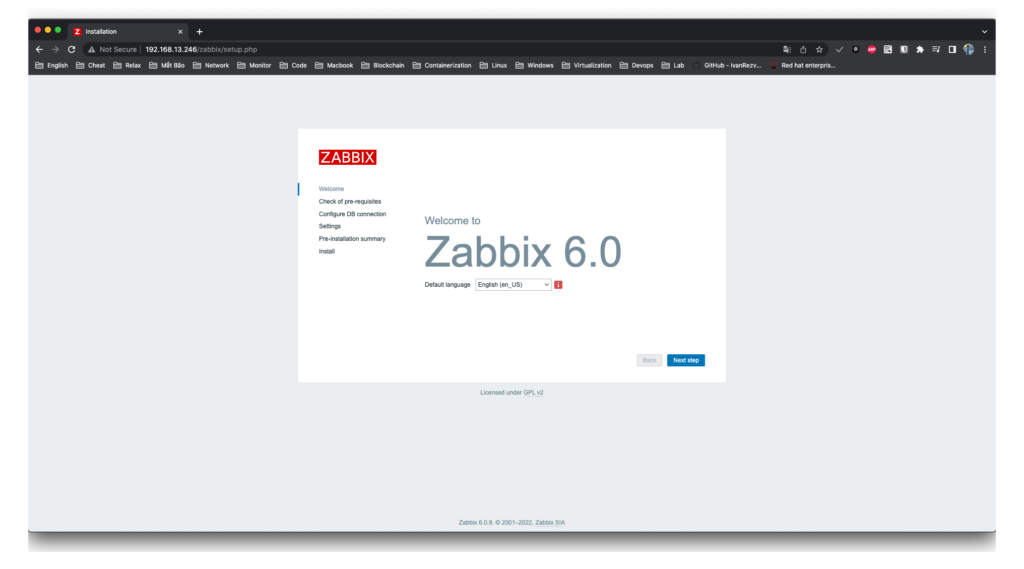
Dùng trình duyệt login vào url: http://ip-zabbix-server/zabbix -> next step
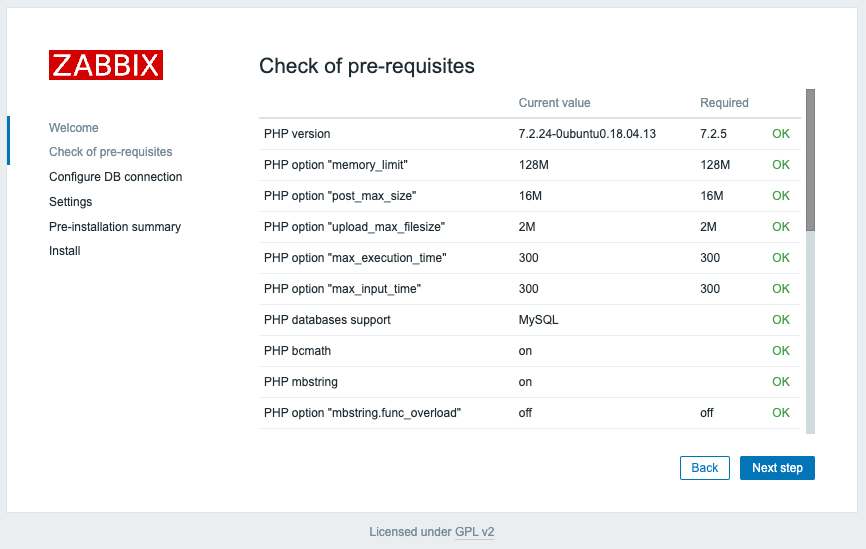
Nếu mọi thứ đều ổn thì sẽ có các tích xanh như dưới, bấm next step.
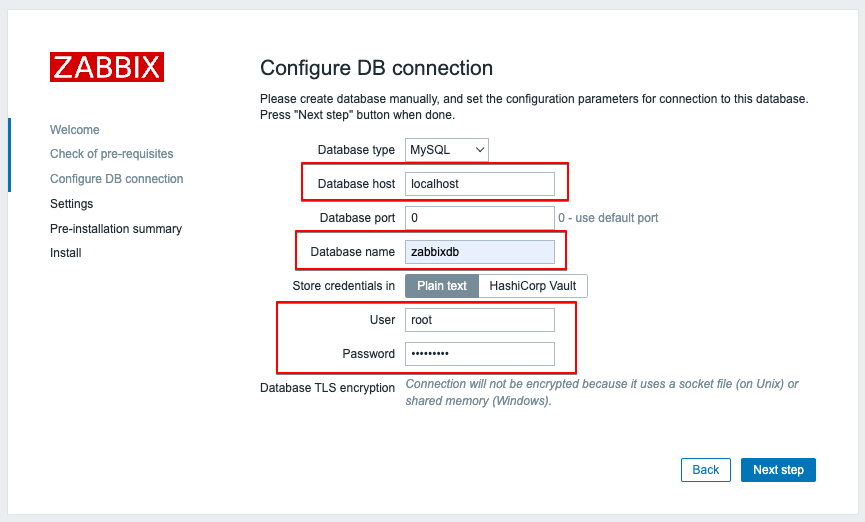
Điền các thông số phù đã thiết lập ở trên vào cho phù hợp, cần lưu ý các vùng khoanh đỏ sau đó bấm vào next step.
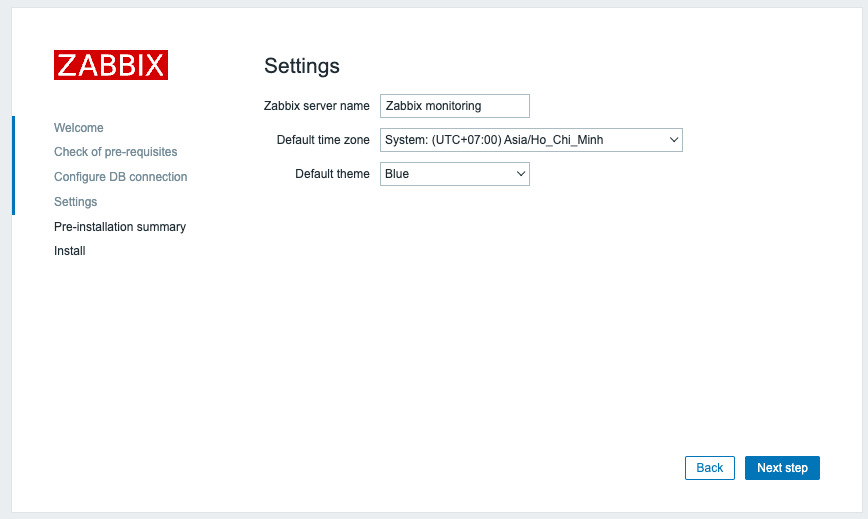
Đặt tên cho Zabbix server name và bấm next step.
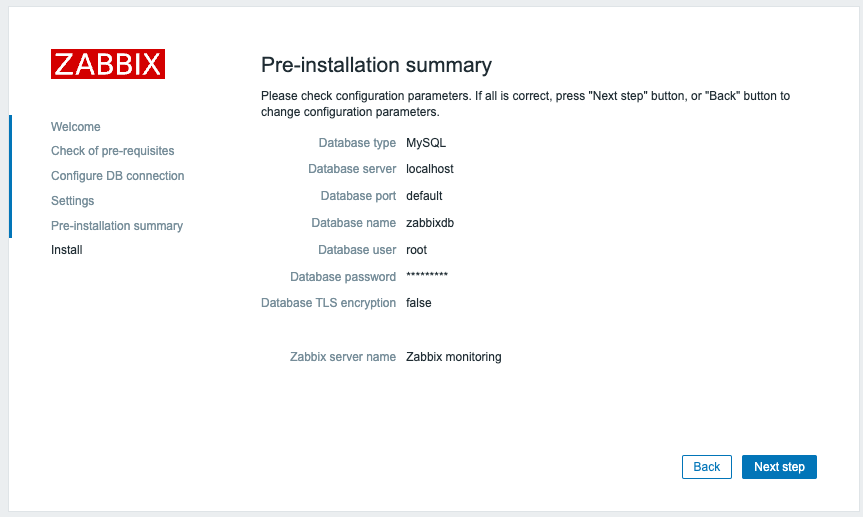
Nhìn lại bảng tóm tắt các thông tin, nếu không có gì thay đổi, bấm next step.
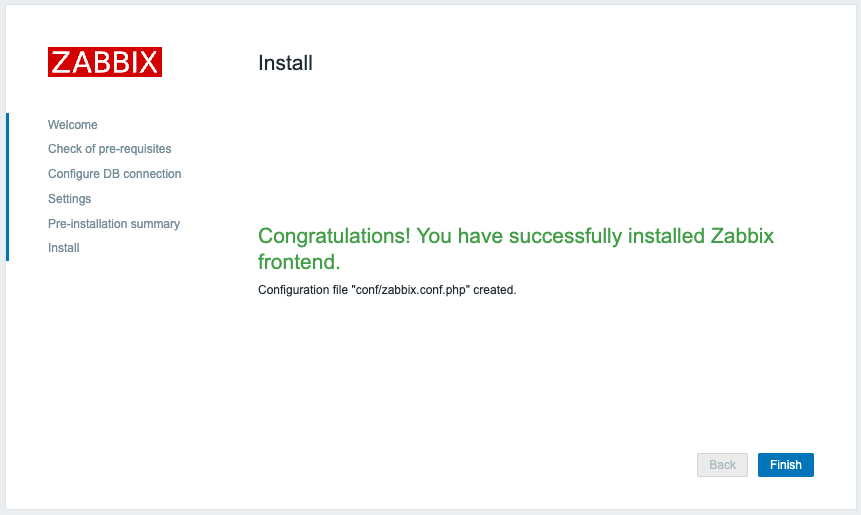
Bảng thông báo quá trình cài đặt thành công.
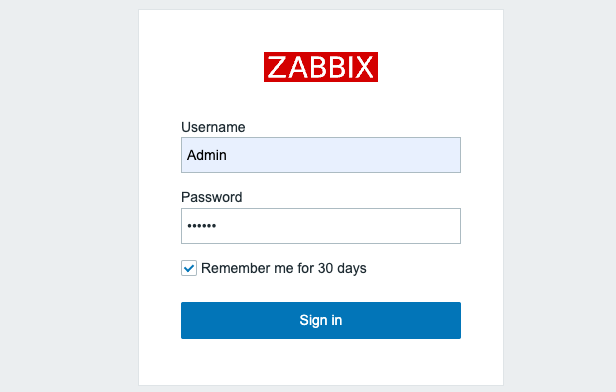
Login vào với thông tin là username là Admin và mật khẩu là zabbix nhé.
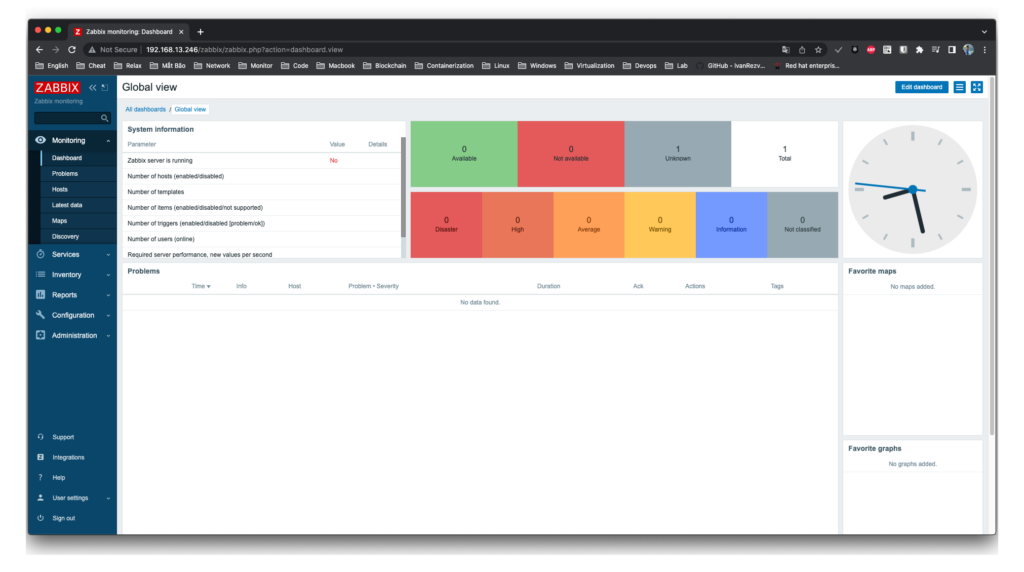
Và đây là thành quả.
Chúc các bạn thành công.
