Tiếp theo là phần cài đặt ứng dụng bằng bash script, hôm nay mình giới thiệu cách tự động hóa cài đặt Gitlab nhé. Việc của bạn chỉ cần thay đổi ipaddr của gitlab server và nếu port ssh của bạn khác 22 thì thay thế nó vào biến sshport là được.
#!/bin/bash
ipaddr='192.168.13.231'
sshport=''

if [[ $sshport == '' ]];then sshport=22;fi

port_random(){
cmd="netstat -plnt | awk '{print \$4}' | cut -d':' -f2 | grep -Eo '[0-9]{1,4}'"
listen_port=$(ssh -p $sshport -o StrictHostKeychecking=no root@$ipaddr "$cmd")
port_random=$(shuf -i 1000-9999 -n 1)
while [[ $(echo $listen_port | grep -c $port_random) == 1 ]]
  do
    port_random=$(shuf -i 8080-9090 -n 1)
  done
}

gitlab_install(){
port_random && gitlab_install="""sudo apt update -y
# Install GitLab dependencies below:
sudo apt install -y ca-certificates curl openssh-server tzdata
curl -sS https://packages.gitlab.com/install/repositories/gitlab/gitlab-ce/script.deb.sh | sudo bash

# The repository contents are added to
cat /etc/apt/sources.list.d/gitlab_gitlab-ce.list

# Once the repository has been added, install GitLab CE on Ubuntu 22.04|20.04|18.04 using the apt package manager command
sudo apt update -y
sudo apt install gitlab-ce -y

# Edit the GitLab configuration file to set hostname and other parameters
sudo sed -i 's|external_url .*|external_url '\'http://$ipaddr:$port_random\''|' /etc/gitlab/gitlab.rb

sudo sed -i 's|listen.*|listen *:$port_random|' /var/opt/gitlab/nginx/conf/gitlab-http.conf # gitlab-ctl restart
# When done, start your GitLab instance by running the following command
sudo gitlab-ctl reconfigure
sudo gitlab-ctl status

# A password for root user is randomly generated and stored for 24 hours
cat /etc/gitlab/initial_root_password"""

if [[ $(ssh -p $sshport -o StrictHostKeychecking=no root@$ipaddr "grep -w gitlab /opt/gitlab/version-manifest.txt") == '' ]]
  then
    ssh -p $sshport -o StrictHostKeychecking=no root@$ipaddr "$gitlab_install"
    root_passwd=$(ssh -p $sshport -o StrictHostKeychecking=no root@$ipaddr "cat /etc/gitlab/initial_root_password")
    echo -e "Domain: http://$ipaddr:$port_random"
else
    echo 'Gitlab already exist.'
fi
}
gitlab_install
Sau khi script chạy xong bạn sẽ thấy thông báo như dưới.
# WARNING: This value is valid only in the following conditions
#          1. If provided manually (either via `GITLAB_ROOT_PASSWORD` environment variable or via `gitlab_rails['initial_root_password']` setting in `gitlab.rb`, it was provided before database was seeded for the first time (usually, the first reconfigure run).
#          2. Password hasn't been changed manually, either via UI or via command line.
#
#          If the password shown here doesn't work, you must reset the admin password following https://docs.gitlab.com/ee/security/reset_user_password.html#reset-your-root-password.

Password: G7oyXQhS2Ey1HzpdcjUMDaT2lvBSR0FgMIIOXr5/3jg=

# NOTE: This file will be automatically deleted in the first reconfigure run after 24 hours.
Domain: http://192.168.13.231:9540
Dùng trình duyệt web login theo thông tin http://192.168.13.231:9540 và mật khẩu root là G7oyXQhS2Ey1HzpdcjUMDaT2lvBSR0FgMIIOXr5/3jg=, hưởng thụ thôi nào.

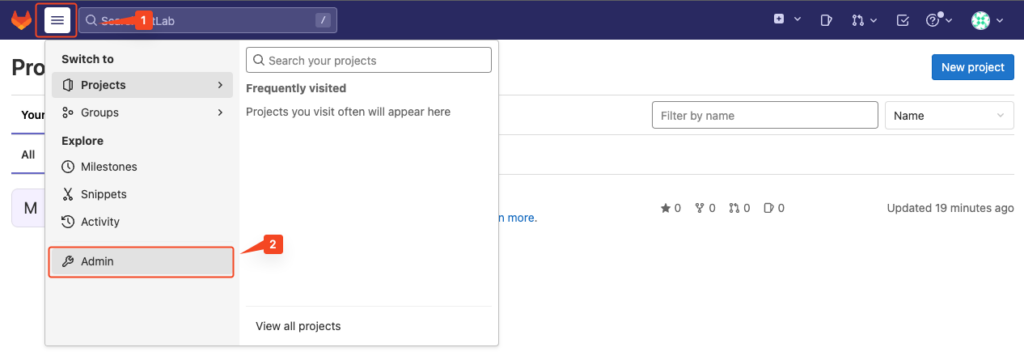
Để thay đổi mật khẩu root mặc định, hãy vào admin và làm theo các bước dưới

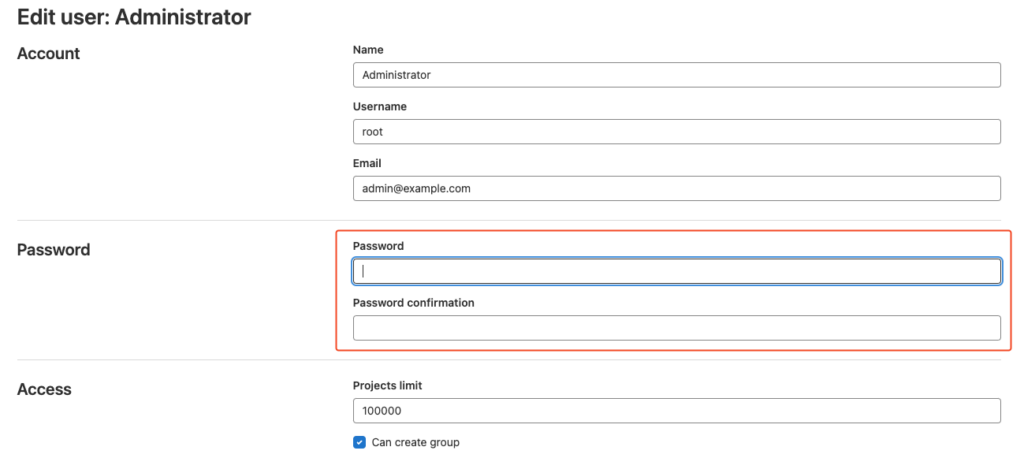
Chọn user cần thay đổi mật khẩu

Gõ mật khẩu mới và xác nhận lại mật khẩu ở ô dưới sau đó bấm lưu lại

Chúc các bạn thành công.
