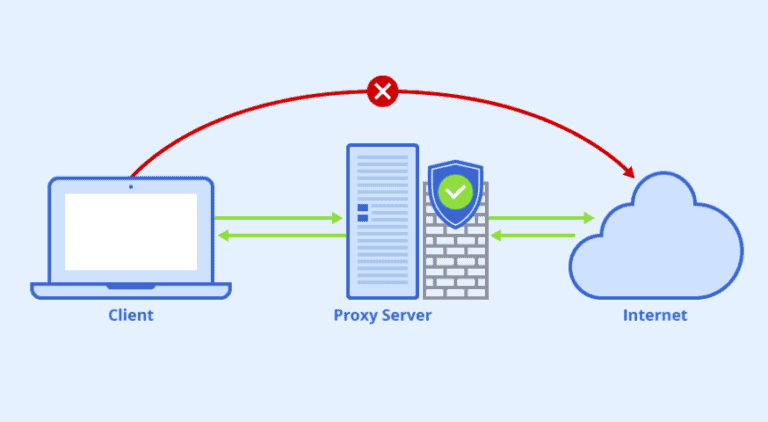
Squid là một proxy với đầy đủ các chức năng, hỗ trợ các giao thức mạng phổ biến như HTTP, HTTPS, FTP và nhiều hơn. Nó có thể dùng để cải thiện hiệu năng của máy chủ bằng việc tạo bộ nhớ đệm cho các requests lặp đi lặp lại, lọc web traffic và truy cập các thông tin bị giới hạn theo vị trí địa lí. Trong bài này mình sẽ hướng dẫn cách thiết lập Squid Proxy trên Ubuntu 20.04 và cấu hình Firefox và Chrome để sử dụng nó. Có khá nhiều phần mềm có vai trò là Proxy Server, tuy nhiên, với Linux, chắc chắn sẽ không thể không nhắc tới một lão làng về Proxy, đó chính là Squid. Về ưu điểm, Squid Proxy Server trong hệ thống mạng giúp chúng ta 3 vấn đề:
- Tăng cường bảo mật.
- Giúp tiết kiệm băng thông cho hệ thống
- Tăng tốc độ truy cập nhờ tính năng cache.
Dưới đây là một vài vấn đề chúng ta sẽ cần phải chú ý khi triển khai Squid Server:
- Ổ cứng: Đây là vấn đề cần lưu ý hàng đầu: do Squid sẽ thường xuyên đọc ghi lên ổ cứng. Do đó, nếu có khả năng và rủng rỉnh về tài chính, bạn nên trang bị ổ cứng SSD, ổ cứng server giao tiếp iSCSI hoặc chí ít cũng là dòng Enterprise nếu dùng chuẩn SATA.
- RAM: yếu tố quan trọng thứ 2. Thực ra thì, càng nhiều RAM càng tốt !
- Dung lượng ổ cứng: Theo đánh giá chung, 2GB sẽ có thể đáp ứng cho một mạng khoảng 100 máy. Tuy nhiên cần lưu ý, con số này chỉ là tương đối, do nhu cầu sử dụng mạng mới là yếu tố chủ chốt quyết định vấn đề này.
- CPU: là yếu tô cuối cùng, do nó thực sự không quan trọng, Squid không chiếm nhiều CPU của bạn. Ít thôi !!!
Cài đặt Squid với Ubuntu.
Package Squid đã có sẵn trong repositories mặc định của Ubuntu 20.04. Để cài đặt bạn chỉ cần gõ hai câu lệnh sau:
sudo apt update
sudo apt install squid -y
Sau khi cài đặt xong thì services của squid sẽ tự động khởi chạy. Để kiểm tra trạng thái của squid bạn sử dụng câu lệnh
$ sudo systemctl status squid
● squid.service - LSB: Squid HTTP Proxy version 3.x
   Loaded: loaded (/etc/init.d/squid; generated)
   Active: active (running) since Mon 2022-12-26 15:38:57 +07; 3h 34min ago
     Docs: man:systemd-sysv-generator(8)
  Process: 127836 ExecStop=/etc/init.d/squid stop (code=exited, status=0/SUCCESS)
  Process: 23234 ExecReload=/etc/init.d/squid reload (code=exited, status=0/SUCCESS)
  Process: 128020 ExecStart=/etc/init.d/squid start (code=exited, status=0/SUCCESS)
    Tasks: 5 (limit: 19140)
   CGroup: /system.slice/squid.service
           ├─ 23251 (logfile-daemon) /var/log/squid/access.log
           ├─ 23252 (pinger)
           ├─ 23403 (basic_ncsa_auth) /etc/squid/.htpasswd
           ├─128076 /usr/sbin/squid -YC -f /etc/squid/squid.conf
           └─128079 (squid-1) -YC -f /etc/squid/squid.conf
Cấu hình squid.
File cấu hình chính của squid được lưu tại file /etc/squid/squid.conf. File cấu hình này chứa các comments mô tả mỗi cấu hình sẽ thực hiện những hành động nào. Trước khi thay đổi bất cứ điều gì, bạn nên sao lưu lại file cấu hình mẫu:
sudo cp /etc/squid/squid.conf /etc/squid/squid.conf.orginalTiến hành mở file /etc/squid/squid.conf và xoá toàn bộ những gì có trong đó và thay thế bằng nội dung ngắn gọn như dưới, mình sẽ giải thích từng thành phần ở phần tiếp theo.
Ở phần config này mình triển khai 2 user1 và user2 với user1 sẽ đi gmail và user2 sẽ đi các website liên quan đến vng, các website không được khai báo sẽ bị chặn.
acl SSL_ports port 443
acl Safe_ports port 80		# http
acl Safe_ports port 21		# ftp
acl Safe_ports port 443		# https
acl Safe_ports port 70		# gopher
acl Safe_ports port 210		# wais
acl Safe_ports port 1025-65535	# unregistered ports
acl Safe_ports port 280		# http-mgmt
acl Safe_ports port 488		# gss-http
acl Safe_ports port 591		# filemaker
acl Safe_ports port 777		# multiling http
acl CONNECT method CONNECT

auth_param basic program /usr/lib/squid/basic_ncsa_auth /etc/squid/htpasswd
auth_param basic children 5
auth_param basic realm Squid Basic Authentication
auth_param basic credentialsttl 5 hours

acl allow_gmail_url dstdomain "/etc/squid/allow_gmail.txt"
acl allow_vng_url dstdomain "/etc/squid/allow_vng.txt"

acl access_gmail_user proxy_auth user1
acl access_vng_user proxy_auth user2
acl gmail_allowed_ips src "/etc/squid/gmail_allowed_ips.txt"
acl gmail_allowed_mac arp "/etc/squid/gmail_allowed_mac.txt"

http_access allow gmail_allowed_ips gmail_allowed_mac access_gmail_user allow_gmail_url
http_access allow gmail_allowed_ips gmail_allowed_mac access_vng_user allow_vng_url

http_access deny !Safe_ports
http_access deny CONNECT !SSL_ports
http_access allow localhost manager
http_access deny manager
http_access allow localhost
http_access deny all

http_port 3048
forwarded_for off
request_header_access Allow allow all
request_header_access Authorization allow all
request_header_access WWW-Authenticate allow all
request_header_access Proxy-Authorization allow all
request_header_access Proxy-Authenticate allow all
request_header_access Cache-Control allow all
request_header_access Content-Encoding allow all
request_header_access Content-Length allow all
request_header_access Content-Type allow all
request_header_access Date allow all
request_header_access Expires allow all
request_header_access Host allow all
request_header_access If-Modified-Since allow all
request_header_access Last-Modified allow all
request_header_access Location allow all
request_header_access Pragma allow all
request_header_access Accept allow all
request_header_access Accept-Charset allow all
request_header_access Accept-Encoding allow all
request_header_access Accept-Language allow all
request_header_access Content-Language allow all
request_header_access Mime-Version allow all
request_header_access Retry-After allow all
request_header_access Title allow all
request_header_access Connection allow all
request_header_access Proxy-Connection allow all
request_header_access User-Agent allow all
request_header_access Cookie allow all
request_header_access All deny all

refresh_pattern ^ftp:		1440	20%	10080
refresh_pattern ^gopher:	1440	0%	1440
refresh_pattern -i (/cgi-bin/|\?) 0	0%	0
refresh_pattern (Release|Packages(.gz)*)$      0       20%     2880
refresh_pattern .		0	20%	4320
coredump_dir /var/spool/squid
Thông tin file allow_gmail.txt
cat > /etc/squid/allow_gmail.txt << 'OEF'
.ngoctham.com
.gmail.com
.google.com
.lh3.googleusercontent.com
.csp.withgoogle.com
.googletagmanager.com
.google-analytics.com
.fonts.googleapis.com
.gstatic.com
.google.com.vn
.ngocthamjewelry.org
OEF
Thông tin file allow_vng.txt
cat > /etc/squid/allow_vng.txt << 'OEF'
.zing.vn
.zingnews.vn
OEF
Với thông số http_port 3128 thì mặc định squid sẽ lắng nghe ở cổng 3128 ở tất cả các network interfaces trong server. Nếu bạn muốn đổi port cho một interface cụ thể, bạn sẽ tìm dòng bắt đầu bằng http_port và chỉ định IP của interface và port mới. Nếu không có interface nào được chỉ định thì Squid sẽ lắng nghe ở tất cả các interfaces.
# Squid normally listens to port 3128
http_port IP_ADDR:PORT
Phần lớn người dùng thường chạy Squid ở tất cả các interfaces với port mặc định, Squid cho phép bạn kiểm soát clients truy cập các tài nguyên web sử dụng Access Control Lists (ACLs). Mặc định thì quyền truy cập mặc định là chỉ từ localhost. Nếu tất cả clients mà sử dụng proxy này đều có một địa chỉ IP tĩnh, thì tuỳ chọn đơn giản nhất để kiểm soát truy cập vào proxy server là tạo ra một ACL trong đó có những IP được cho phép. Ngoài ra bạn có thể yêu cầu xác thực khi sử dụng squid. Thay vì thêm các địa chỉ IP vào trong file cấu hình chính, tạo một file riêng lưu trữ các địa chỉ IPs được yêu cầu. Chẳng hạn như files /etc/squid/allowed_ips.txt với nội dung như ở dưới.
cat > /etc/squid/gmail_allowed_ips.txt << 'OEF'
192.168.12.5
192.168.12.6
OEF
Nếu bạn sử dụng mac address để filter thì sử dụng file này.
cat > /etc/squid/gmail_allowed_mac.txt << 'OEF'
00:0C:29:60:76:FA
00:0F:29:61:76:FD
OEF
Sau khi hoàn thành, mở file cấu hình và tạo một ACL mới có tên là allowed_ips và cho phép truy cập vào ACL sử dụng chỉ thị http_access. Thứ tự các dòng của rules http_access thực sự quan trọng. Bạn lưu ý hãy thêm dòng này trước dòng http_access deny all. Chỉ thị http_access hoạt động như một rules của tường lửa. Squid đọc các rules từ cao xuống thấp, và khi một rule được kích hoạt thành công thì rules ở dưới sẽ không được thực hiện. Sau khi bạn thay đổi file cấu hình, bạn hãy khởi động lại Squid Service để thay đổi có hiệu lực.
sudo systemctl restart squidXác thực trong Squid.
Nếu việc giới hạn truy cập dựa trên IP không phù hợp cho trường hợp của bạn, bạn có thể dùng squild sử dụng một back-end để xác thực người dùng. Squid hỗ trợ Samba, LDAP và HTTP basic auth. Trong hướng dẫn này mình sẽ sử dụng basic auth. Nó là một phương pháp xác thực đơn giản sử dụng giao thức HTTP. Để làm như vậy, trước tiên hãy cài đặt gói apache2-utils bằng lệnh sau:
apt-get install apache2-utils -yTiếp theo, tạo một file để lưu trữ người dùng và mật khẩu Squid:
touch /etc/squid/htpasswdĐể tạo người dùng và mật khẩu mới, sử dụng cú pháp dưới.
htpasswd /etc/squid/htpasswd <username>Ví dụ
$ htpasswd  /etc/squid/htpasswd hoanghd
New password:
Re-type new password:
Adding password for user hoanghd
Đây là đoạn config xác thực người dùng, để ý tại phần acl password proxy_auth REQUIRED với password bạn có thể tự định danh theo ý mình thích và trỏ tên định danh đó vào http_access allow password để sử dụng.
auth_param basic program /usr/lib/squid/basic_ncsa_auth /etc/squid/htpasswd
auth_param basic children 5
auth_param basic realm Squid Basic Authentication
auth_param basic credentialsttl 5 hours
acl password proxy_auth REQUIRED
http_access allow password
Mình lấy ví dụ ở đoạn config trên của mình.
- Ở đoạn này mình sẽ đọc thông tin người dùng đã được tạo ở bước trên nằm trong file /etc/squid/htpasswd.
- Tạo 2 file chứa thông tin url /etc/squid/allow_gmail.txt và /etc/squid/allow_vng.txt với file allow_gmail.txt mình định danh acl cho nó là allow_gmail_url và file /etc/squid/allow_vng.txt mình định danh cho nó là allow_vng_url.
- Mình đã tạo 2 user1 và user2, với user1 mình sẽ cho nó quyền truy cập vào access_gmail_user và user2 mình cho nó quyền truy cập vào allow_vng_url
- Phần tiếp mình sẽ viết 1 access list để định danh cho file /etc/squid/gmail_allowed_ips.txt là gmail_allowed_ips và file /etc/squid/gmail_allowed_mac.txt là gmail_allowed_ips. Phần này bạn có thể sử filter dựa vào mac address hoặc ip address hoặc cả 2.
- Phần tiếp bạn hãy viết các hàm http_access allow để gán quyền cho các thành phần như ở dưới.
- Phần cuối cùng hãy chú ý, thành phần http_access deny all bạn phải để cuối cùng để vì nếu bạn để ở trên thì mặc định Squid đọc từ trên xuống dưới và khi gặp rule này nó sẽ deny toàn bộ.
auth_param basic program /usr/lib/squid/basic_ncsa_auth /etc/squid/htpasswd
auth_param basic children 5
auth_param basic realm Squid Basic Authentication
auth_param basic credentialsttl 5 hours

acl allow_gmail_url dstdomain "/etc/squid/allow_gmail.txt"
acl allow_vng_url dstdomain "/etc/squid/allow_vng.txt"

acl access_gmail_user proxy_auth user1
acl access_vng_user proxy_auth user2
acl gmail_allowed_ips src "/etc/squid/gmail_allowed_ips.txt"
acl gmail_allowed_mac arp "/etc/squid/gmail_allowed_mac.txt"

http_access allow gmail_allowed_ips gmail_allowed_mac access_gmail_user allow_gmail_url
http_access allow gmail_allowed_ips gmail_allowed_mac access_vng_user allow_vng_url

http_access deny !Safe_ports
http_access deny CONNECT !SSL_ports
http_access allow localhost manager
http_access deny manager
http_access allow localhost
http_access deny all
Kiểm tra.
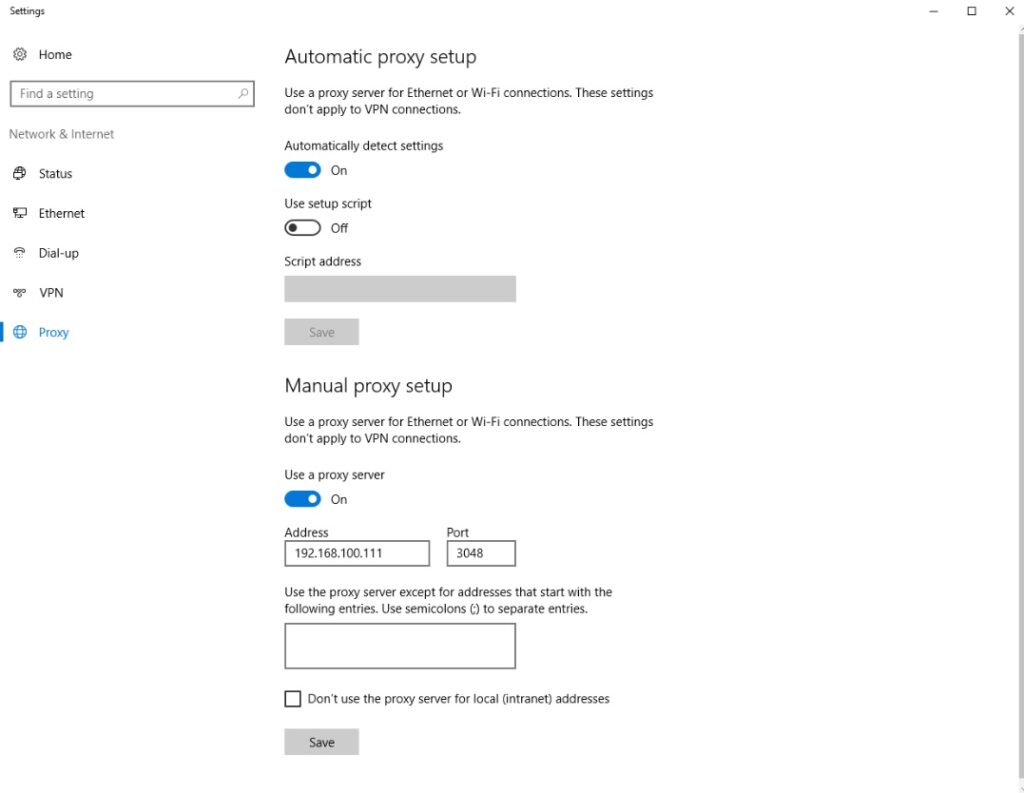
Sử dụng một máy tính bất kỳ có kết nối tới Squid Server và vào config proxy cho trình duyệt như dưới.

Trỏ thông tin của Squid Server là 192.168.100.111 và port là 3048, sau đó bấm lưu lại.
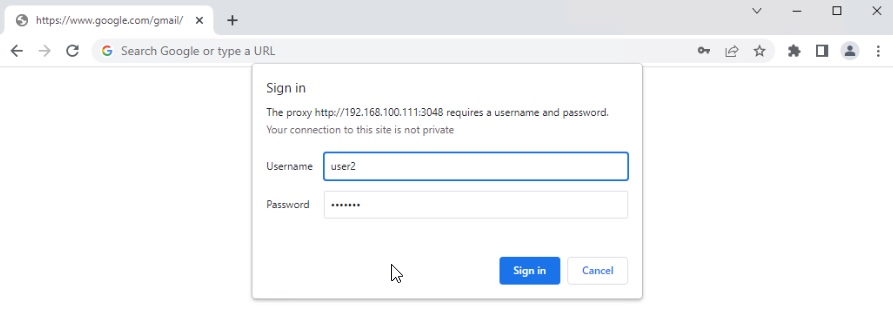
Sử dụng trình duyệt và login vào user1.

Kết quả khi login vào user1 bạn sẽ truy cập được gmail nhưng các website khác bạn sẽ bị chặn.
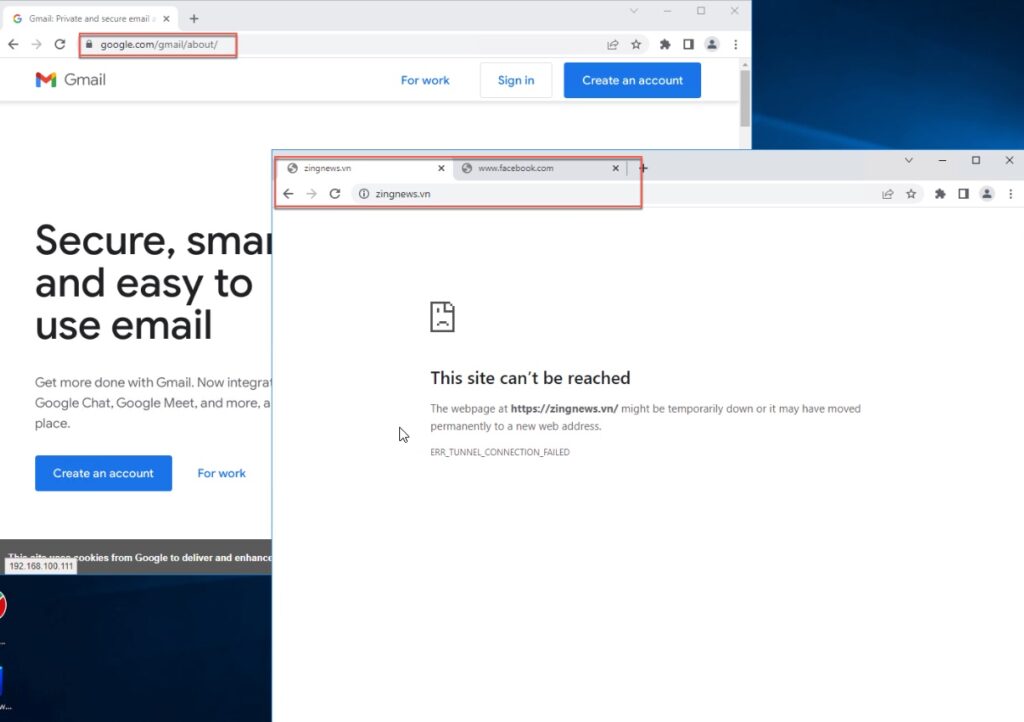
Hãy thoát trình duyệt và mở lại trình duyệt, tiến hành login vào user2.
Kết quả bạn sẽ bị chặn tất cả và chỉ đi được mỗi trang zing, để thấy được hình các bạn tiếp tục mở tất cả các url liên quan đến việc load trang của zing nhé.

Chúc các bạn thành công.
