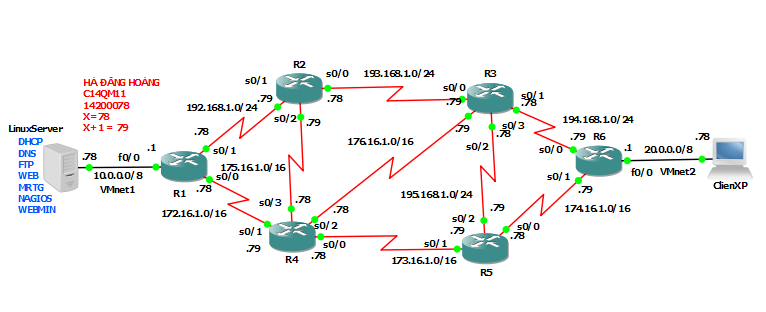
I – NỘI DUNG VÀ YÊU CẦU BÀI LAB.
2 – Yêu cầu.
* Phần Cisco.
- Thiết lập mô hình mạng theo mô hình trên, đặt mật khẩu, web, telnet, smmp trên các Router.
- Các router liên kết bằng công nghệ MPLS, định tuyến bằng giao thức OSPF.
- Cấu hình VPN (site-to-site) để kết nối R1 & R6.
* Phần Linux.
- Xây dựng dịch vụ DHCP, DNS, WEB và FILE, MRTG, NAGOS, WEBMIN trên máy chủ Linux.
- Sử dụng WEBMIN để quản lý các dịch vụ trên Server.
- Dùng NAGIOS, MRTG để quản lý hệ thống.
A. PHẦN CISCO.
Router 1.
R1#configure terminal
R1(config)#interface fastEthernet 0/0
R1(config-if)#no shutdown
R1(config-if)#ip address 10.0.0.1 255.0.0.0
R1(config-if)#exit
R1(config)#interface serial 0/0
R1(config-if)#no shutdown
R1(config-if)#ip address 172.16.1.78 255.255.0.0
R1(config-if)#exit
R1(config)#interface serial 0/1
R1(config-if)#no shutdown
R1(config-if)#ip address 192.168.1.78 255.255.255.0
R1(config-if)#end
R1#write
Router 2.
R2#configure terminal
R2(config)#interface serial 0/0
R2(config-if)#no shutdown
R2(config-if)#ip address 193.168.1.78 255.255.255.0
R2(config-if)#exit
R2(config)#interface serial 0/1
R2(config-if)#no shutdown
R2(config-if)#ip address 192.168.1.79 255.255.255.0
R2(config-if)#exit
R2(config)#interface serial 0/2
R2(config-if)#no shutdown
R2(config-if)#ip address 175.16.1.79 255.255.0.0
R2(config-if)#end
R2#write
Router 3.
R3#configure terminal
R3(config)#interface serial 0/0
R3(config-if)#no shutdown
R3(config-if)#ip address 193.168.1.79 255.255.255.0
R3(config-if)#exit
R3(config)#interface serial 0/1
R3(config-if)#no shutdown
R3(config-if)#ip address 194.168.1.78 255.255.255.0
R3(config-if)#exit
R3(config)#interface serial 0/2
R3(config-if)#no shutdown
R3(config-if)#ip address 176.16.1.79 255.255.0.0
R3(config-if)#exit
R3(config)#interface serial 0/3
R3(config-if)#no shutdown
R3(config-if)#ip address 195.168.1.78 255.255.255.0
R3(config-if)#end
Router 4.
R4#configure terminal
R4(config)#interface serial 0/0
R4(config-if)#no shutdown
R4(config-if)#ip address 173.16.1.78 255.255.0.0
R4(config-if)#exit
R4(config)#interface serial 0/1
R4(config-if)#no shutdown
R4(config-if)#ip address 172.16.1.79 255.255.0.0
R4(config-if)#exit
R4(config)#interface serial 0/2
R4(config-if)#no shutdown
R4(config-if)#ip address 176.16.1.78 255.255.0.0
R4(config-if)#exit
R4(config)#interface serial 0/3
R4(config-if)#no shutdown
R4(config-if)#ip address 175.16.1.78 255.255.0.0
R4(config-if)#end
R4#write
Router 5.
R5#configure terminal
R5(config)#interface serial 0/0
R5(config-if)#no shutdown
R5(config-if)#ip address 174.16.1.78 255.255.0.0
R5(config-if)#exit
R5(config)#interface serial 0/1
R5(config-if)#no shutdown
R5(config-if)#ip address 173.16.1.79 255.255.0.0
R5(config-if)#exit
R5(config)#interface serial 0/2
R5(config-if)#no shutdown
R5(config-if)#ip address 195.168.1.79 255.255.255.0
R5(config-if)#end
R5#write
Router 6.
R6#configure terminal
R6(config)#interface fastEthernet 0/0
R6(config-if)#no shutdown
R6(config-if)#ip address 20.0.0.1 255.0.0.0
R6(config-if)#exit
R6(config)#interface serial 0/0
R6(config-if)#no shutdown
R6(config-if)#ip address 194.168.1.79 255.255.255.0
R6(config-if)#exit
R6(config)#interface serial 0/1
R6(config-if)#no shutdown
R6(config-if)#ip address 174.16.1.79 255.255.0.0
R6(config-if)#end
R6#write
2. Cấu hình định tuyến OSPF cho các Router.
Router 1.
R1#configure terminal
R1(config)#router ospf 78
R1(config-router)#network 10.0.0.0 0.255.255.255 area 78
R1(config-router)#network 172.16.1.0 0.0.255.255 area 78
R1(config-router)#network 192.168.1.0 0.0.0.255 area 78
R1(config-router)#end
R1#write
Router 2.
R2#configure terminal
R2(config)#router ospf 78
R2(config-router)#network 192.168.1.0 0.0.0.255 area 78
R2(config-router)#network 193.168.1.0 0.0.0.255 area 78
R2(config-router)#network 175.16.1.0 0.0.255.255 area 78
R2(config-router)#end
R2#write
Router 3.
R3#configure terminal
R3(config)#router ospf 78
R3(config-router)#net
R3(config-router)#network 193.168.1.0 0.0.0.255 area 78
R3(config-router)#network 194.168.1.0 0.0.0.255 area 78
R3(config-router)#network 195.168.1.0 0.0.0.255 area 78
R3(config-router)#network 176.16.1.0 0.0.255.255 area 78
R3(config-router)#end
R3#write
Router 4.
R4#configure terminal
R4(config)#router ospf 78
R4(config-router)#network 172.16.1.0 0.0.255.255 area 78
R4(config-router)#network 175.16.1.0 0.0.255.255 area 78
R4(config-router)#network 173.16.1.0 0.0.255.255 area 78
R4(config-router)#network 176.16.1.0 0.0.255.255 area 78
R4(config-router)#end
R4#write
Router 5.
R5#configure terminal
R5(config)#router ospf 78
R5(config-router)#network 195.168.1.0 0.0.0.255 area 78
R5(config-router)#network 173.16.1.0 0.0.255.255 area 78
R5(config-router)#network 174.16.1.0 0.0.255.255 area 78
R5(config-router)#end
R5#write
Router 6.
R6#configure terminal
R6(config)#router ospf 78
R6(config-router)#network 20.0.0.0 0.255.255.255 area 78
R6(config-router)#network 194.168.1.0 0.0.0.255 area 78
R6(config-router)#network 174.16.1.0 0.0.255.255 area 78
R6(config-router)#end
R6#write
3. Cấu hình Telnet cho tất cả các Router.
Router#configure terminal
Router(config)#enable password 123
Router(config)#line vty 0 4
Router(config-line)#password 123
Router(config-line)#login
Router(config-router)#end
Router#write
Note: Áp dụng cho tất cả các Router.
4. Cấu hình HTTP, SNMP trên các Router.
+ HTTP Server.
Router(config)#ip http server
Router(config)#end
Router#write
Note: Áp dụng cho tất cả các Router.
+ Cấu hình SNMP
Router(config)#snmp-server community public RO
Router(config)#snmp-server community private RW
Router(config)#end
Router#write
Note: Áp dụng cho tất cả các Router.
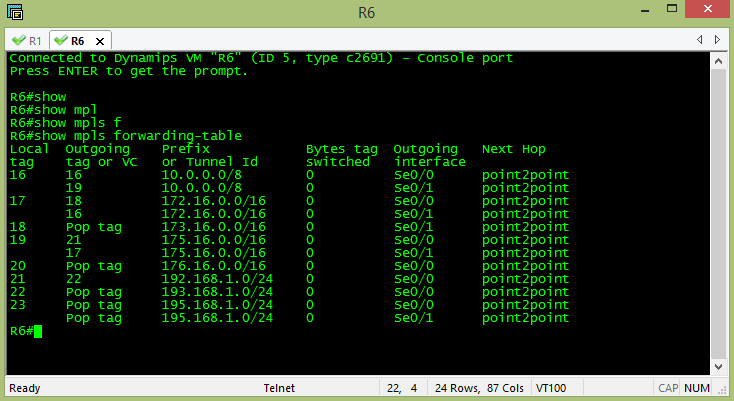
5. Cấu hình giao thức MPLS trên từng Router, bạn gõ các lệnh sau vào từng Router.
Router(config)#ip cef
Router(config)#tag-switching advertise-tags
Router(config)#tag-switching ip
Sau khi gõ các lệnh xong cho Router, ta vào từng cổng đang trạng thái UP của Router đó và gõ tag-switching ip
Note: Áp dụng cho tất cả các Router.
* Ví dụ cho Router 1.
Dùng lệnh show ip interface brief để kiểm tra cổng nào đang UP.
Nhìn trên bảng ta thấy R1 có Serial0/0, Serial0/1 và FastEthernet0/0 đang trạng thái UP như vậy ta sẽ gõ:
R1(config)#interface serial 0/0
R1(config-if)#tag-switching ip
R1(config-if)#exit
R1(config)#interface serial 0/1
R1(config-if)#tag-switching ip
R1(config-if)#exit
R1(config)#interface fastEthernet 0/0
R1(config-if)#tag-switching ip
R1(config-if)#end
R1#write
Note: Áp dụng cho tất cả các Router.
6. Cấu hình VPN site to site cho R1 và R6 (ở đây mình sẽ làm dây ở trên của R1 và R6).
Router 1.
R1(config)#crypto isakmp policy 9
R1(config-isakmp)#hash md5
R1(config-isakmp)#authentication pre-share
R1(config-isakmp)#exit
R1(config)#crypto isakmp key 6 HADANGHOANG address 194.168.1.79
R1(config)#crypto ipsec security-association lifetime seconds 86400
R1(config)#crypto ipsec transform-set C14QM11 esp-3des esp-md5-hmac
R1(cfg-crypto-trans)#exit
R1(config)#crypto map HADANGHOANG 10 ipsec-isakmp
R1(config-crypto-map)#set peer 194.168.1.79
R1(config-crypto-map)#set transform-set C14QM11
R1(config-crypto-map)#match address 100
R1(config-crypto-map)#exit
R1(config)#access-list 100 permit ip 192.168.1.0 0.0.0.255 194.168.1.0 0.0.0.255
R1(config)#interface serial 0/1
R1(config-if)#crypto map HADANGHOANG
R1(config-if)#end
Router 6.
R6(config)#crypto isakmp policy 9
R6(config-isakmp)#hash md5
R6(config-isakmp)#authentication pre-share
R6(config-isakmp)#exit
R6(config)#crypto isakmp key 6 HADANGHOANG address 192.168.1.78
R6(config)#crypto ipsec security-association lifetime seconds 86400
R6(config)#crypto ipsec transform-set C14QM11 esp-3des esp-md5-hmac
R6(cfg-crypto-trans)#exit
R6(config)#crypto map HADANGHOANG 10 ipsec-isakmp
R6(config-crypto-map)#set peer 192.168.1.78
R6(config-crypto-map)#set transform-set C14QM11
R6(config-crypto-map)#match address 100
R6(config-crypto-map)#exit
R6(config)#access-list 100 permit ip 194.168.1.0 0.0.0.255 192.168.1.0 0.0.0.255
R6(config)#interface serial 0/0
R6(config-if)#crypto map HADANGHOANG
R6(config-if)#end
7. Show kết quả cho phần cisco.
7.1. Telnet.
Telnet từ R1 tới R6.
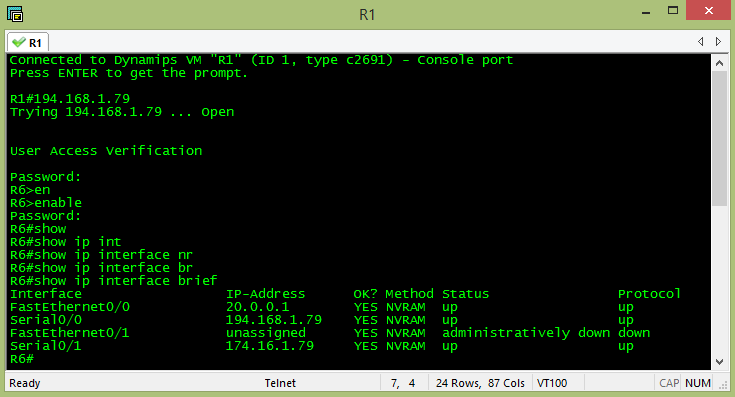
Note: Áp dụng cho tất cả các Router muốn telnet
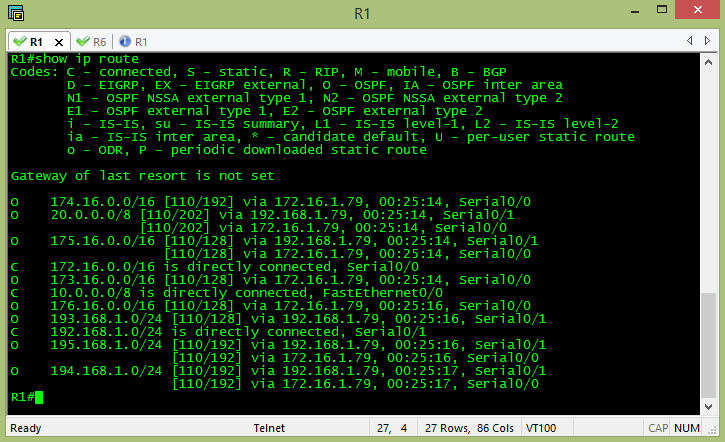
Router 1
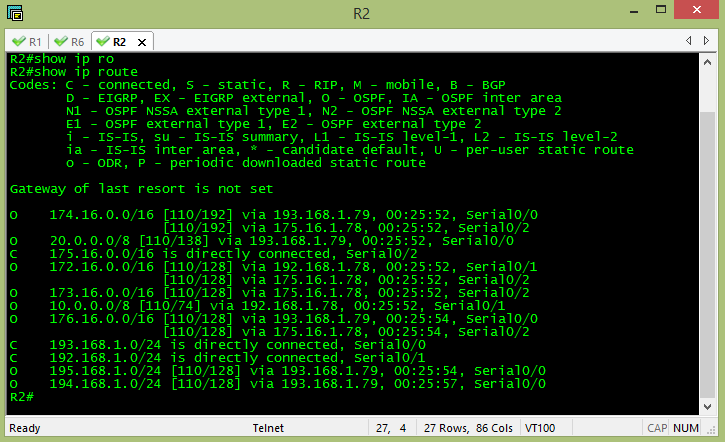
Router 2
Router 3
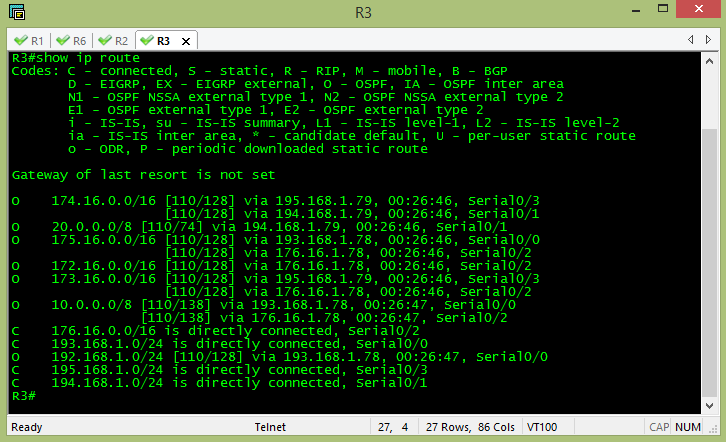
Router 4
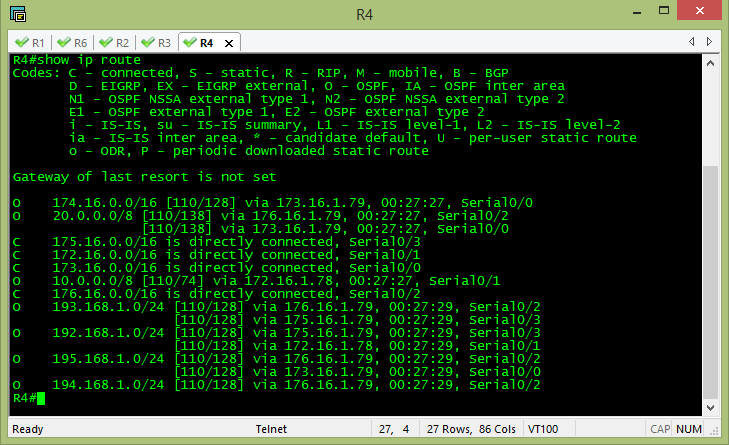
Router 5

Router 6
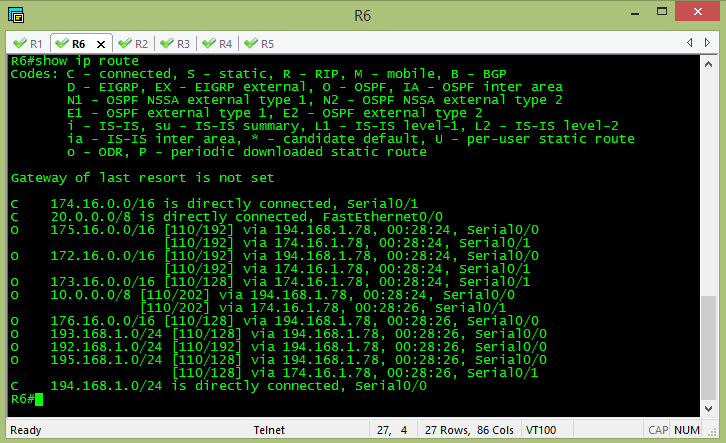
Router 1

Router 6
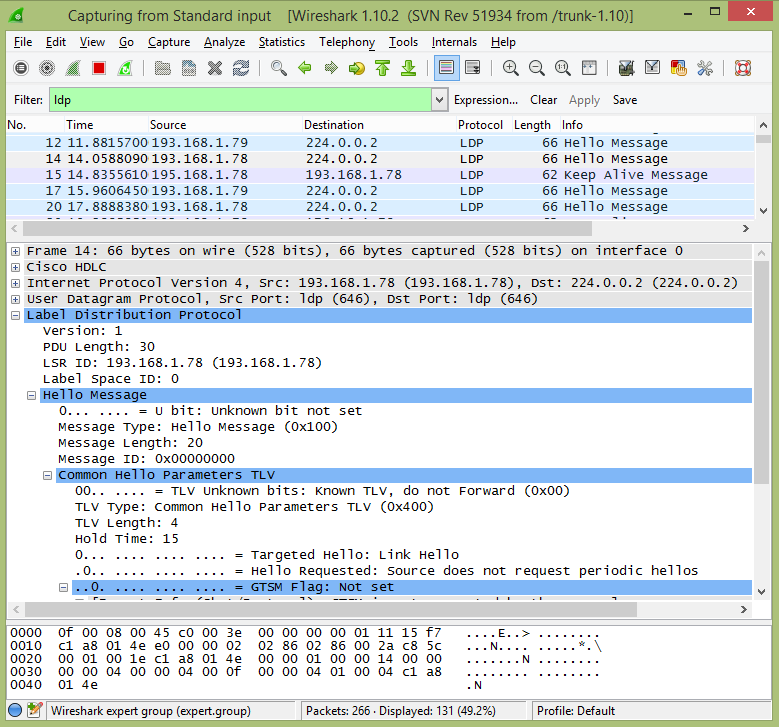
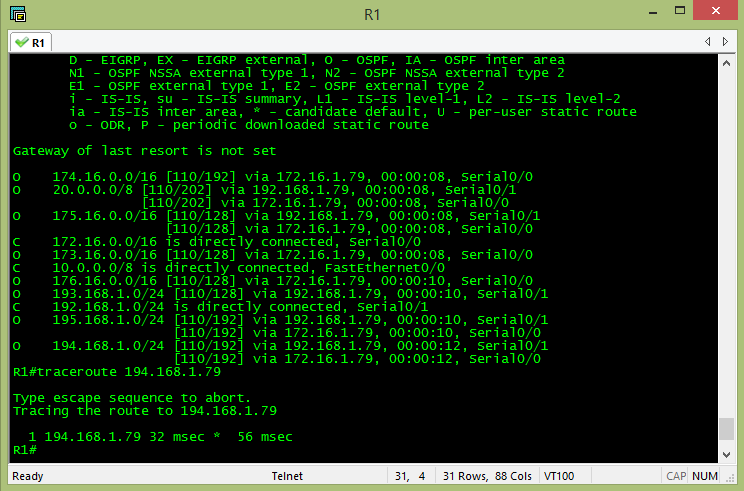
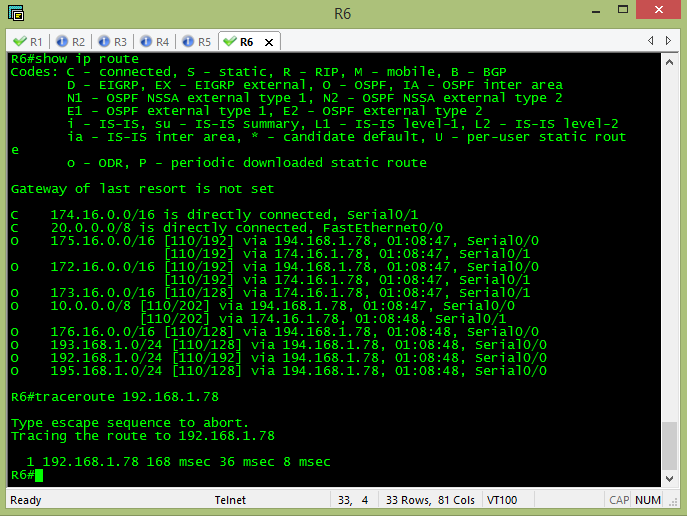
Tất cả các Router đều được kết nối với nhau bằng giao thức OSPF, khi ta traceroute nếu kết quả hiện như sau là bạn đã cấu hình đúng.
Traceroute Router 1 -> Router 6
Traceroute Router 6 -> Router 1
8. Show file cấu hình các Router
Router 1.
version 12.4
service timestamps debug datetime msec
service timestamps log datetime msec
no service password-encryption
!
hostname R1
!
boot-start-marker
boot-end-marker
!
enable password 123
!
no aaa new-model
memory-size iomem 5
no ip icmp rate-limit unreachable
ip cef
!
!
!
!
no ip domain lookup
!
!
!
!
!
!
!
!
!
!
!
!
!
!
!
!
!
!
!
ip tcp synwait-time 5
!
!
crypto isakmp policy 9
hash md5
authentication pre-share
crypto isakmp key 6 HADANGHOANG78 address 194.168.1.79
!
crypto ipsec security-association lifetime seconds 86400
!
crypto ipsec transform-set C14QM11 esp-3des esp-md5-hmac
!
crypto map HADANGHOANG 10 ipsec-isakmp
set peer 194.168.1.79
set transform-set C14QM11
match address 100
!
!
!
!
interface FastEthernet0/0
ip address dhcp
duplex auto
speed auto
mpls ip
!
interface Serial0/0
ip address 172.16.1.78 255.255.0.0
mpls ip
clock rate 2000000
!
interface FastEthernet0/1
no ip address
shutdown
duplex auto
speed auto
!
interface Serial0/1
ip address 192.168.1.78 255.255.255.0
mpls ip
clock rate 2000000
crypto map HADANGHOANG
!
!
router ospf 78
log-adjacency-changes
network 10.0.0.0 0.255.255.255 area 78
network 172.16.0.0 0.0.255.255 area 78
network 192.168.1.0 0.0.0.255 area 78
!
ip forward-protocol nd
!
!
ip http server
no ip http secure-server
!
access-list 100 permit ip 192.168.1.0 0.0.0.255 194.168.1.0 0.0.0.255
snmp-server community public RO
snmp-server community private RW
!
!
!
!
control-plane
!
!
!
!
!
!
!
!
!
!
line con 0
exec-timeout 0 0
privilege level 15
logging synchronous
line aux 0
exec-timeout 0 0
privilege level 15
logging synchronous
line vty 0 4
password 123
login
!
!
endversion 12.4
service timestamps debug datetime msec
service timestamps log datetime msec
no service password-encryption
!
hostname R2
!
boot-start-marker
boot-end-marker
!
enable password 123
!
no aaa new-model
memory-size iomem 5
no ip icmp rate-limit unreachable
ip cef
!
!
!
!
no ip domain lookup
!
!
!
!
!
!
!
!
!
!
!
!
!
!
!
!
!
!
!
ip tcp synwait-time 5
!
!
!
!
!
interface FastEthernet0/0
no ip address
shutdown
duplex auto
speed auto
!
interface Serial0/0
ip address 193.168.1.78 255.255.255.0
mpls ip
clock rate 2000000
!
interface FastEthernet0/1
no ip address
shutdown
duplex auto
speed auto
!
interface Serial0/1
ip address 192.168.1.79 255.255.255.0
mpls ip
clock rate 2000000
!
interface Serial0/2
ip address 175.16.1.79 255.255.0.0
mpls ip
clock rate 2000000
!
interface Serial0/3
no ip address
shutdown
clock rate 2000000
!
!
router ospf 78
log-adjacency-changes
network 175.16.0.0 0.0.255.255 area 78
network 192.168.1.0 0.0.0.255 area 78
network 193.168.1.0 0.0.0.255 area 78
!
ip forward-protocol nd
!
!
ip http server
no ip http secure-server
!
snmp-server community public RO
snmp-server community private RW
!
!
!
!
control-plane
!
!
!
!
!
!
!
!
!
!
line con 0
exec-timeout 0 0
privilege level 15
logging synchronous
line aux 0
exec-timeout 0 0
privilege level 15
logging synchronous
line vty 0 4
password 123
login
!
!
endRouter 3.
version 12.4
service timestamps debug datetime msec
service timestamps log datetime msec
no service password-encryption
!
hostname R3
!
boot-start-marker
boot-end-marker
!
enable password 123
!
no aaa new-model
memory-size iomem 5
no ip icmp rate-limit unreachable
ip cef
!
!
!
!
no ip domain lookup
!
!
!
!
!
!
!
!
!
!
!
!
!
!
!
!
!
!
!
ip tcp synwait-time 5
!
!
!
!
!
interface FastEthernet0/0
no ip address
shutdown
duplex auto
speed auto
!
interface Serial0/0
ip address 193.168.1.79 255.255.255.0
mpls ip
clock rate 2000000
!
interface FastEthernet0/1
no ip address
shutdown
duplex auto
speed auto
!
interface Serial0/1
ip address 194.168.1.78 255.255.255.0
mpls ip
clock rate 2000000
!
interface Serial0/2
ip address 176.16.1.79 255.255.0.0
mpls ip
clock rate 2000000
!
interface Serial0/3
ip address 195.168.1.78 255.255.255.0
mpls ip
clock rate 2000000
!
!
router ospf 78
log-adjacency-changes
network 176.16.0.0 0.0.255.255 area 78
network 193.168.1.0 0.0.0.255 area 78
network 194.168.1.0 0.0.0.255 area 78
network 195.168.1.0 0.0.0.255 area 78
!
ip forward-protocol nd
!
!
ip http server
no ip http secure-server
!
snmp-server community public RO
snmp-server community private RW
!
!
!
!
control-plane
!
!
!
!
!
!
!
!
!
!
line con 0
exec-timeout 0 0
privilege level 15
logging synchronous
line aux 0
exec-timeout 0 0
privilege level 15
logging synchronous
line vty 0 4
password 123
login
!
!
endversion 12.4
service timestamps debug datetime msec
service timestamps log datetime msec
no service password-encryption
!
hostname R4
!
boot-start-marker
boot-end-marker
!
enable password 123
!
no aaa new-model
memory-size iomem 5
no ip icmp rate-limit unreachable
ip cef
!
!
!
!
no ip domain lookup
!
!
!
!
!
!
!
!
!
!
!
!
!
!
!
!
!
!
!
ip tcp synwait-time 5
!
!
!
!
!
interface FastEthernet0/0
no ip address
shutdown
duplex auto
speed auto
!
interface Serial0/0
ip address 173.16.1.78 255.255.0.0
mpls ip
clock rate 2000000
!
interface FastEthernet0/1
no ip address
shutdown
duplex auto
speed auto
!
interface Serial0/1
ip address 172.16.1.79 255.255.0.0
mpls ip
clock rate 2000000
!
interface Serial0/2
ip address 176.16.1.78 255.255.0.0
mpls ip
clock rate 2000000
!
interface Serial0/3
ip address 175.16.1.78 255.255.0.0
mpls ip
clock rate 2000000
!
!
router ospf 78
log-adjacency-changes
network 172.16.0.0 0.0.255.255 area 78
network 173.16.0.0 0.0.255.255 area 78
network 175.16.0.0 0.0.255.255 area 78
network 176.16.0.0 0.0.255.255 area 78
!
ip forward-protocol nd
!
!
ip http server
no ip http secure-server
!
snmp-server community public RO
snmp-server community private RW
!
!
!
!
control-plane
!
!
!
!
!
!
!
!
!
!
line con 0
exec-timeout 0 0
privilege level 15
logging synchronous
line aux 0
exec-timeout 0 0
privilege level 15
logging synchronous
line vty 0 4
password 123
login
!
!
endRouter 5.
version 12.4
service timestamps debug datetime msec
service timestamps log datetime msec
no service password-encryption
!
hostname R5
!
boot-start-marker
boot-end-marker
!
enable password 123
!
no aaa new-model
memory-size iomem 5
no ip icmp rate-limit unreachable
ip cef
!
!
!
!
no ip domain lookup
!
!
!
!
!
!
!
!
!
!
!
!
!
!
!
!
!
!
!
ip tcp synwait-time 5
!
!
!
!
!
interface FastEthernet0/0
no ip address
shutdown
duplex auto
speed auto
!
interface Serial0/0
ip address 174.16.1.78 255.255.0.0
mpls ip
clock rate 2000000
!
interface FastEthernet0/1
no ip address
shutdown
duplex auto
speed auto
!
interface Serial0/1
ip address 173.16.1.79 255.255.0.0
mpls ip
clock rate 2000000
!
interface Serial0/2
ip address 195.168.1.79 255.255.255.0
mpls ip
clock rate 2000000
!
interface Serial0/3
no ip address
shutdown
clock rate 2000000
!
!
router ospf 78
log-adjacency-changes
network 173.16.0.0 0.0.255.255 area 78
network 174.16.0.0 0.0.255.255 area 78
network 195.168.1.0 0.0.0.255 area 78
!
ip forward-protocol nd
!
!
ip http server
no ip http secure-server
!
snmp-server community public RO
snmp-server community private RW
!
!
!
!
control-plane
!
!
!
!
!
!
!
!
!
!
line con 0
exec-timeout 0 0
privilege level 15
logging synchronous
line aux 0
exec-timeout 0 0
privilege level 15
logging synchronous
line vty 0 4
password 123
login
!
!
end
Router 6.
version 12.4
service timestamps debug datetime msec
service timestamps log datetime msec
no service password-encryption
!
hostname R6
!
boot-start-marker
boot-end-marker
!
enable password 123
!
no aaa new-model
memory-size iomem 5
no ip icmp rate-limit unreachable
ip cef
!
!
!
!
no ip domain lookup
!
!
!
!
!
!
!
!
!
!
!
!
!
!
!
!
!
!
!
ip tcp synwait-time 5
!
!
crypto isakmp policy 9
hash md5
authentication pre-share
crypto isakmp key 6 HADANGHOANG78 address 192.168.1.78
!
crypto ipsec security-association lifetime seconds 86400
!
crypto ipsec transform-set C14QM11 esp-3des esp-md5-hmac
!
crypto map HADANGHOANG 10 ipsec-isakmp
set peer 192.168.1.78
set transform-set C14QM11
match address 100
!
!
!
!
interface FastEthernet0/0
ip address 20.0.0.1 255.0.0.0
duplex auto
speed auto
mpls ip
!
interface Serial0/0
ip address 194.168.1.79 255.255.255.0
mpls ip
clock rate 2000000
crypto map HADANGHOANG
!
interface FastEthernet0/1
no ip address
shutdown
duplex auto
speed auto
!
interface Serial0/1
ip address 174.16.1.79 255.255.0.0
mpls ip
clock rate 2000000
!
!
router ospf 78
log-adjacency-changes
network 20.0.0.0 0.255.255.255 area 78
network 174.16.0.0 0.0.255.255 area 78
network 194.168.1.0 0.0.0.255 area 78
!
ip forward-protocol nd
!
!
ip http server
no ip http secure-server
!
access-list 100 permit ip 194.168.1.0 0.0.0.255 192.168.1.0 0.0.0.255
!
!
!
!
control-plane
!
!
!
!
!
!
!
!
!
!
line con 0
exec-timeout 0 0
privilege level 15
logging synchronous
line aux 0
exec-timeout 0 0
privilege level 15
logging synchronous
line vty 0 4
password 123
login
!
!
end
B. PHẦN LINUX
1. Trước khi cấu hình, ta sửa lại một số thông tin cho máy chủ Linux.
* Kiểm tra các card mạng có trong máy chủ.
[root@hadanghoang Desktop]# ifconfig
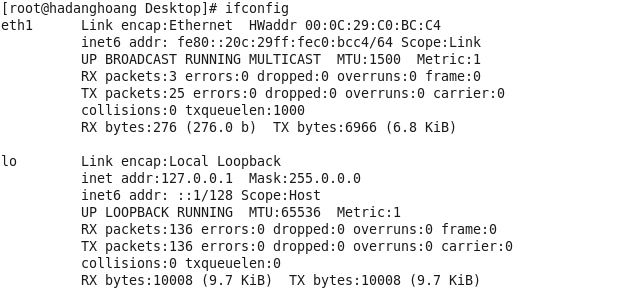
Nhìn hình ta thấy có 2 card mạng eth1 và lo (loopback) trong máy chủ.
* Chỉnh sửa IP cho card mạng eth1
[root@hadanghoang Desktop]# vi /etc/sysconfig/network-scripts/ifcfg-eth1Chỉnh sửa lại eth1 như sau (màu đỏ là nơi bạn cần chỉnh sửa).
DEVICE=eth1
HWADDR=00:0C:29:C0:BC:C4
TYPE=Ethernet
UUID=c1539085-73d7-4455-ac82-88f26464458a
ONBOOT=yes
NM_CONTROLLED=yes
BOOTPROTO=none
IPADDR=10.0.0.78
NETMASK=255.0.0.0
GATEWAY=10.0.0.1
DNS1=10.0.0.78
IPV6INIT=no
USERCTL=no
Note: Để ý chỉ sửa các dòng được tô màu đỏ.
[root@hadanghoang Desktop]# service network restart
* Kiểm tra lại IP cho eth1, ta thấy đã có IP tĩnh cho eth1 là 10.0.0.78/8
[root@hadanghoang Desktop]# ifconfig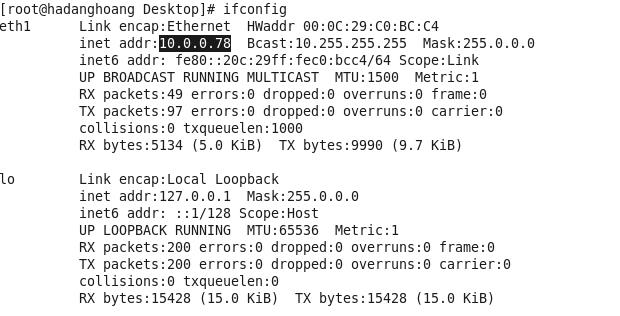
* Sửa lại hostname cho máy
[root@hadanghoang Desktop]# vi /etc/sysconfig/network
NETWORKING=yes
HOSTNAME=hadanghoang.com
Note: Để ý chỉ sửa các dòng được tô màu đỏ.
2.1. DHCP Server.
Kiểm tra kết nối mạng để tiến hành cài đặt các gói tin cần thiết từ internet
[root@hadanghoang Desktop]# ping 8.8.8.8
* Tiến hành cài đặt.
[root@hadanghoang Desktop]# yum -y install dhcp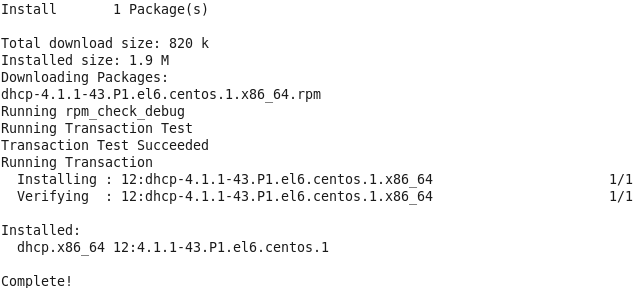
* Sửa file dhcpd.conf
root@hadanghoang Desktop]# vi /etc/dhcp/dhcpd.conf
# create new
# specify domain name
option domain-name "hadanghoang.com";
# specify name server's hostname or IP address
option domain-name-servers c14qm11.hadanghoang.com;
# default lease time
default-lease-time 600;
# max lease time
max-lease-time 7200;
# this DHCP server to be declared valid
authoritative;
# specify network address and subnet mask
subnet 10.0.0.0 netmask 255.0.0.0 {
# specify the range of lease IP address
range dynamic-bootp 10.0.0.78 10.0.0.254;
# specify broadcast address
option broadcast-address 10.0.0.255;
# specify default gateway
option routers 10.0.0.1;
}
[root@hadanghoang Desktop]# /etc/rc.d/init.d/dhcpd start
[root@hadanghoang Desktop]# /etc/rc.d/init.d/dhcpd restart
* Cấp cho WinXP.
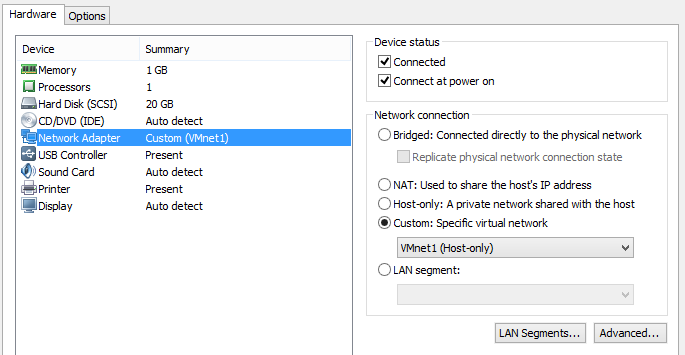
Dùng WinXP gắn card VMnet1 dùng để test DHCP.
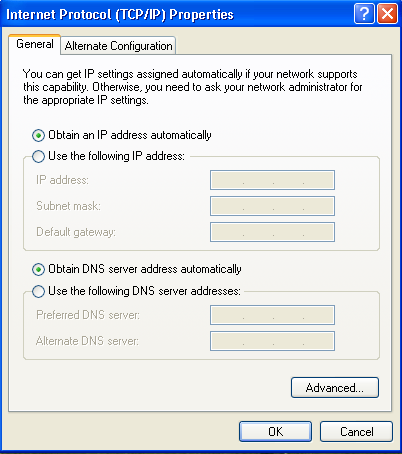
Đưa về chế độ cấp IP DHCP.

C:\Documents and Settings\Administrator>ipconfig /release
C:\Documents and Settings\Administrator>ipconfig /renew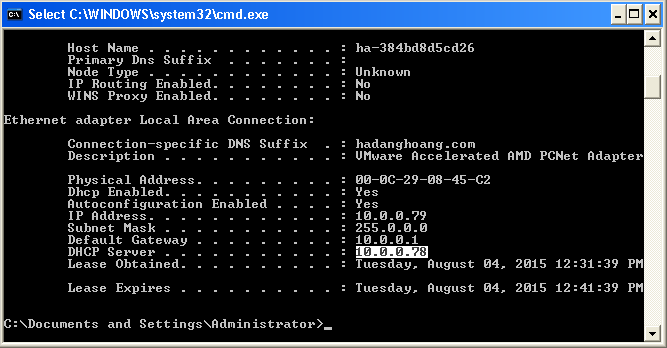
C:\Documents and Settings\Administrator>ipconfig /all* Cấp IP cho Router 1
– Vào lại dhcpd.conf chỉnh sửa lại các dòng sau và save lại.
root@hadanghoang Desktop]# vi /etc/dhcp/dhcpd.confrange dynamic-bootp 10.0.0.1 10.0.0.2;
# option routers 10.0.0.1;– Từ Router 1 gõ lệnh sau để cấp DHCP cho R1
R1#configure terminal
R1(config)#interface fastEthernet 0/0
R1(config-if)#ip address dhcp
R1(config-if)#end
R1#write
Kiểm tra lại DHCP cồng interface fastEthernet 0/0
R1#show ip interface brief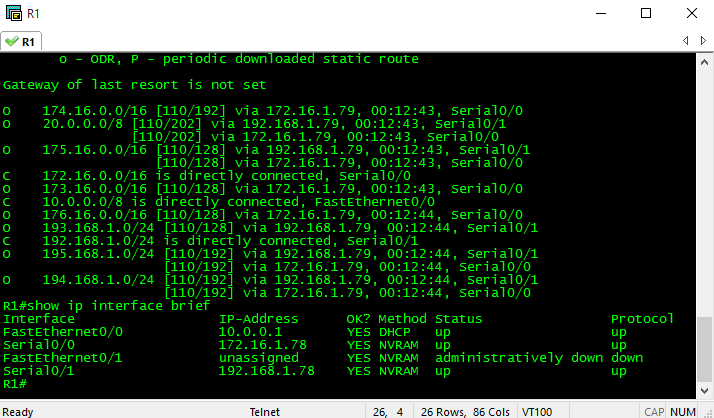
Ta thấy interface fastEthernet 0/0 cột Method ở chế độ DHCP và được cấp IP là 10.0.0.1/8 đúng theo yêu cầu sơ đồ.
[root@hadanghoang hadanghoang_ftp]# yum -y install httpd
[root@hadanghoang hadanghoang_ftp]# vi /etc/httpd/conf/httpd.confChỉnh sửa các line như bảng dưới.
# line 44: change
ServerTokens Prod
# line 76: change to ON
KeepAlive On
# line 262: Admin's address
ServerAdmin root@hadanghoang.com
# line 338: change
AllowOverride All
# line 276: change to your server's name
ServerName www.hadanghoang.com:80
# line 402: add file name that it can access only with directory's name
DirectoryIndex index.html index.htm
# line 536: change
ServerSignature Off
# line 759: comment out
AddDefaultCharset UTF-8
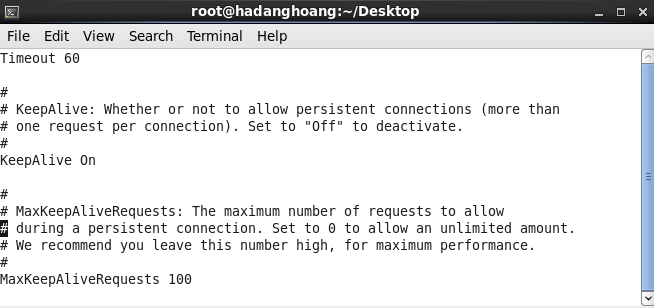
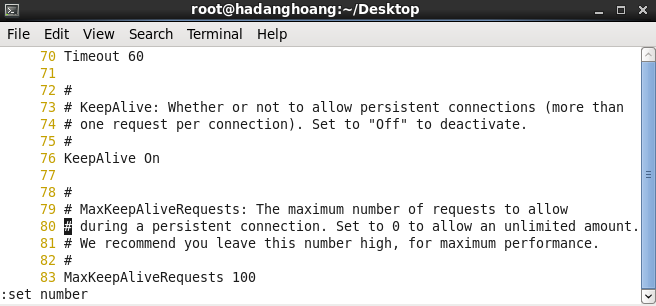
Note: Để hiện số line thứ tự các bạn bấm nút Esc sau đó buông ra, gõ vào :set number hoặc :set number hoặc có thể viết tắt :set nu và bấm Enter (xem hình dưới).
Bảng Vi chưa set number.
Bảng Vi đã set number.
Note : Tương tự như :set number ta sử dụng :q để thoát, :w để lưu, :wq để lưu và thoát ở trong Vi và Vim, nếu dùng gedit thì ta bấm save như ở windows.
[root@hadanghoang hadanghoang_ftp]# service httpd start
[root@hadanghoang hadanghoang_ftp]# chkconfig httpd on
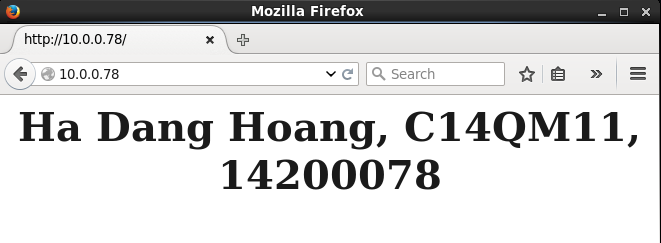
[root@hadanghoang hadanghoang_ftp]# vi /var/www/html/index.html<html>
<body>
<div style="width: 100%; font-size: 40px; font-weight: bold; text-align: center;">
Ha Dang Hoang, C14QM11, 14200078
</div>
</body>
</html>* Kết quả.
* Tạo thêm Web mã nguồn PHP.
[root@hadanghoang Desktop]# yum -y install php php-mbstring php-pear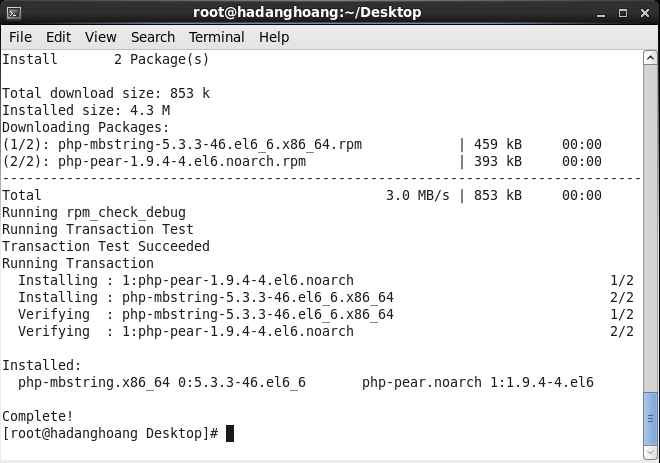

[root@hadanghoang Desktop]# vi /etc/php.ini
[root@hadanghoang Desktop]# /etc/rc.d/init.d/httpd restart
[root@hadanghoang Desktop]# vi /var/www/html/index.php <html>
<body>
<div style="width: 100%; font-size: 40px; font-weight: bold; text-align: center;">
<?php
print Date("Y/m/d");
?>
</div>
</body>
</html>* Kết quả.

[root@hadanghoang Desktop]# yum -y install bind bind-utils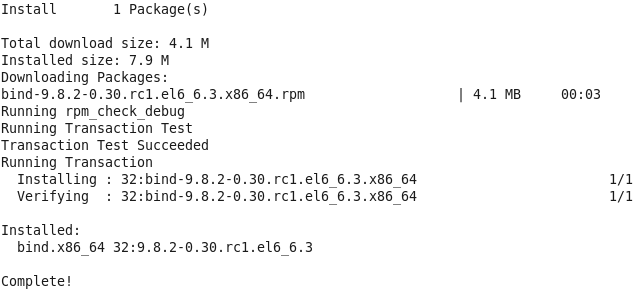
root@hadanghoang Desktop]# gedit /etc/named.conf//
// named.conf
//
// Provided by Red Hat bind package to configure the ISC BIND named(8) DNS
// server as a caching only nameserver (as a localhost DNS resolver only).
//
// See /usr/share/doc/bind*/sample/ for example named configuration files.
//
options {
listen-on port 53 { 127.0.0.1; 10.0.0.78; };
listen-on-v6 port 53 { ::1; };
directory "/var/named";
dump-file "/var/named/data/cache_dump.db";
statistics-file "/var/named/data/named_stats.txt";
memstatistics-file "/var/named/data/named_mem_stats.txt";
allow-query { localhost; 10.0.0.0/8; };
recursion yes;
dnssec-enable yes;
dnssec-validation yes;
dnssec-lookaside auto;
/* Path to ISC DLV key */
bindkeys-file "/etc/named.iscdlv.key";
managed-keys-directory "/var/named/dynamic";
};
logging {
channel default_debug {
file "data/named.run";
severity dynamic;
};
};
zone "." IN {
type hint;
file "named.ca";
};
zone"hadanghoang.com" IN {
type master;
file "hadanghoang.thuan";
allow-update { none; };
};
zone"0.0.10.in-addr.arpa" IN {
type master;
file "hadanghoang.nghich";
allow-update { none; };
};
include "/etc/named.rfc1912.zones";
include "/etc/named.root.key";[root@hadanghoang Desktop]# vi /var/named/hadanghoang.thuan $TTL 86401
@ IN SOA dns.hadanghoang.com. root.hadanghoang.com. (
2011071001 ; dns update time for new zone (yyyy-mm-dd-hh-mm)
3600 ; Refresh to new update
1800 ; Retry time for error
604800 ; Expire Time after remove record from system
86400 ; Minimum TTL
)
IN NS dns.hadanghoang.com.
dns IN A 10.0.0.78
www IN A 10.0.0.78[root@hadanghoang Desktop]# gedit /var/named/hadanghoang.nghich$TTL 86400
@ IN SOA dns.hadanghoang.com. root.hadanghoang.com. (
2011071001 ; Serial
3600 ; Refresh
1800 ; Retry
604800 ; Expire
86400 ; Minimum TTL
)
IN NS dns.hadanghoang.com.
78 IN PTR dns.hadanghoang.com.[root@hadanghoang named]# service named start
– Mở port 53 trên fireware hay stop firewall.
[root@hadanghoang named]# service iptables stop
– Restart lại DNS.
[root@hadanghoang named]# service named restart
– Kiểm tra lại DNS xem đã đúng với IP của máy chủ chưa.
[root@hadanghoang named]# vi /etc/resolv.conf# Generated by NetworkManager
search com
nameserver 10.0.0.78Bạn hãy gõ lệnh nslookup ta có kết quả.
[root@hadanghoang Desktop]# nslookup
> set type=any
> hadanghoang.com
> www.hadanghoang.com
> 10.0.0.78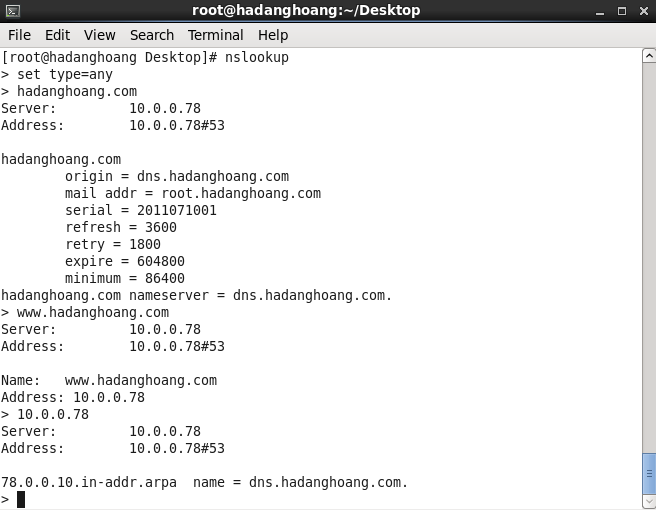
– Test DNS trên máy trạm XP.

Truy cập Website http://www.hadanghoang.com.

5.1. FTP Server
[root@hadanghoang Desktop]# yum -y install vsftpd
– Chỉnh sửa file vsftpd.conf như sau.
[root@hadanghoang Desktop]# vi /etc/vsftpd/vsftpd.conf
# line 12: no anonymous
anonymous_enable=NO
# line 81,82: uncomment ( allow ascii mode )
ascii_upload_enable=YES
ascii_download_enable=YES
# line 96,97: uncomment ( enable chroot )
chroot_local_user=YES
chroot_list_enable=YES
# line 99: uncomment ( specify chroot list )
chroot_list_file=/etc/vsftpd/chroot_list
# line 105: uncomment
ls_recurse_enable=YES
[root@hadanghoang /]# vi /etc/vsftpd/chroot_list
hoang_ftpChú ý: Khi chạy vsftpd trên CentOS5. Nếu bật chức năng SELinux = enforcing (/etc/sysconfig/selinux) thì ta cần phải set biến ftp_home_dir = on
– Kiểm tra biến ftp_home_dir
[root@hadanghoang Desktop]# getsebool ftp_home_dir
ftp_home_dir --> off
– Set biết ftp_home_dir = on
[root@hadanghoang Desktop]# setsebool -P ftp_home_dir 1– Kiểm tra lại biến ftp_home_dir
[root@hadanghoang Desktop]# getsebool ftp_home_dir
ftp_home_dir --> on
– Tạo FTP Home Dir
[root@hadanghoang Desktop]# cd /
[root@hadanghoang /]# mkdir /hadanghoang_ftp
– Tạo User cho phép truy cập FTP server
[root@hadanghoang /]# useradd -d /hadanghoang_ftp/hoang_ftp hoang_ftp– Tạo mật khẩu cho hoang_ftp
[root@hadanghoang /]# passwd hoang_ftp
Changing password for user hoang_ftp.
New password:
BAD PASSWORD: it is too simplistic/systematic
BAD PASSWORD: is too simple
Retype new password:
passwd: all authentication tokens updated successfully.
– Tạo file test_ftp.txt
[root@hadanghoang /]# touch /hadanghoang_ftp/hoang_ftp/test_ftp.txt– FTP server khi chạy cần mở port (20,21) nên ta phải mở 2 port này trên firewall hay tắt firewall.
[root@hadanghoang named]# service iptables stop

[root@hadanghoang /]# service vsftpd restart

[root@hadanghoang /]# chkconfig vsftpd on

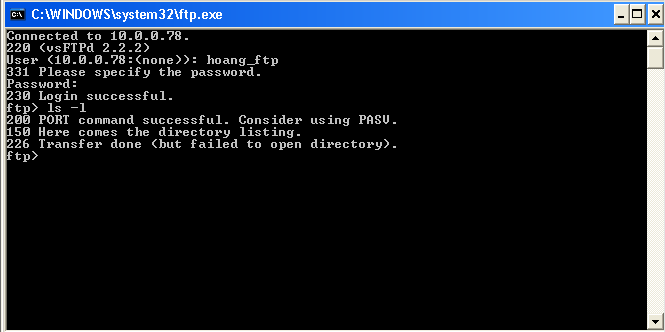
Từ Run gõ ftp 10.0.0.78 (10.0.0.78 là IP máy chủ Linux)
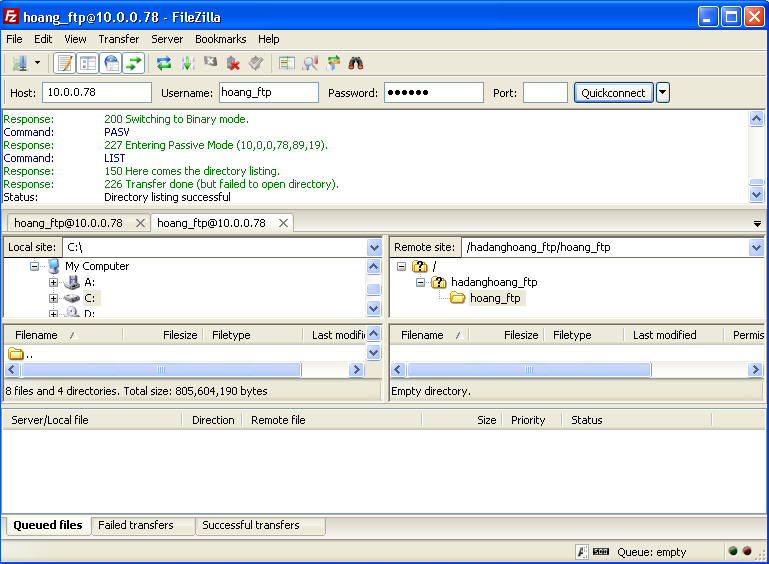
* Test trên phần mêm FileZilla Client
6.1. Cấu hình.
[root@hadanghoang /]# yum -y install net-snmp net-snmp-utils mrtg
[root@hadanghoang Desktop]# vi /etc/snmp/snmpd.conf#Dòng 41: Thêm dấu # ở đầu dòng để bỏ kích hoạt.
41 #com2sec notConfigUser default public
# Thêm dấu # ở đầu dòng các dòng sau để kích hoạt.
74 com2sec local localhost hadanghoang.com
75 com2sec mynetwork 10.0.0.0/8 hadanghoang.com
78 group MyRWGroup any local
79 group MyROGroup any mynetwork
85 view all included .1
93 access MyROGroup "" any noauth 0 all none none
94 access MyRWGroup "" any noauth 0 all all all[root@hadanghoang Desktop]# /etc/rc.d/init.d/snmpd start
[root@hadanghoang Desktop]# chkconfig snmpd on
[root@hadanghoang Desktop]# snmpwalk -v2c -c hadanghoang.com localhost system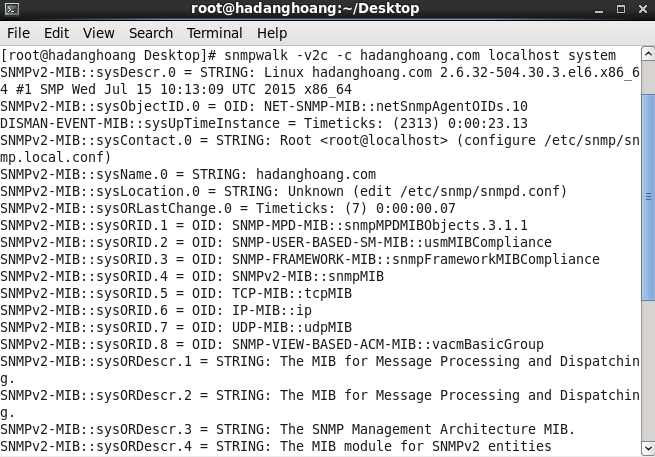
– Tạo tập tin mrtg.cfg
root@hadanghoang Desktop]# cfgmaker --ifref=descr --ifdesc=descr hadanghoang.com@10.0.0.78 > /etc/mrtg/mrtg.cfg[root@hadanghoang Desktop]# vi /etc/mrtg/mrtg.cfg#Thêm WorkDir: /var/www/mrtg tại dòng số 9
9 WorkDir: /var/www/mrtg
#Loại bỏ # Options[_]: growright, bits tại dòng số 16
16 Options[_]: growright, bits
# Loại bỏ # dòng số 75, 76, 77, 78, 79d
75 Target[10.0.0.78_eth1]: \eth1:hadanghoang.com@10.0.0.78:
76 SetEnv[10.0.0.78_eth1]: MRTG_INT_IP="10.0.0.78" MRTG_INT_DESCR="eth1"
77 MaxBytes[10.0.0.78_eth1]: 125000000
78 Title[10.0.0.78_eth1]: eth1 -- hadanghoang.com
79 PageTop[10.0.0.78_eth1]: <h1>eth1 -- hadanghoang.com</h1>[root@hadanghoang Desktop]# for (( i=1 ; i <= 3 ; i++ )); do env LANG=C mrtg /etc/mrtg/mrtg.cfg; done
[root@hadanghoang Desktop]# indexmaker --columns=1 /etc/mrtg/mrtg.cfg > /var/www/mrtg/index.html[root@hadanghoang Desktop]# cat /etc/cron.d/mrtg*/5 * * * * root LANG=C LC_ALL=C /usr/bin/mrtg /etc/mrtg/mrtg.cfg --lock-file /var/lock/mrtg/mrtg_l --confcache-file /var/lib/mrtg/mrtg.ok[root@hadanghoang Desktop]# vi /etc/httpd/conf.d/mrtg.confAlias /mrtg /var/www/mrtg
<Location /mrtg>
Order deny,allow
Deny from all
Allow from 127.0.0.1 10.0.0.0/8
Allow from ::1
# Allow from .example.com
</Location>[root@hadanghoang Desktop]# /etc/rc.d/init.d/httpd restart
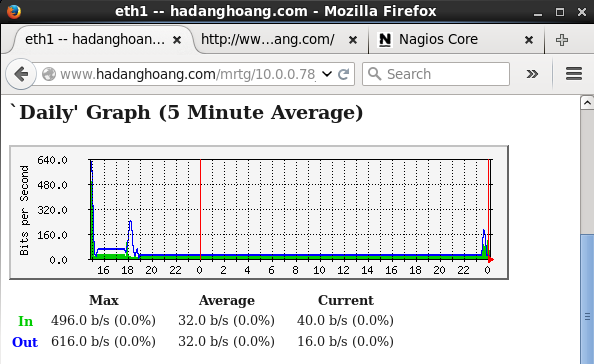
Truy cập MRTG bằng địa chỉ http://www.hadanghoang.com/mrtg hoặc http://ip:mrtg
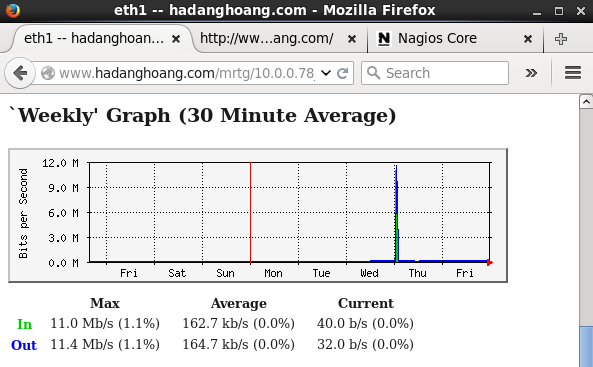
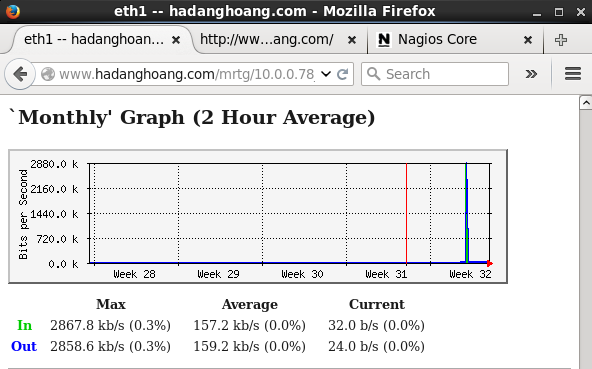
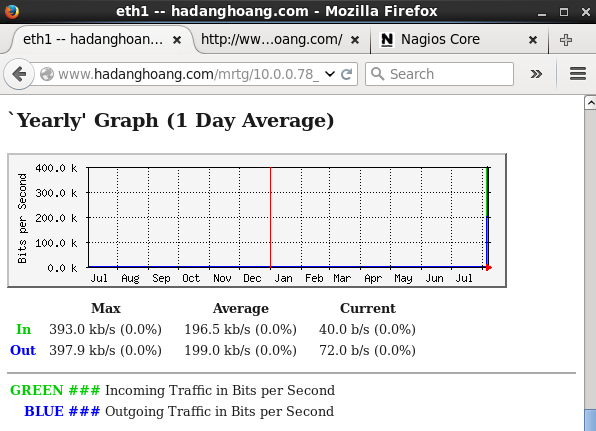
6.2.1. Card Network eth1
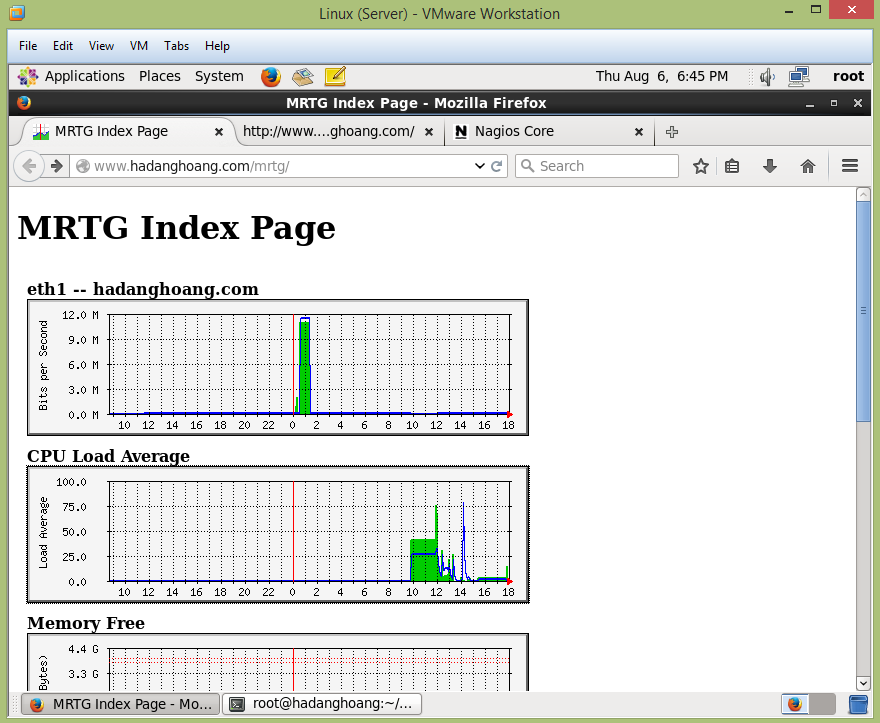

+ `Daily’ Graph (5 Minute Average)
+ `Weekly’ Graph (30 Minute Average)
+ `Monthly’ Graph (2 Hour Average)
+ `Yearly’ Graph (1 Day Average)
6.2.2. CPU Load Average.
[root@hadanghoang Desktop]# vi /etc/mrtg/mrtg.cfgTarget[CPU]: .1.3.6.1.4.1.2021.10.1.5.1&.1.3.6.1.4.1.2021.10.1.5.2:hadanghoang.com@127.0.0.1
MaxBytes[CPU]: 100
Unscaled[CPU]: dwmy
Options[CPU]: gauge, growright, nopercent
YLegend[CPU]: Load Average
ShortLegend[CPU]: (%)
LegendI[CPU]: Load Average 1 min
LegendO[CPU]: Load Average 5 min
Legend1[CPU]: Load Average 1 min
Legend2[CPU]: Load Average 5 min
Title[CPU]: CPU Load Average
PageTop[CPU]: <h1>CPU Load Average</h1>[root@hadanghoang Desktop]# for (( i=1 ; i <= 3 ; i++ )); do env LANG=C mrtg /etc/mrtg/mrtg.cfg; done
[root@hadanghoang Desktop]# indexmaker --columns=1 /etc/mrtg/mrtg.cfg > /var/www/mrtg/index.html
* Kết quả.
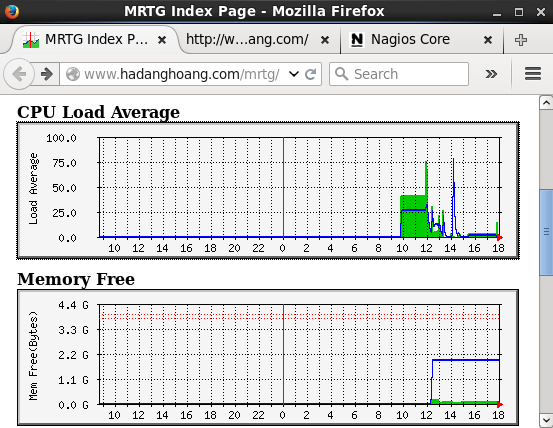
+ `Daily’ Graph (5 Minute Average)
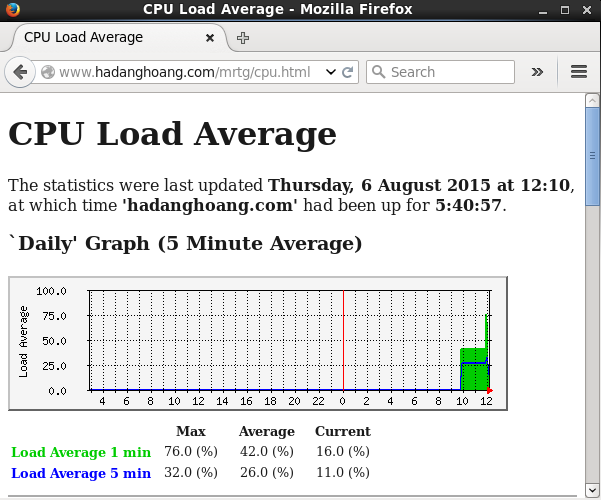
+`Weekly’ Graph (30 Minute Average)
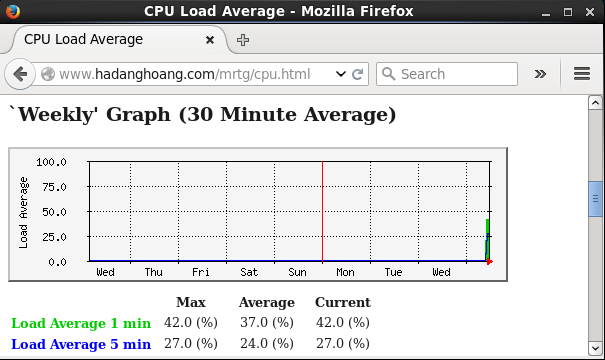
+ `Monthly’ Graph (2 Hour Average)
+`Yearly’ Graph (1 Day Average)
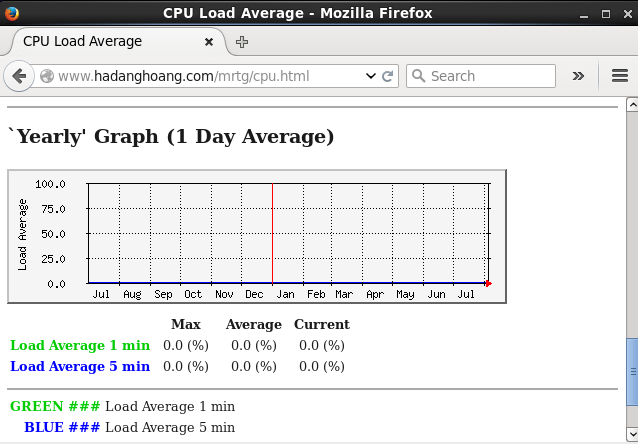
[root@hadanghoang Desktop]# gedit /etc/mrtg/mrtg.cfg# add follows to the end
Target[mem]: .1.3.6.1.4.1.2021.4.6.0&.1.3.6.1.4.1.2021.4.4.0:hadanghoang.com@127.0.0.1
# total memory
MaxBytes1[Mem]: 3922688
# total swap
MaxBytes2[Mem]: 4128764
Unscaled[Mem]: dwmy
Options[Mem]: gauge, growright
YLegend[Mem]: Mem Free(Bytes)
ShortLegend[Mem]: Bytes
kilo[Mem]: 1024
kMG[Mem]: k,M,G,T,P
LegendI[Mem]: Real
LegendO[Mem]: Swap
Legend1[Mem]: Memory Free [MBytes]
Legend2[Mem]: Swap Free [MBytes]
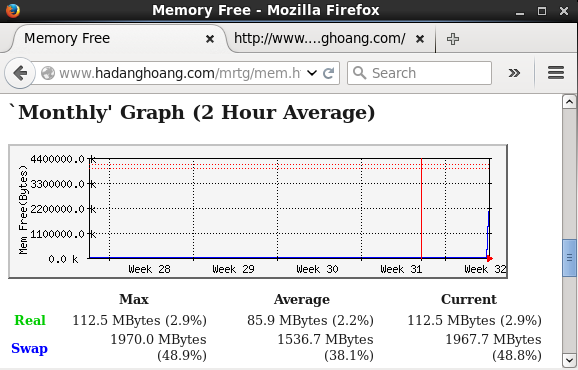
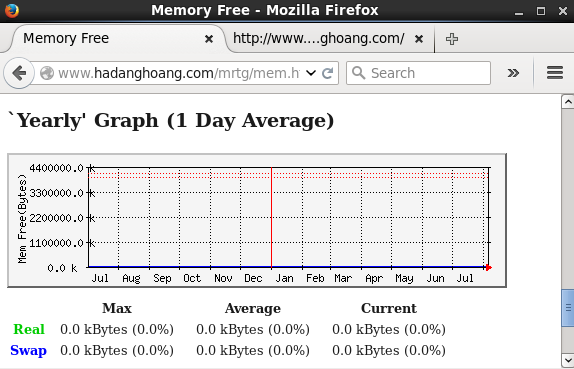
Title[Mem]: Memory Free
PageTop[Mem]: <H1>Memory Free</H1>[root@hadanghoang Desktop]# for (( i=1 ; i <= 3 ; i++ )); do env LANG=C mrtg /etc/mrtg/mrtg.cfg; done
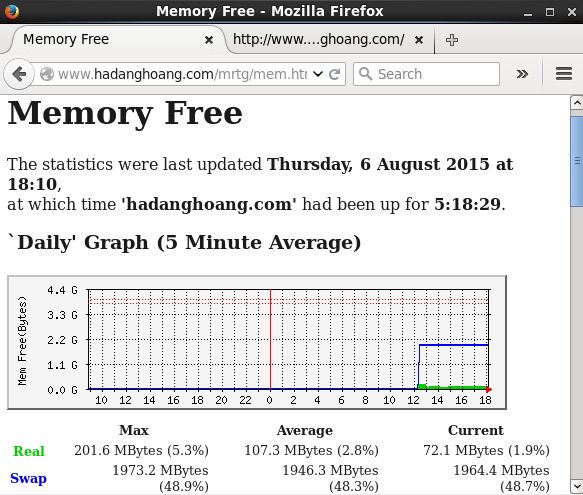
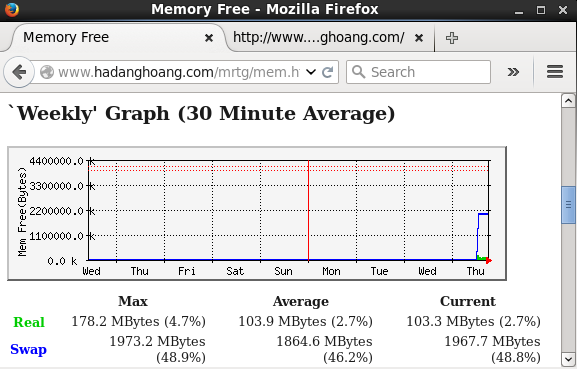
[root@hadanghoang Desktop]# indexmaker --columns=1 /etc/mrtg/mrtg.cfg > /var/www/mrtg/index.html* Kết quả.
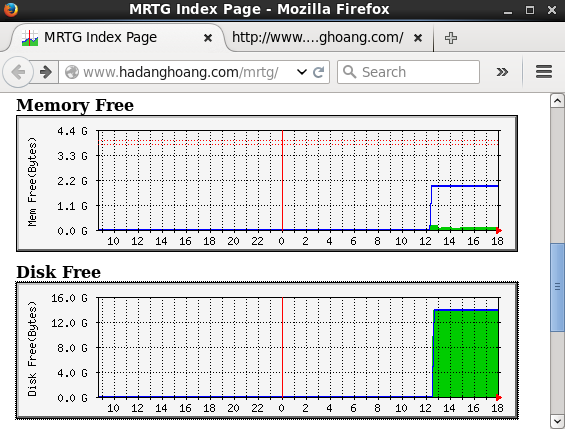
– `Daily’ Graph (5 Minute Average)
– `Weekly’ Graph (30 Minute Average)
– `Monthly’ Graph (2 Hour Average)
– `Yearly’ Graph (1 Day Average)
[root@hadanghoang Desktop]# vi /etc/snmp/snmpd.conf Bỏ dấu # đầu dòng 323

Khởi động lại snmpd
[root@hadanghoang Desktop]# /etc/rc.d/init.d/snmpd restart
[root@hadanghoang Desktop]# snmpwalk -v2c -c hadanghoang.com localhost .1.3.6.1.4.1.2021.9.1.6
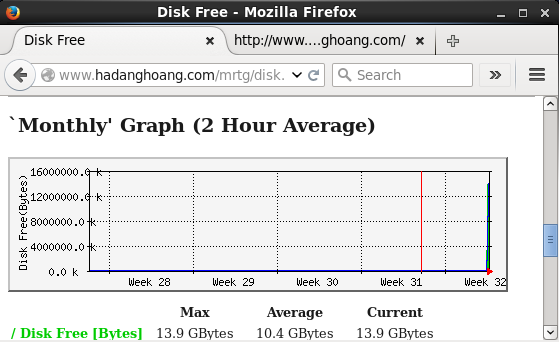
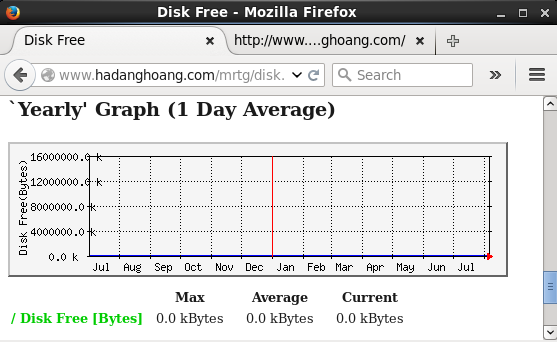
[root@hadanghoang Desktop]# gedit /etc/mrtg/mrtg.cfgTarget[Disk]: .1.3.6.1.4.1.2021.9.1.7.1&.1.3.6.1.4.1.2021.9.1.7.1:hadanghoang.com@127.0.0.1
MaxBytes[Disk]: 15939004
kMG[Disk]: k,M,G,T,P
Unscaled[Disk]: dwmy
Options[Disk]: gauge, absolute, growright, nopercent
YLegend[Disk]: Disk Free(Bytes)
ShortLegend[Disk]: Bytes
LegendI[Disk]: / Disk Free [Bytes]
LegendO[Disk]:
Legend1[Disk]: / Disk Free [Bytes]
Legend2[Disk]:
Title[Disk]: Disk Free
PageTop[Disk]: <H1>Disk Free</H1>[root@hadanghoang Desktop]# for (( i=1 ; i <= 3 ; i++ )); do env LANG=C mrtg /etc/mrtg/mrtg.cfg; done
[root@hadanghoang Desktop]# indexmaker --columns=1 /etc/mrtg/mrtg.cfg > /var/www/mrtg/index.html* Kết quả.
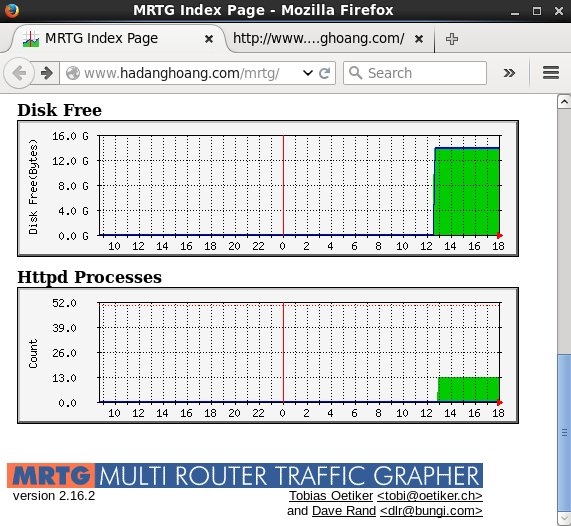
+ `Daily’ Graph (5 Minute Average)
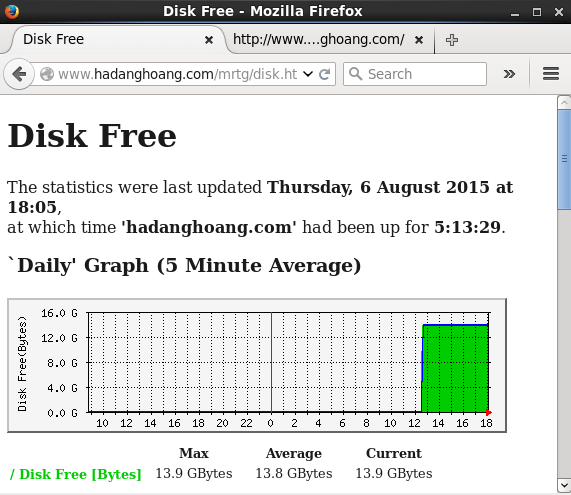
+ `Weekly’ Graph (30 Minute Average)

+ `Monthly’ Graph (2 Hour Average)
+ `Yearly’ Graph (1 Day Average)
[root@hadanghoang Desktop]# vi /etc/snmp/snmpd.conf
[root@hadanghoang Desktop]# /etc/rc.d/init.d/snmpd restart
[root@hadanghoang Desktop]# gedit /etc/mrtg/mrtg.cfgTarget[httpd]: .1.3.6.1.4.1.2021.2.1.5.1&.1.3.6.1.4.1.2021.2.1.4.1:hadanghoang.com@127.0.0.1
MaxBytes[httpd]: 50
Unscaled[httpd]: dwmy
Options[httpd]: gauge, growright, nopercent
YLegend[httpd]: Count
ShortLegend[httpd]: proc(s).
Title[httpd]: Httpd Processes
LegendI[httpd]: Processes
LegendO[httpd]:
Legend1[httpd]: Httpd Processes
Legend2[httpd]:
PageTop[httpd]: <h1>Httpd Processes</h1>[root@hadanghoang Desktop]# for (( i=1 ; i <= 3 ; i++ )); do env LANG=C mrtg /etc/mrtg/mrtg.cfg; done
[root@hadanghoang Desktop]# indexmaker --columns=1 /etc/mrtg/mrtg.cfg > /var/www/mrtg/index.html* Kết quả.
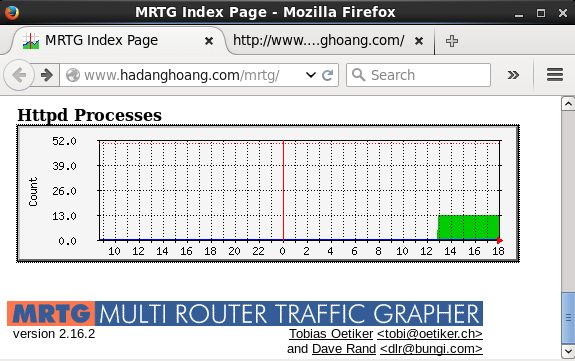
+ `Daily’ Graph (5 Minute Average)
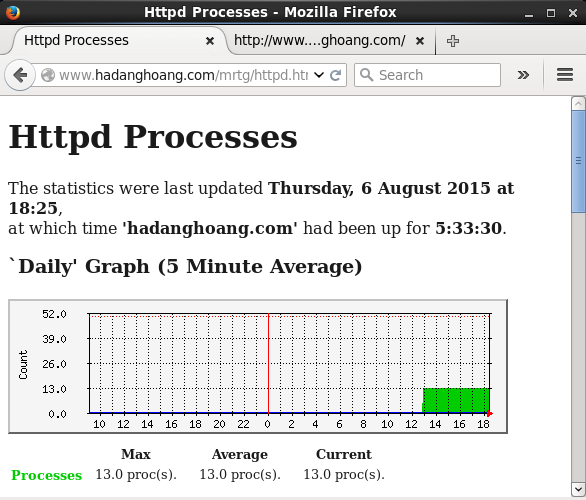
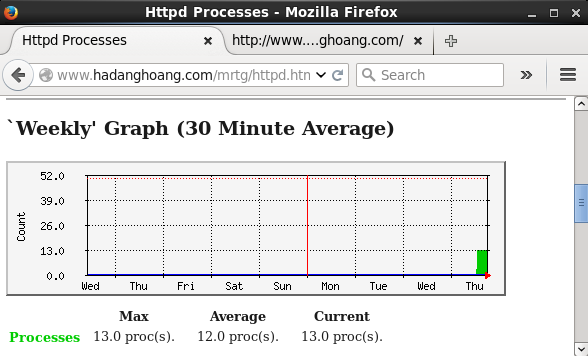
+ `Weekly’ Graph (30 Minute Average)
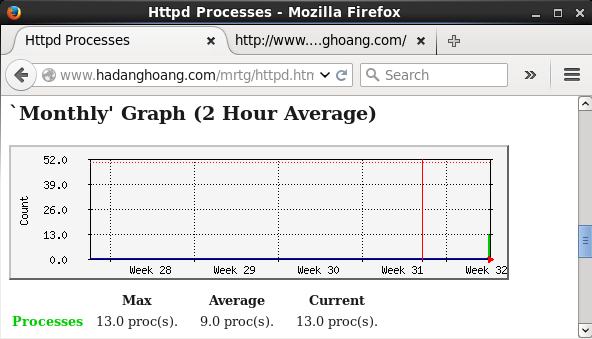
+ `Monthly’ Graph (2 Hour Average)
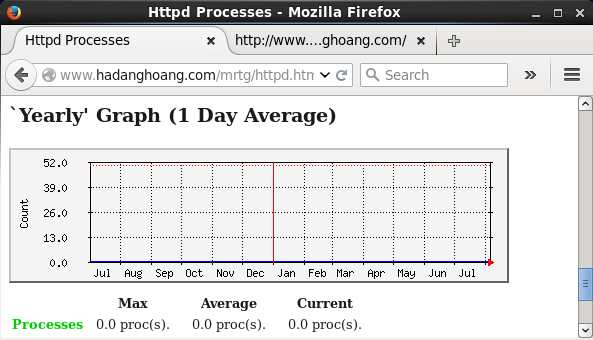
+ `Yearly’ Graph (1 Day Average)
7.1. Cài đặt.
[root@hadanghoang /]# yum -y install perl-Net-SSLeay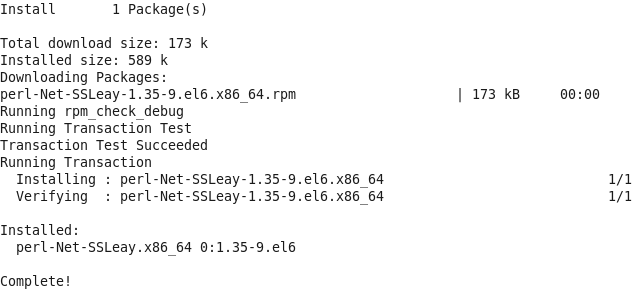
[root@hadanghoang /]# yum -y install http://download.webmin.com/download/yum/webmin-1.740-1.noarch.rpm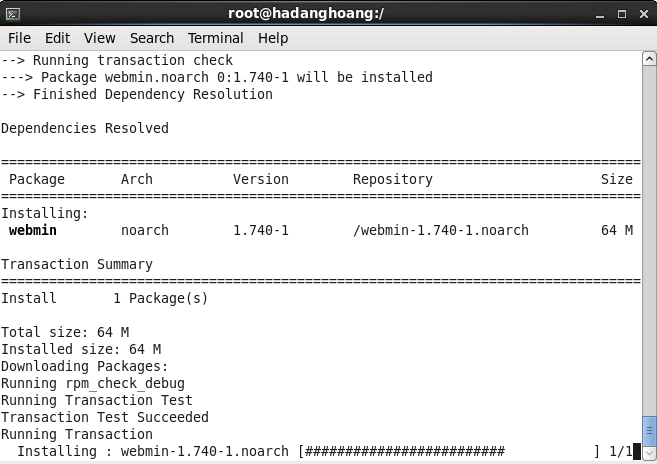
[root@hadanghoang Desktop]# vi /etc/webmin/miniserv.confThêm dải IP này
allow=127.0.0.1 10.0.0.0/8[root@hadanghoang Desktop]# /etc/rc.d/init.d/webmin restartĐăng nhập vào WEBMIN bằng địa chỉ http://www.hadanghoang.com:10000 port là 10000 (port này có thể thay đổi).
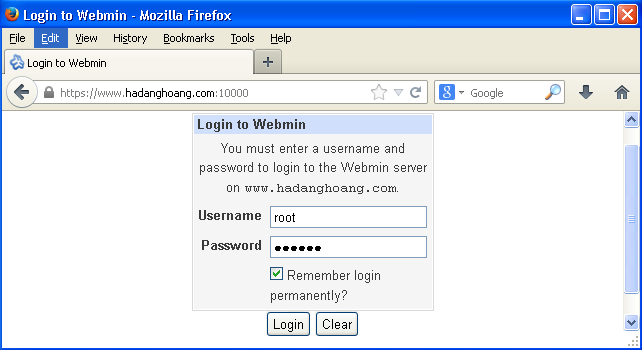
– Username: Root
– Password: 123456 (mật khẩu root của máy chủ).
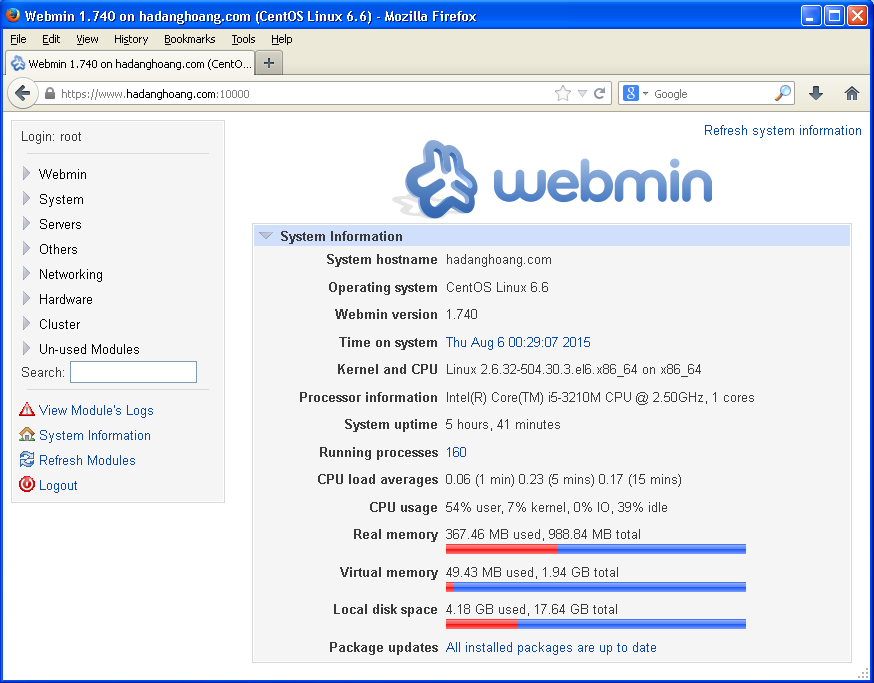
– Trang thông tin cơ bản máy chủ Linux.
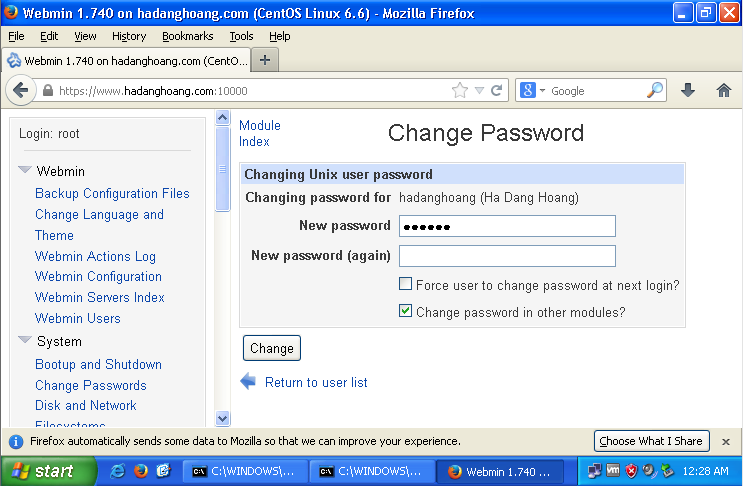
Đổi mật khẩu các người dùng

Bảng menu chính tích hợp rất nhiều tính năng hay để quản lý hệ thống.
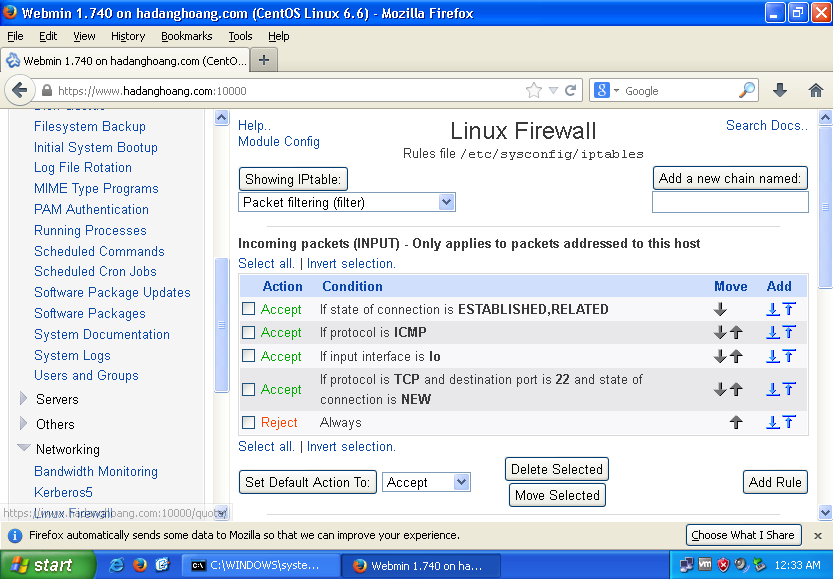
Hệ thống quản lý tường lửa
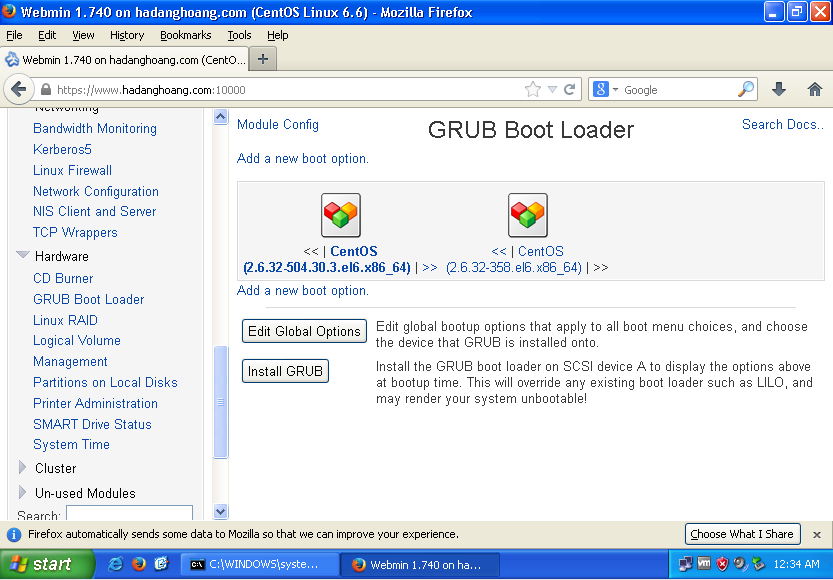
Quản lý Boot (GRUB)
* Tóm lại: WEBMIN giúp cho chúng ta quản lý máy chủ Linux hiệu quả hơn dựa vào giao diện đồ họa thân thiện, tránh phải dùng những lệnh mà nhiều khi chúng ta không thể nhớ ra được, từ đó nó cải thiện tốc độ làm việc và giúp cho người quản lý máy chủ vận hành nó được linh hoạt hơn.
Lên mạng tìm và tải gói tin epel-release-6-8.noarch.rpm về hoặc chạy lệnh sudo yum install epel-release để cài đặt trực tiếp từ internet.
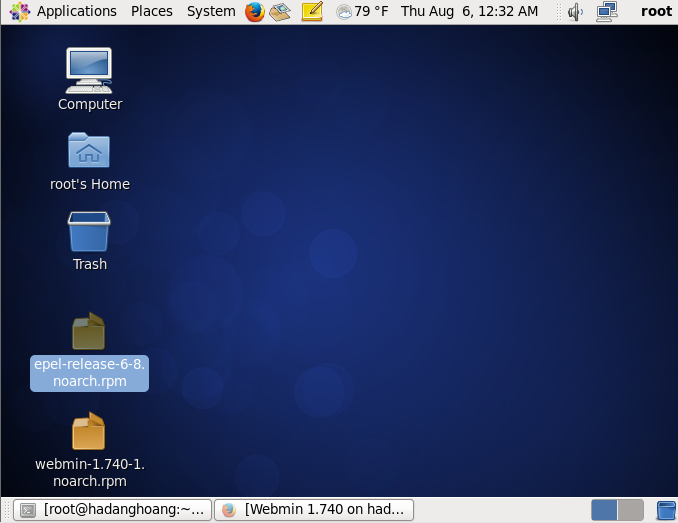
[root@hadanghoang Desktop]# rpm -ivh epel-release-6-8.noarch.rpm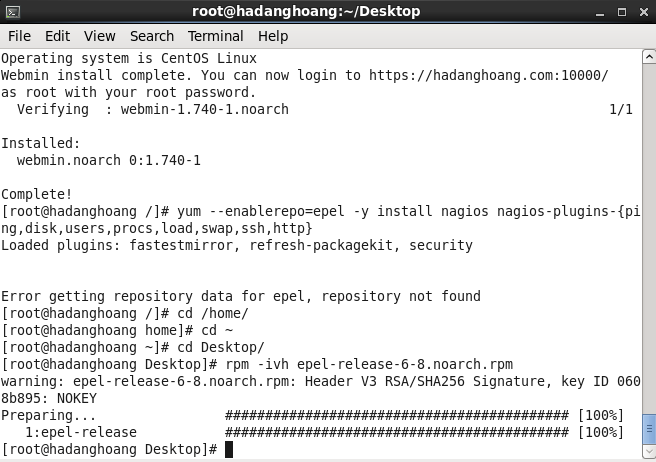
[root@hadanghoang Desktop]# yum --enablerepo=epel -y install nagios nagios-plugins-{ping,disk,users,procs,load,swap,ssh,http}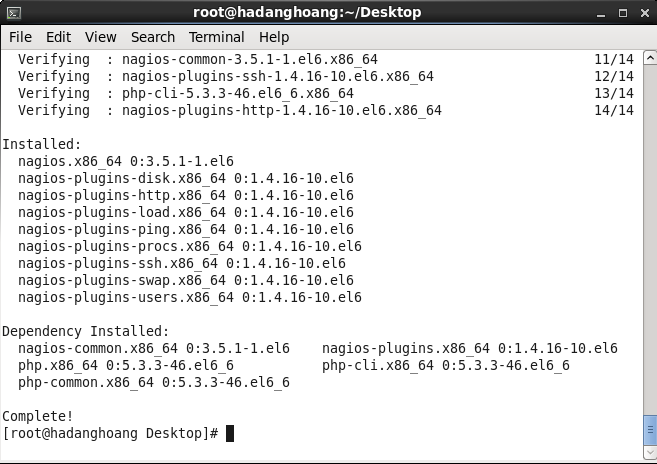
[root@hadanghoang Desktop]# vi /etc/httpd/conf.d/nagios.conf
[root@hadanghoang Desktop]# htpasswd /etc/nagios/passwd nagiosadmin
[root@hadanghoang Desktop]# /etc/rc.d/init.d/nagios start
[root@hadanghoang Desktop]# /etc/rc.d/init.d/httpd restart
– Đăng nhập vào NAGIOS bằng địa chỉ http://www.hadanghoang.com/nagios hoặc http://ip/nagios
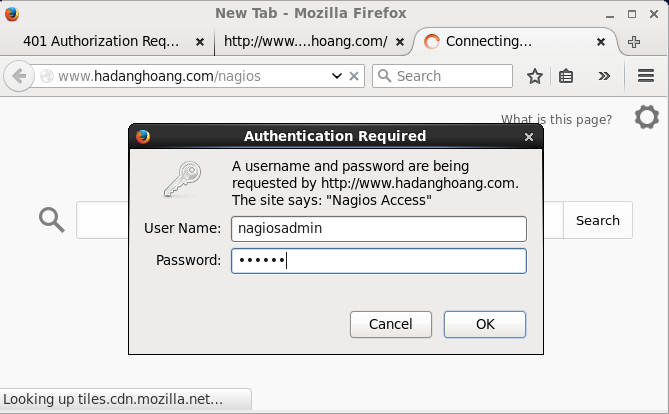
User Name: nagiosadmin
Password: 123456 (do mình tự đặt lúc cấu hình nagios)
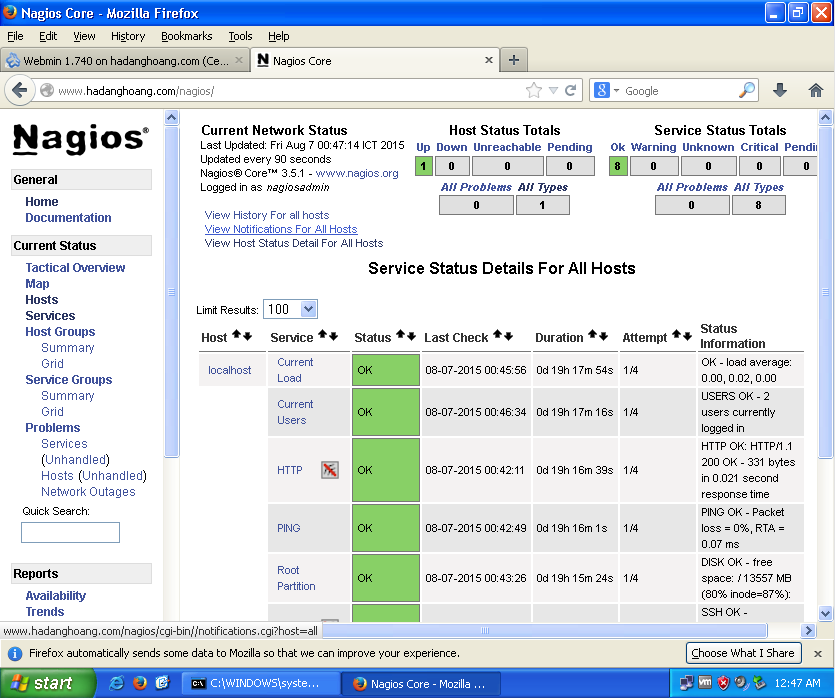
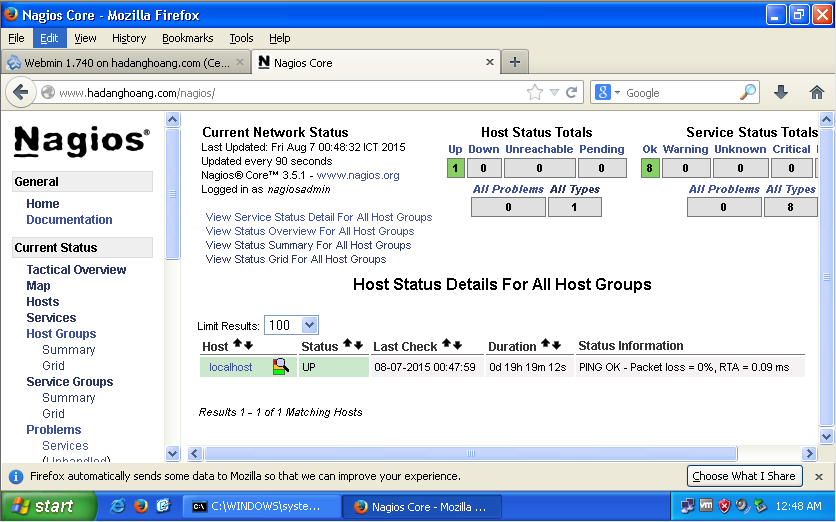
– Giao diện chính của NAGIOS.

* Một số hình ảnh của Nagios.
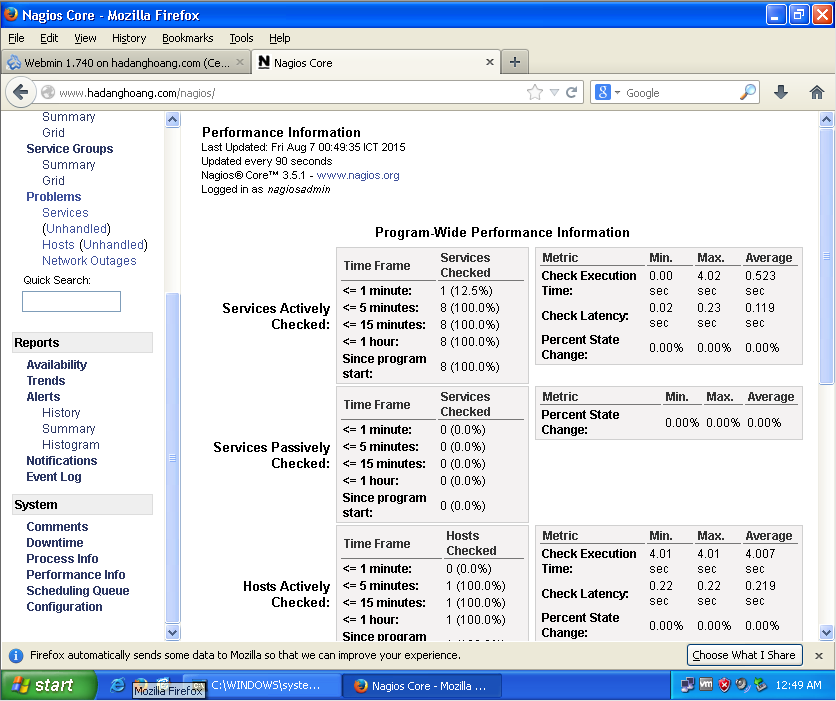
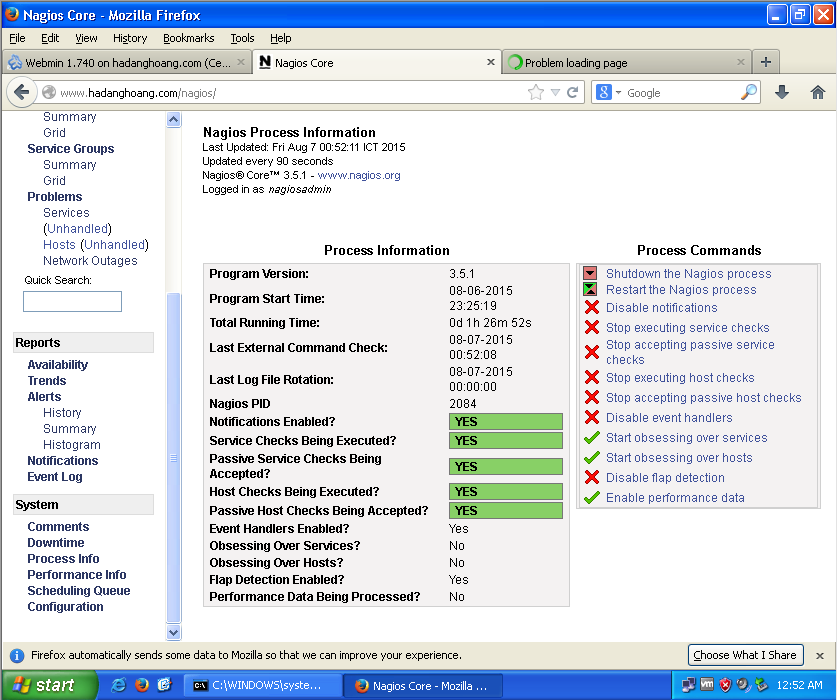
* Thông tin thêm về Nagios.
Phần mềmNagios là một mã nguồn phần mềm mở, là một ứng dụng mạnh trong việc giám sát mạng. Nó phù hợp với các hệ thống mạng lớn và nhỏ.
Ưu điểm:
- Lớn nhất của nó là tính mở của chương trình, ta có thể cấu hình Nagios theo nhiều cách, đồng thời có thể mở rộng theo nhu cầu của người sử dụng.
- Giao diện đẹp.
- Có khả năng theo dõi định kì theo thời gian đã được cấu hình trước.
- Ít tốn tài nguyên.
- Có cơ chế tự động cảnh báo cho người quản trị khi có sự cố xảy ra.
- Độ ổn định cao.
- Đặc biệt có khả năng giám sát phân tán nên có thể hỗ trợ tối đa 100000 node.
Nhược điểm:
- Không có khả năng tự động nhận biết các thiết bị giám sát trong mạng mà cần phải định nghĩa trên Nagios Server.
- Một số thiết bị mới chưa thể giám sát được, ví dụ như Access Point,..
- Triển khai khó vì phải thực hiện trên CentOS.
