1. Giới thiệu
Rancher là công cụ nguồn mở, giao diện nền web, để quản lý Kubernetes Cluster, triển khai ứng dụng trên Kubernetes cho dù Cluster của bạn chạy ở đâu, cung cấp bởi dịch vụ nào (AWS, GCP, Azure …). Từ một Server cài đặt Rancher bạn có thể quản lý một hay nhiều Kubernetes Cluster trên cùng một giao diện.
Rancher cho phép bạn theo dõi, giám sát tình trạng của Kubernetes Cluster, nhận các cảnh bảo về sử dụng tài nguyên …
Để triển khai Rancher, bạn cần cài đặt Rancher trên một Server: gọi là Server Rancher, cần đảm bảo địa chỉ IP của Server Rancher và các Node của Kubernetes Cluster cần quản lý liên lạc mạng được với nhau.
2. Triển khai Rancher lên Kubernetes bằng helm.
2.1. Thêm Repo Rancher Helm Chart
– Các phiên bản của Rancher được phân loại như sau:
+ Bản mới nhất được đề xuất để thử các tính năng mới nhất
helm repo add rancher-latest https://releases.rancher.com/server-charts/latest+ Bản ổn định được đề xuất cho môi trường cung cấp dịch vụ
helm repo add rancher-stable https://releases.rancher.com/server-charts/stable+ Alpha là bản thử nghiệm của các bản sắp phát hành sắp tới
helm repo add rancher-alpha https://releases.rancher.com/server-charts/alphaỞ bài này mình sẽ sử dụng bản latest với cú pháp như dưới
root@k8s-standalone:/home# helm repo add rancher-latest https://releases.rancher.com/server-charts/latest
"rancher-latest" has been added to your repositories
Verify repo vừa thêm
root@k8s-standalone:/home# helm repo ls
NAME            URL
nginx-stable    https://helm.nginx.com/stable
rancher-latest  https://releases.rancher.com/server-charts/latest
2.2. Triển khai cert-manager
Ta triển khai cert-manager với cú pháp như dưới
root@k8s-standalone:~# kubectl apply -f https://github.com/cert-manager/cert-manager/releases/download/v1.7.1/cert-manager.crds.yaml

customresourcedefinition.apiextensions.k8s.io/certificaterequests.cert-manager.io created
customresourcedefinition.apiextensions.k8s.io/certificates.cert-manager.io created
customresourcedefinition.apiextensions.k8s.io/challenges.acme.cert-manager.io created
customresourcedefinition.apiextensions.k8s.io/clusterissuers.cert-manager.io created
customresourcedefinition.apiextensions.k8s.io/issuers.cert-manager.io created
customresourcedefinition.apiextensions.k8s.io/orders.acme.cert-manager.io created
Thêm Helm repo Jetstack
root@k8s-standalone:/home# helm repo add jetstack https://charts.jetstack.io
"jetstack" has been added to your repositories
Cập nhật lại repo của Helm chart
root@k8s-standalone:/home# helm repo update
Hang tight while we grab the latest from your chart repositories...
...Successfully got an update from the "jetstack" chart repository
...Successfully got an update from the "rancher-latest" chart repository
Update Complete. ⎈Happy Helming!⎈
Cài đặt Helm chart cert-manager
root@k8s-standalone:/home# helm install cert-manager jetstack/cert-manager \
  --namespace cert-manager \
  --create-namespace \
  --version v1.7.1
Đầu ra trông sẽ như vậy
NAME: cert-manager
LAST DEPLOYED: Tue Oct  4 10:27:48 2022
NAMESPACE: cert-manager
STATUS: deployed
REVISION: 1
TEST SUITE: None
NOTES:
cert-manager v1.7.1 has been deployed successfully!

In order to begin issuing certificates, you will need to set up a ClusterIssuer
or Issuer resource (for example, by creating a 'letsencrypt-staging' issuer).

More information on the different types of issuers and how to configure them
can be found in our documentation:

https://cert-manager.io/docs/configuration/

For information on how to configure cert-manager to automatically provision
Certificates for Ingress resources, take a look at the `ingress-shim`
documentation:

https://cert-manager.io/docs/usage/ingress/
Khi bạn đã triển khai xong, bạn có thể xác minh xem nó được triển khai chưa như ở dưới
root@k8s-standalone:/home# kubectl get pods --namespace cert-manager
NAME                                     READY   STATUS    RESTARTS   AGE
cert-manager-76d44b459c-8fv5t            1/1     Running   0          90s
cert-manager-cainjector-9b679cc6-m48nn   1/1     Running   0          90s
cert-manager-webhook-57c994b6b9-vbg9x    1/1     Running   0          90s
2.3. Triển khai Rancher
Tạo namespace cattle-system cho Rancher
root@k8s-standalone:~# kubectl create namespace cattle-system
namespace/cattle-system created
Triển khai Rancher với phiên bản rancher-latest, mình sử dụng ingress.tls.source=rancher vì mình sẽ sử dụng cert-manager tự xác thực của Rancher.
root@k8s-standalone:/home# helm install rancher rancher-latest/rancher \
  --namespace cattle-system \
  --set hostname=rancher.hoanghd.com \
  --set bootstrapPassword=admin \
  --set ingress.tls.source=rancher
Đầu ra của lệnh trông sẽ như dưới
NAME: rancher
LAST DEPLOYED: Tue Oct  4 10:35:37 2022
NAMESPACE: cattle-system
STATUS: deployed
REVISION: 1
TEST SUITE: None
NOTES:
Rancher Server has been installed.

NOTE: Rancher may take several minutes to fully initialize. Please standby while Certificates are being issued, Containers are started and the Ingress rule comes up.

Check out our docs at https://rancher.com/docs/

If you provided your own bootstrap password during installation, browse to https://rancher.hoanghd.com to get started.

If this is the first time you installed Rancher, get started by running this command and clicking the URL it generates:

```
echo https://rancher.my.org/dashboard/?setup=$(kubectl get secret --namespace cattle-system bootstrap-secret -o go-template='{{.data.bootstrapPassword|base64decode}}')
```

To get just the bootstrap password on its own, run:

```
kubectl get secret --namespace cattle-system bootstrap-secret -o go-template='{{.data.bootstrapPassword|base64decode}}{{ "\n" }}'
```


Happy Containering!
Sau khi thêm các secret, hãy kiểm tra xem Rancher đã được triển khai thành công hay chưa
root@loadbalancer3:/home# kubectl -n cattle-system rollout status deploy/rancher
deployment "rancher" successfully rolled out
Bạn có thể kiểm tra trạng thái deployment xem đã triển khai xong hay chưa bằng lệnh dưới.
root@loadbalancer3:/home# kubectl -n cattle-system get deploy rancher
NAME      READY   UP-TO-DATE   AVAILABLE   AGE
rancher   3/3     3            3           3m8s
Xác minh các services thuộc namespace cattle-system
root@loadbalancer3:/home# kubectl get svc/rancher -n cattle-system
NAME      TYPE        CLUSTER-IP     EXTERNAL-IP   PORT(S)          AGE
rancher   ClusterIP   10.96.39.167   <none>        80/TCP,443/TCP   2m33s
Xác minh các ingress thuộc namespace cattle-system ta thấy khi triển khai bằng helm thì hệ thống đã tự tạo ra 1 ingress cho Rancher, nhưng do mình đã có 1 ingress mà trước đó đã triển khai nên mình sẽ sử dụng ingress do chính mình triển khai.
root@loadbalancer3:/home# kubectl get ing -n cattle-system
NAME      CLASS    HOSTS                 ADDRESS   PORTS     AGE
rancher   <none>   rancher.hoanghd.com             80, 443   24m
Mình sẽ xoá ingress hiện tại
root@loadbalancer3:/home# kubectl delete ing/rancher -n cattle-system
ingress.networking.k8s.io "rancher" deleted
Xác minh lại ingress cũ đã được xoá.
root@loadbalancer3:/home# kubectl get ing -n cattle-system
No resources found in cattle-system namespace.
Mình tạo 1 manifest ingress mới với nội dung như dưới
cat > ./rancher-ingress.yaml << OEF
apiVersion: networking.k8s.io/v1
kind: Ingress
metadata:
  name: rancher-ingress
  namespace: cattle-system
  annotations:
    nginx.ingress.kubernetes.io/rewrite-target: /
    cert-manager.io/issuer: rancher
    cert-manager.io/issuer-kind: Issuer
    meta.helm.sh/release-name: rancher
    meta.helm.sh/release-namespace: cattle-system
    nginx.ingress.kubernetes.io/proxy-connect-timeout: "30"
    nginx.ingress.kubernetes.io/proxy-read-timeout: "1800"
    nginx.ingress.kubernetes.io/proxy-send-timeout: "1800"
spec:
  ingressClassName: nginx
  rules:
    - host: rancher.hoanghd.com
      http:
        paths:
          - path: /
            pathType: Prefix
            backend:
              service:
                name: rancher
                port:
                  number: 80
  tls:
  - hosts:
    - rancher.hoanghd.com
    secretName: tls-rancher-ingress
OEF
Triển khai manifest trên
root@loadbalancer3:/home# kubectl apply -f ./rancher-ingress.yaml
ingress.networking.k8s.io/rancher-ingress created
Xác nhận lại ingress mình đặt tên mới là rancher-ingress đã được tạo
root@loadbalancer3:/home# kubectl get ing -n cattle-system
NAME              CLASS   HOSTS                 ADDRESS          PORTS     AGE
rancher-ingress   nginx   rancher.hoanghd.com   192.168.13.239   80, 443   9s
Bằng cách nào đó bạn tự tạo 1 domain mà trước đó đã khai báo trong ingress, mình sẽ sử dụng file host
hoanghd@mb-hoanghd ~ % cat  /etc/hosts | grep rancher
192.168.13.239 rancher.hoanghd.com
Hãy đảm bảo máy client có thể connect tới domain này
hoanghd@mb-hoanghd ~ % ping rancher.hoanghd.com
PING rancher.hoanghd.com (192.168.13.239): 56 data bytes
64 bytes from 192.168.13.239: icmp_seq=0 ttl=64 time=0.448 ms
64 bytes from 192.168.13.239: icmp_seq=1 ttl=64 time=0.400 ms
64 bytes from 192.168.13.239: icmp_seq=2 ttl=64 time=0.478 ms
64 bytes from 192.168.13.239: icmp_seq=3 ttl=64 time=0.445 ms

--- rancher.hoanghd.com ping statistics ---
4 packets transmitted, 4 packets received, 0.0% packet loss
round-trip min/avg/max/stddev = 0.400/0.443/0.478/0.028 ms
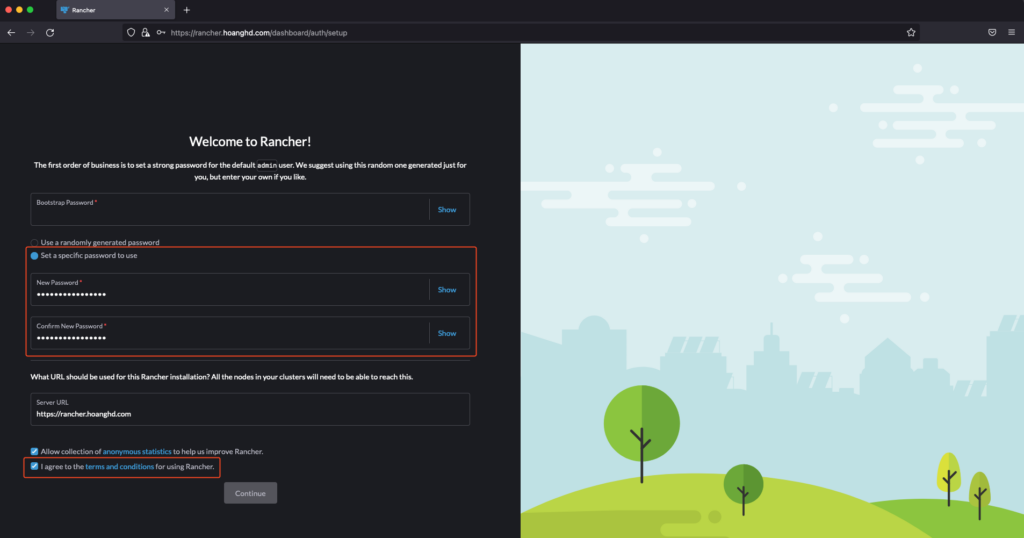
Dùng trình duyệt truy cập url: https://rancher.hoanghd.com ta có kết quả như dưới

Chọn Set a specific password to use và đặt mật khẩu mới cho Rancher, tại What URL should be used for this Rancher installation? All the nodes in your clusters will need to be able to reach this nếu không có thay đổi về url của Rancher thì các bạn giữ nguyên.
Bấm chọn I agree to the terms and conditions for using Rancher và Continue để hoàn thành.

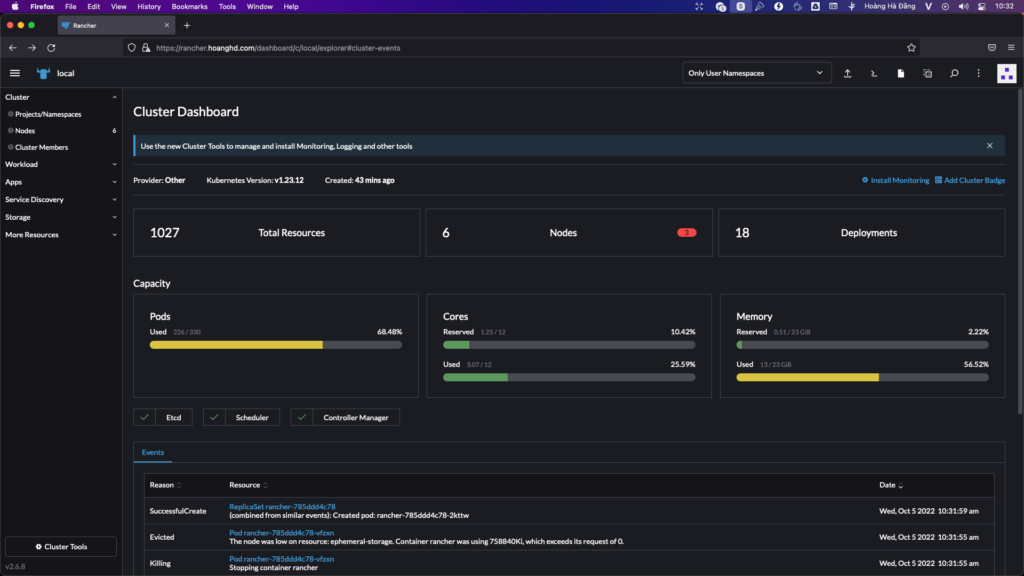
Khi login vào ta sẽ có 1 giao diện như vậy, nó cho ta biết chi tiết node của mình và rất nhiều tính năng khác, để tránh bài quá dài thì mình sẽ hướng dẫn sử dụng Rancher ở 1 bài khác.
Chúc các bạn thành công.
