1. Tổng quan.
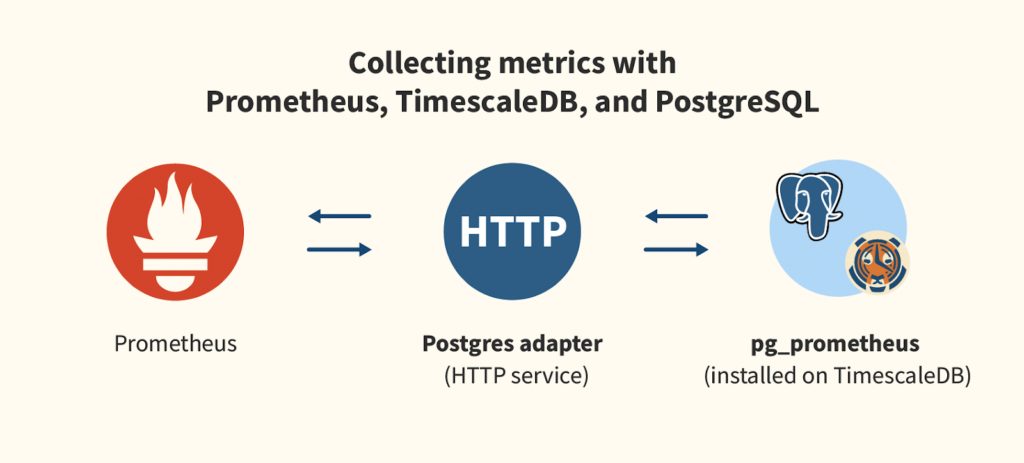
PostgreSQL với Grafana và Prometheus là một giải pháp để giám sát và trực quan hóa dữ liệu từ hệ thống cơ sở dữ liệu PostgreSQL bằng cách sử dụng công cụ Grafana và nền tảng giám sát Prometheus.
- PostgreSQL là một hệ thống quản lý cơ sở dữ liệu mã nguồn mở được sử dụng rộng rãi và phổ biến. Nó cung cấp các tính năng mạnh mẽ và đáng tin cậy cho việc lưu trữ và truy vấn dữ liệu.
- Prometheus là một nền tảng giám sát mã nguồn mở được thiết kế để thu thập, lưu trữ và truy xuất các metric từ các hệ thống và ứng dụng khác nhau. Nó hỗ trợ việc giám sát thời gian thực và cung cấp các công cụ phân tích và cảnh báo mạnh mẽ.
- Grafana là một công cụ trực quan hóa dữ liệu và tạo bảng điều khiển đa nguồn dữ liệu. Nó cung cấp giao diện người dùng tương tác và linh hoạt để tạo biểu đồ, bảng điều khiển và báo cáo dựa trên dữ liệu từ nhiều nguồn, bao gồm Prometheus.
Khi kết hợp PostgreSQL, Grafana và Prometheus lại với nhau, bạn có thể thu thập và lưu trữ các metric từ PostgreSQL bằng Prometheus và sử dụng Grafana để trực quan hóa và hiển thị dữ liệu metric này. Bằng cách tạo các dashboard và biểu đồ trong Grafana, bạn có thể theo dõi hiệu suất, tình trạng và xu hướng của hệ thống PostgreSQL, giúp bạn phát hiện sự cố, tối ưu hiệu suất và đưa ra quyết định dựa trên dữ liệu thống kê và phân tích.
2. Tóm tắt quy trình triển khai.
Để giám sát PostgreSQL với Grafana và Prometheus trên Ubuntu 20.04, bạn cần cài đặt và cấu hình các thành phần sau đây:
- Cài đặt và cấu hình PostgreSQL: Đầu tiên, bạn cần cài đặt PostgreSQL trên máy chủ chạy Windows và cấu hình nó để chấp nhận kết nối từ các máy chủ khác.
- Cài đặt và cấu hình Prometheus: Tiếp theo, bạn cần cài đặt Prometheus trên máy chủ Ubuntu 20.04. Prometheus sẽ thu thập và lưu trữ các metric từ PostgreSQL.
- Cài đặt và cấu hình PostgreSQL Exporter: PostgreSQL Exporter là một công cụ được sử dụng để xuất các metric của PostgreSQL cho Prometheus. Bạn cần cài đặt PostgreSQL Exporter trên máy chủ Windows Server hoặc Windows 10, 11,… tuỳ ý bạn và cấu hình nó để kết nối và thu thập metric từ PostgreSQL.
- Cấu hình Prometheus để scrape PostgreSQL Exporter: Bạn cần chỉnh sửa file cấu hình của Prometheus để thêm PostgreSQL Exporter là một target để scrape metric. Điều này cho phép Prometheus lấy dữ liệu metric từ PostgreSQL Exporter.
- Cài đặt và cấu hình Grafana: Grafana là một công cụ trực quan hóa dữ liệu mạnh mẽ. Bạn cần cài đặt Grafana trên máy chủ Ubuntu 20.04 và cấu hình nó để kết nối với Prometheus làm nguồn dữ liệu.
- Tạo các Dashboard trong Grafana: Bạn có thể tạo các biểu đồ và dashboard trong Grafana để hiển thị các metric được thu thập từ PostgreSQL qua Prometheus và PostgreSQL Exporter.
Với cấu hình này, bạn có thể theo dõi và trực quan hóa các metric của PostgreSQL sử dụng Grafana trên Ubuntu 20.04. Bạn có thể tạo các biểu đồ, bảng điều khiển và cảnh báo để theo dõi hiệu suất và tình trạng của PostgreSQL.
3. Triển khai.
Bước 1 – Cài đặt PostgresSQL.
Đương nhiên rồi, phải cài đặt PostgresSQL mới có cái mà monitor, xem bài hướng dẫn sau để cài nóhttps://wiki.hoanghd.com/cai-dat-postgresql-len-he-dieu-hanh-windows/
Bước 2 – Cài đặt Prometheus.
Thực hiện theo bài https://wiki.hoanghd.com/cach-cai-dat-prometheus-len-he-dieu-hanh-ubuntu/
Bước 3 – Cài đặt Postgres Exporter
Lấy phiên bản mới nhất của Postgres Exporter.
VERSION=$(curl -s https://api.github.com/repos/prometheus-community/postgres_exporter/releases/latest|grep tag_name|cut -d '"' -f 4|sed 's/v//')Xác nhận lại phiên bản của Postgres Exporter.
$ echo $VERSION
0.12.1
Tạo thư mục chứa Postgres Exporter và di chuyển vào nó.
sudo mkdir /opt/postgres_exporter && cd /opt/postgres_exporterTải Postgres Exporter về thư mục này.
sudo wget https://github.com/prometheus-community/postgres_exporter/releases/download/v$VERSION/postgres_exporter-$VERSION.linux-amd64.tar.gzGiải nén file vừa tải về.
sudo tar -xf postgres_exporter-$VERSION.linux-*.tar.gzCopy các thành phần của Postgres Exporter sang thư mục /usr/local/bin.
sudo cp postgres_exporter-$VERSION.linux-*/postgres_exporter /usr/local/binTạo file biến môi trường postgres_exporter.env với nội dung dưới. Nội dung này chúng ta tạo một file tin có tên là postgres_exporter.env và thiết lập các biến môi trường cho PostgreSQL Exporter.
- Một ví dụ để giám sát tất cả các cơ sở dữ liệu trên PostgreSQL. Biến
DATA_SOURCE_NAMEđược thiết lập để kết nối với PostgreSQL thông quaDATA_SOURCE_NAME="postgresql://postgres:postgres@192.168.13.234:5432/?sslmode=disable". Điều này đặt tên người dùng (postgres) và mật khẩu (postgres) để truy cập vào PostgreSQL trên máy local, IP192.168.13.234chính là IP của PostgreSQL vàsslmode=disableđể vô hiệu hóa SSL.
Sau khi tạo và cấu hình file tin postgres_exporter.env, bạn có thể sử dụng nó để cung cấp các cấu hình kết nối cho PostgreSQL Exporter.
cat > postgres_exporter.env << 'OEF'
##To monitor all Databases##
DATA_SOURCE_NAME="postgresql://postgres:postgres@192.168.13.234:5432/?sslmode=disable"
OEF
Tạo file service Postgres Exporter.
cat > /etc/systemd/system/postgres_exporter.service << 'OEF'
[Unit]
Description=Prometheus exporter for Postgresql
Wants=network-online.target
After=network-online.target

[Service]
User=postgres_exporter
Group=postgres_exporter
WorkingDirectory=/opt/postgres_exporter
EnvironmentFile=/opt/postgres_exporter/postgres_exporter.env
ExecStart=/usr/local/bin/postgres_exporter --web.listen-address=:9187 --web.telemetry-path=/metrics
Restart=always

[Install]
WantedBy=multi-user.target

[Install]
WantedBy=multi-user.target

[Install]
WantedBy=multi-user.target
OEF
Chạy lệnh sau để tạo một người dùng hệ thống mới có tên “postgres_exporter”, Lệnh này sẽ tạo một người dùng hệ thống (-r) với shell /sbin/nologin và không tạo thư mục home.
sudo useradd -r -s /sbin/nologin postgres_exporterTa tạo một file tin có tên là postgres_exporter.service trong thư mục /etc/systemd/system/ để cấu hình PostgreSQL Exporter như một dịch vụ systemd.
- Phần
[Unit]chỉ định thông tin về dịch vụ, bao gồm mô tả (Description), yêu cầu các unit khác (Wants), và xác định thứ tự chạy sau các unit khác (After). - Phần
[Service]xác định cách dịch vụ được chạy. Người dùng (User) và nhóm (Group) được đặt làpostgres_exporter. Thư mục làm việc (WorkingDirectory) là/opt/postgres_exporter.EnvironmentFilechỉ định đường dẫn tới file tinpostgres_exporter.envđã được tạo trước đó, để đọc các biến môi trường.ExecStartxác định lệnh để khởi chạy PostgreSQL Exporter, với địa chỉ lắng nghe (--web.listen-address=:9187) và đường dẫn thống kê (--web.telemetry-path=/metrics).Restartđược thiết lập làalwaysđể tự động khởi động lại dịch vụ nếu nó dừng. - Phần
[Install]chỉ định các phụ thuộc và mức độ khởi động dịch vụ.
Sau khi tạo và cấu hình file tin postgres_exporter.service, bạn có thể sử dụng các lệnh systemd để quản lý dịch vụ PostgreSQL Exporter, chẳng hạn như systemctl start postgres_exporter để khởi động dịch vụ, systemctl enable postgres_exporter để tự động khởi động cùng với hệ thống, và systemctl status postgres_exporter để kiểm tra trạng thái của dịch vụ.
sudo chown -R postgres_exporter:postgres_exporter /opt/postgres_exporterLệnh daemon-reload sẽ cập nhật file /etc/systemd/system/postgres_exporter.service mà chúng ta mới tạo ở bước trên.
sudo systemctl daemon-reloadBật tính năng tự khởi động theo OS cho dịch vụ này.
sudo systemctl enable --now postgres_exporterKhởi động nó.
systemctl start postgres_exporterKiếm tra trạng thái.
systemctl status postgres_exporterNếu thành công bạn sẽ nhân được trạng thái là Active như dưới.
● postgres_exporter.service - Prometheus exporter for Postgresql
   Loaded: loaded (/etc/systemd/system/postgres_exporter.service; enabled; vendor preset: enabled)
   Active: active (running) since Tue 2023-06-20 08:07:10 UTC; 1min 39s ago
 Main PID: 5775 (postgres_export)
    Tasks: 5 (limit: 4915)
   CGroup: /system.slice/postgres_exporter.service
           └─5775 /usr/local/bin/postgres_exporter --web.listen-address=:9187 --web.telemetry-path=/metrics
...
Xác nhận port 9187 của dịch vụ postgres_expor đã listen.
$ netstat -tlnp | grep postgres_expor
tcp6       0      0 :::9187                 :::*                    LISTEN      5775/postgres_expor
Thêm nội dung dưới vào file /etc/prometheus/prometheus.yml. Phần cấu hình này trong Prometheus là để định nghĩa một công việc (job) có tên là “postgres_exporter” để thu thập thông tin từ PostgreSQL Exporter:
  - job_name: "postgres_exporter"
    scrape_interval: 5s
    static_configs:
- targets: ['192.168.13.208:9187']job_name: Đây là tên của công việc (job), trong trường hợp này là “postgres_exporter”. Nó sẽ được sử dụng để nhận dạng và xác định các cấu hình riêng cho công việc này trong Prometheus.scrape_interval: Đây là khoảng thời gian giữa các lần thu thập thông tin từ exporter. Trong trường hợp này, là 5 giây (5s). Điều này có nghĩa là Prometheus sẽ gửi yêu cầu scrape (lấy thông tin) đến PostgreSQL Exporter mỗi 5 giây.static_configs: Đây là phần cấu hình tĩnh cho công việc (job), cho phép định nghĩa các mục tiêu (targets) mà Prometheus sẽ scrape dữ liệu từ. Trong trường hợp này, mục tiêu là ‘192.168.13.208:9187’, tức là địa chỉ IP và cổng của PostgreSQL Exporter. Điều này cho phép Prometheus kết nối và lấy thông tin từ exporter để lưu trữ và phân tích.
Với cấu hình trên, Prometheus sẽ thực hiện scrape dữ liệu từ PostgreSQL Exporter mỗi 5 giây và lưu trữ nó để sử dụng cho việc giám sát và tạo đồ thị trong Grafana.
Như vậy cấu hình đầy đủ của bạn có thể sẽ giống thế này hoặc có thể khác tuỳ vào hệ thống của bạn đang giám sát.
cat > /etc/prometheus/prometheus.yml << 'OEF'
global:
  scrape_interval: 15s
  evaluation_interval: 15s

alerting:
  alertmanagers:
    - static_configs:
        - targets: []

rule_files:

scrape_configs:
  - job_name: "prometheus"
    static_configs:
      - targets: ["localhost:9090"]

  - job_name: "postgres_exporter"
    scrape_interval: 5s
    static_configs:
      - targets: ['192.168.13.208:9187']
OEF
Khởi động lại dịch vụ Prometheus.
sudo systemctl restart prometheusXác nhận Prometheus đã khởi động thành công.
sudo systemctl status prometheusĐầu ra của trạng thái Prometheus khi nó khởi động thành công.
● prometheus.service - Prometheus
   Loaded: loaded (/etc/systemd/system/prometheus.service; enabled; vendor preset: enabled)
   Active: active (running) since Tue 2023-06-20 08:15:54 UTC; 2s ago
 Main PID: 6397 (prometheus)
    Tasks: 13 (limit: 4915)
   CGroup: /system.slice/prometheus.service
           └─6397 /usr/local/bin/prometheus --config.file=/etc/prometheus/prometheus.yml --storage.tsdb.path=/var/lib/prometheus/ --web.console.templates=/etc/prometheus/consoles --web.console.libraries=/etc/prometheus/console_libraries --web.listen-address=0.0.0.0:9090
...
Giờ đây bạn có thể sử dụng lệnh curl http://192.168.13.208:9187/metrics | grep 13.234 với 192.168.13.208 là IP của Prometheus và 9187 là port của Postgres Exporter.
curl http://192.168.13.208:9187/metrics | grep 13.234
% Total % Received % Xferd Average Speed Time Time Time Current
Dload Upload Total Spent Left Speed
0 0 0 0 0 0 0 0 --:--:-- --:--:-- --:--:-- 0pg_locks_count{datname="postgres",mode="accessexclusivelock",server="192.168.13.234:5432"} 0
pg_locks_count{datname="postgres",mode="accesssharelock",server="192.168.13.234:5432"} 1
pg_locks_count{datname="postgres",mode="exclusivelock",server="192.168.13.234:5432"} 0
pg_locks_count{datname="postgres",mode="rowexclusivelock",server="192.168.13.234:5432"} 0
pg_locks_count{datname="postgres",mode="rowsharelock",server="192.168.13.234:5432"} 0
pg_locks_count{datname="postgres",mode="sharelock",server="192.168.13.234:5432"} 0
pg_locks_count{datname="postgres",mode="sharerowexclusivelock",server="192.168.13.234:5432"} 0
pg_locks_count{datname="postgres",mode="shareupdateexclusivelock",server="192.168.13.234:5432"} 0
pg_locks_count{datname="postgres",mode="sireadlock",server="192.168.13.234:5432"} 0
pg_locks_count{datname="template0",mode="accessexclusivelock",server="192.168.13.234:5432"} 0
pg_locks_count{datname="template0",mode="accesssharelock",server="192.168.13.234:5432"} 0
pg_locks_count{datname="template0",mode="exclusivelock",server="192.168.13.234:5432"} 0
pg_locks_count{datname="template0",mode="rowexclusivelock",server="192.168.13.234:5432"} 0
pg_locks_count{datname="template0",mode="rowsharelock",server="192.168.13.234:5432"} 0
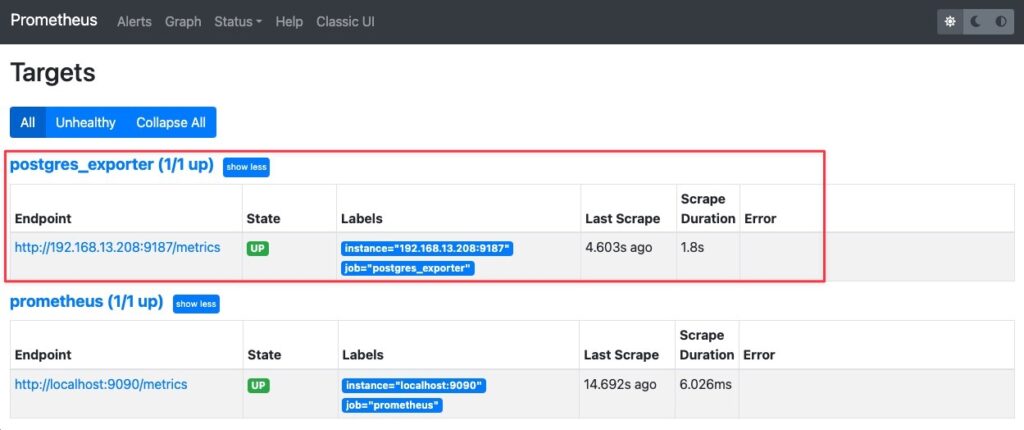
...Nếu bạn chuyển qua phần Targets của Prometheus bạn cũng sẽ thấy Targets của postgres_exporter đang ở trạng thái UP.
Bước 4 – Cài đặt Grafana.
Làm theo hướng dẫn https://wiki.hoanghd.com/huong-dan-cai-dat-grafana/
Bước 5 – Thêm Dashboard vào Grafana.
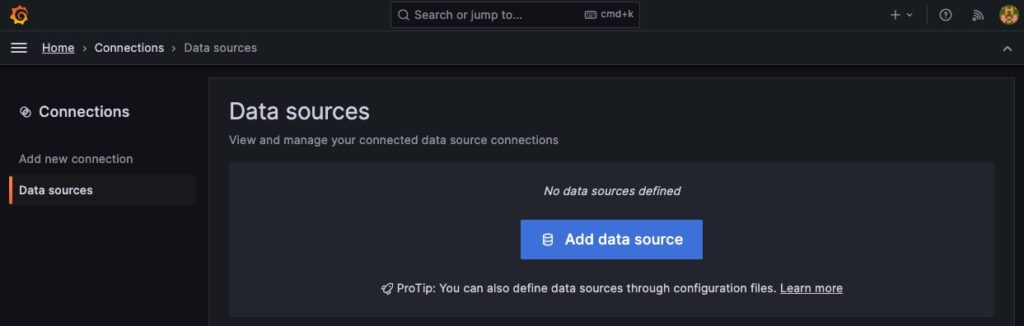
Muốn xem được thông tin metric của MongoDB Exporter thì đầu tiên bạn phải thêm Datasource của Prometheus vào Grafana trước, các bước theo trình tự như dưới.
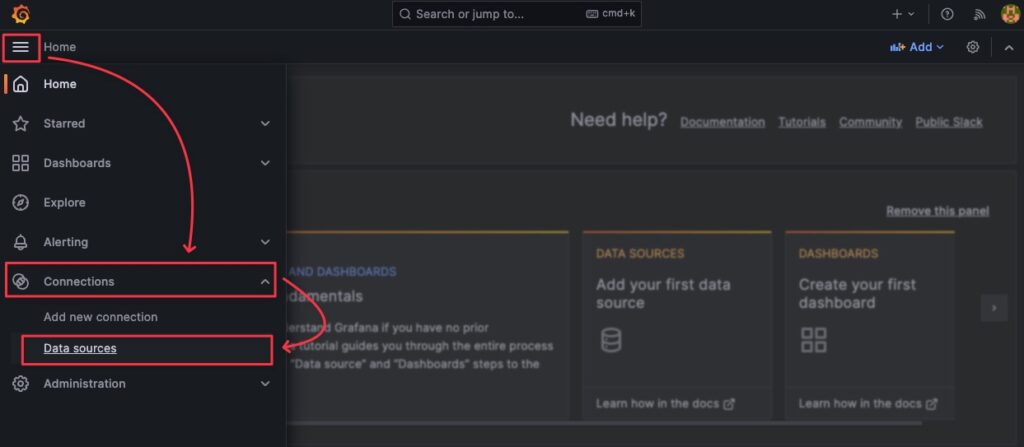
Bấm Add data source.
Chọn Datasource là Prometheus, đặt tên cho Datasource và điền thông tin url của Prometheus vào Prometheus server URL.
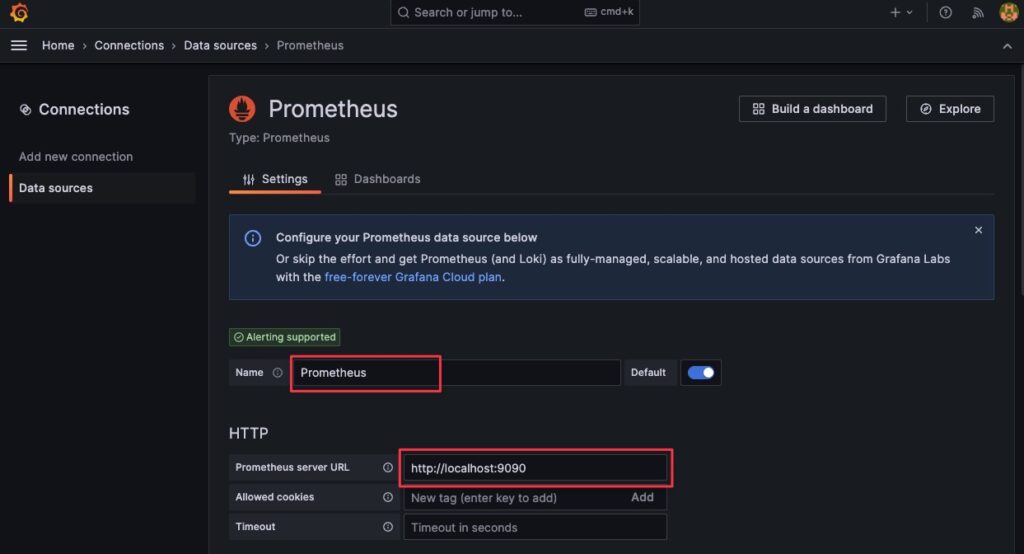
Kéo xuống dưới cùng và bấm Save and test (1), bạn nhận được thông báo (2) tức là đã thành công.

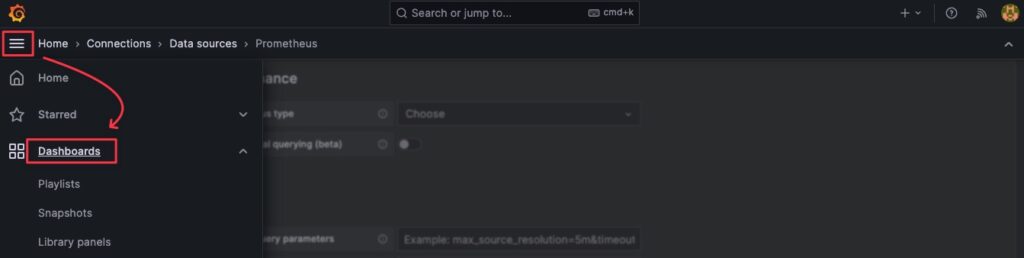
Bước 6 – Thêm Dashboard
Để tạo Dashboards thì bạn vào Dashboards.
Vào Import một Dashboard dành cho MongoDB.
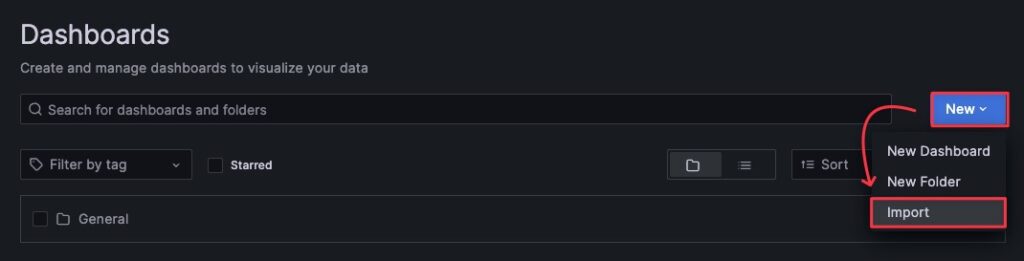
Bạn có thể sử dụng ID 9628 hoặc lấy thông tin để import ở url này https://wiki.hoanghd.com/wp-content/uploads/codes/grafana-dashboard-postgres-exporter.yml
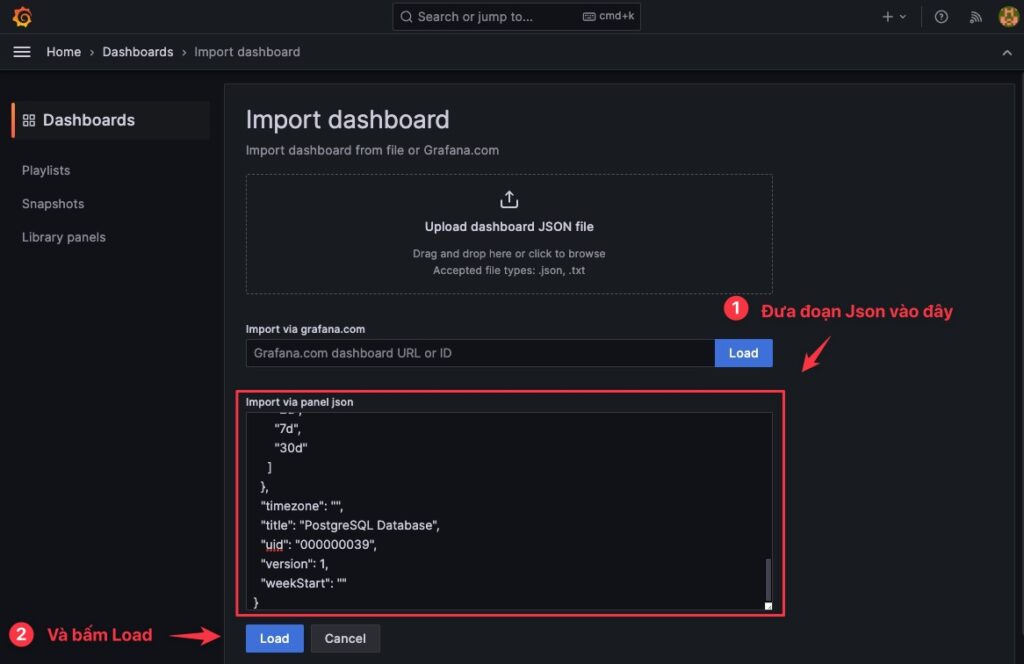
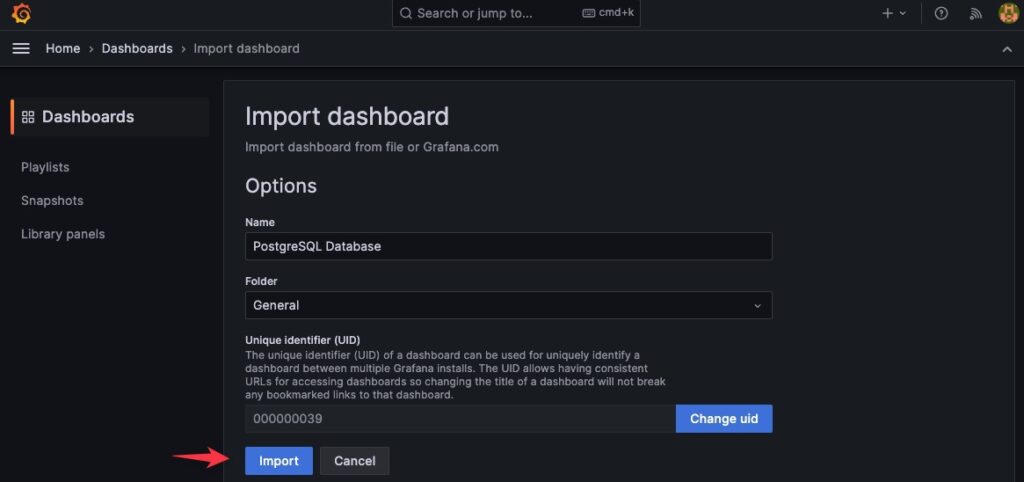
Bạn có thể để tên mặc định hoặc chỉnh sửa tuỳ ý và xong thì bấm Import.
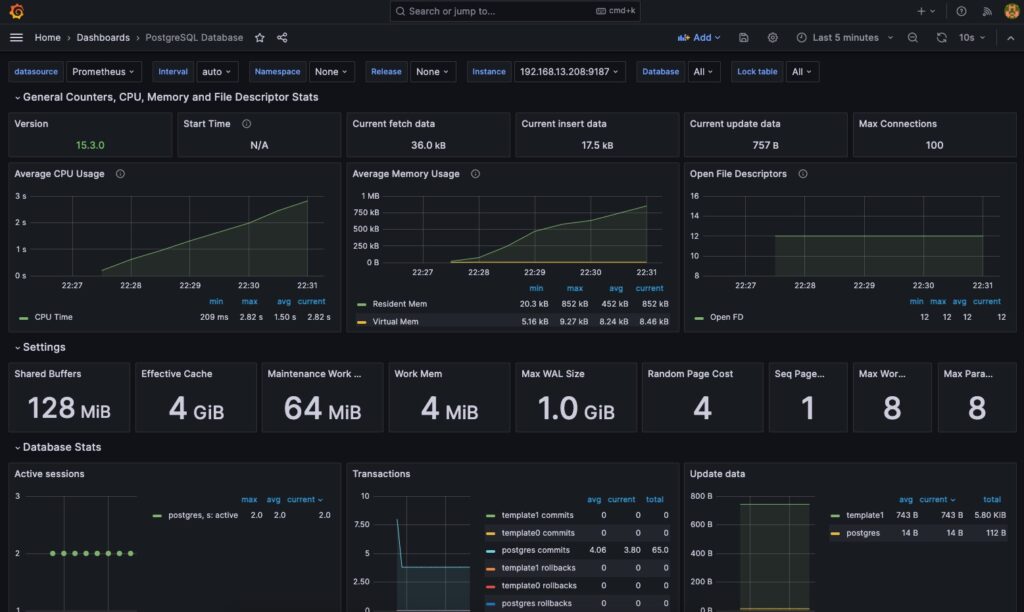
Kết quả nhé.