vPC là viết tắt của virtual Port Channel, là một công nghệ ảo hóa, được ra mắt vào năm 2009, cho phép các liên kết vật lý trên hai thiết bị Cisco Nexus 3000 5000 7000 hoặc 9000 khác nhau có thể được gom lại thành 1 cổng logic (channel) để kết nối tới các thiết bị Endpoint. Endpoint có thể là một switch, máy chủ, router hoặc bất kỳ thiết bị nào khác như Tường lửa hoặc Bộ cân bằng tải hỗ trợ công nghệ link aggregation LACP (EtherChannel).
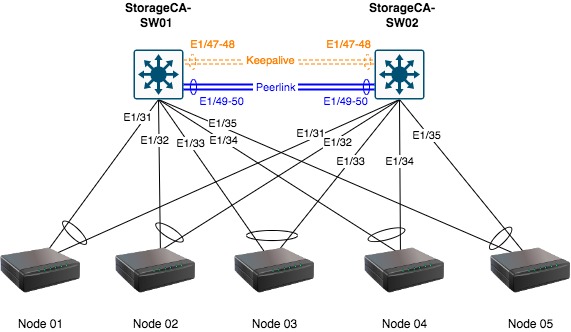
Sơ đồ:
1. Khởi động và kiểm tra version thiết bị
Hãy bật nguồn thiết bị và dưới đây là logs khởi động của nó. Khi thiết bị boot tới Abort Power On Auto Provisioning yes – continue with normal setup, skip – bypass password and basic configuration, no – continue with Power On Auto Provisioning[no], bạn hãy gõ skip để tiếp tục.
graphics_set_kernel_params enter:
Installing klm_card_index
done
INIT: version 2.88 booting
Skipping ata_piix install for n3k.
Unsquashing rootfs ...
Removing libcrdcfgdata and linking libcrdcfgdata3nk
Installing isan procfs ... done.
Installing SSE module with card index 11049 ... done.
Creating SSE device node 246 ... done.
Loading I2C driver ... done.
Installing CCTRL driver for card_type 30 without NEED_GEM ... done.
11.18: Interrupt throttling disabled. No cctrl irq detected.
Loading IGB driver ... done.
Checking for eUSB firmware upgrade..
eUSB firmware upgrade not required

Checking all filesystems.Current boot disk sda3..

Installing SPROM driver ... IS_N3K done.
Skipping installing default sprom values for N3k...
Installing pfmsvcs module with SPROM card index 11049 ... done.
Installing nvram module ... done.
Installing if_index module with port mode 1 ... done.
Installing fcfwd stub
Installing RNI lcnd ... done
Installing LC netdev ... done
Installing psdev module ... done.
Installing veobc module ... done.
Inserting OBFL module ... done.
Making OBFL character devices
Mounting OBFL pstore for mtd
exit code: 1
Starting OpenBSD Secure Shell server: sshd ... done.
Trim files after extracting TOR files ...
tune2fs 1.42.1 (17-Feb-2012)
Setting reserved blocks percentage to 0% (0 blocks)
Starting portmap daemon...
creating NFS state directory: done
starting 8 nfsd kernel threads: done
starting mountd: done
starting statd: done
Saving image for img-sync ...
Loading system software
Installing local RPMS
Patch Repository Setup completed successfully
Creating /dev/mcelog
Starting mcelog daemon
Removing dme lib
Moving N3K specific syslog config file
INIT: Entering runlevel: 3
Running S93thirdparty-script...

Populating conf files for hybrid sysmgr ...
Removing bios-imgs and /lcimages
Starting hybrid sysmgr ...
inserting /isan/lib/modules/klm_cisco_nb.o ... done
Executing Prune clis.
2022 Nov 16 02:19:00  %$ VDC-1 %$ %USER-0-SYSTEM_MSG:  pfm_init; line 1537   - pfm
2022 Nov 16 02:19:01  %$ VDC-1 %$ %PLATFORM-2-PS_FAIL: Power supply 1 failed or shut down (Serial number LIT17270N90)
2022 Nov 16 02:19:01  %$ VDC-1 %$ %PLATFORM-2-PS_OK: Power supply 2 ok (Serial number LIT17280D43)
2022 Nov 16 02:19:01  %$ VDC-1 %$ %PLATFORM-2-PS_FANOK: Fan in Power supply 2 ok
2022 Nov 16 02:19:01  %$ VDC-1 %$ %PLATFORM-2-PS_ABSENT: Power supply 1 is absent/shutdown, ps-redundancy might be affected
2022 Nov 16 02:19:01  %$ VDC-1 %$ %PLATFORM-2-PS_RED_MODE_CHG: Power supply operational redundancy mode changed to non-redundant
2022 Nov 16 02:19:01  %$ VDC-1 %$ %PLATFORM-2-FANMOD_FAN_OK: Fan module 1 (Fan1(sys_fan1) fan) ok
2022 Nov 16 02:19:01  %$ VDC-1 %$ %USER-0-SYSTEM_MSG:  before access to bkout_cfg  - clis
2022 Nov 16 02:19:07  %$ VDC-1 %$ netstack: Registration with cli server complete
2022 Nov 16 02:19:23  %$ VDC-1 %$ %USER-2-SYSTEM_MSG: ssnmgr_app_init called on ssnmgr up - aclmgr
2022 Nov 16 02:19:32  %$ VDC-1 %$ %USER-0-SYSTEM_MSG: end of default policer - copp
2022 Nov 16 02:19:42  %$ VDC-1 %$ %VDC_MGR-2-VDC_ONLINE: vdc 1 has come online
Waiting for system online status before starting POAP ...
Starting Power On Auto Provisioning...2022 Nov 16 02:20:17 switch %$ VDC-1 %$ %ASCII-CFG-2-CONF_CONTROL: System ready
Done

2022 Nov 16 02:20:43 switch %$ VDC-1 %$ %POAP-2-POAP_DHCP_DISCOVER_START: [FOC1552R0JU-54:7F:EE:76:46:7C] - POAP DHCP Discover phase started
2022 Nov 16 02:20:43 switch %$ VDC-1 %$ %POAP-2-POAP_INFO:   - Abort Power On Auto Provisioning [yes - continue with normal setup, skip - bypass password and basic configuration, no - continue with Power On Auto Provisioning] (yes/skip/no)[no]:
2022 Nov 16 02:20:43 switch %$ VDC-1 %$ %POAP-2-POAP_FAILURE: [FOC1552R0JU-54:7F:EE:76:46:7C] - POAP DHCP discover phase failed
2022 Nov 16 02:20:49 switch %$ VDC-1 %$ %POAP-2-POAP_INFO: [FOC1552R0JU-54:7F:EE:76:46:7C] - USB Initializing Success
2022 Nov 16 02:20:49 switch %$ VDC-1 %$ %POAP-2-POAP_INFO: [FOC1552R0JU-54:7F:EE:76:46:7C] - USB disk not detected
2022 Nov 16 02:20:49 switch %$ VDC-1 %$ last message repeated 1 time
Sau khi gõ skip, thiết bị sẽ đưa bạn vào dòng lệnh login, bạn có thể login với thông tin username là admin và password thì để trống nếu đã đưa thiết bị về cài đặt gốc.
!!! NOTE: You have selected skip option. POAP will be aborted and password configuration will be skipped !!!
Disabling POAP.......Disabling POAP
Enabling feature lldp by default
Basic configuration has been skipped!
Applying default configuration
N3K:Applying Default CoPP configuration

User Access Verification
switch login:
Nếu login thành công, thiết bị sẽ đưa bạn về màn hình như dưới.
Cisco Nexus Operating System (NX-OS) Software
TAC support: http://www.cisco.com/tac
Copyright (C) 2002-2018, Cisco and/or its affiliates.
All rights reserved.
The copyrights to certain works contained in this software are
owned by other third parties and used and distributed under their own
licenses, such as open source.  This software is provided "as is," and unless
otherwise stated, there is no warranty, express or implied, including but not
limited to warranties of merchantability and fitness for a particular purpose.
Certain components of this software are licensed under
the GNU General Public License (GPL) version 2.0 or
GNU General Public License (GPL) version 3.0  or the GNU
Lesser General Public License (LGPL) Version 2.1 or
Lesser General Public License (LGPL) Version 2.0.
A copy of each such license is available at
http://www.opensource.org/licenses/gpl-2.0.php and
http://opensource.org/licenses/gpl-3.0.html and
http://www.opensource.org/licenses/lgpl-2.1.php and
http://www.gnu.org/licenses/old-licenses/library.txt.
switch#
Bạn nên reset lại cài đặt gốc trước khi thực hiện VPC. Điều kiện tiên quyết là 2 thiết bị phải cùng loại, cùng version. Dùng lệnh show version để check version thiết bị, hiện tại mình đang sử dụng Nexus3000 C3064PQ Chassis với BIOS version 4.5.0 và NXOS version 7.0(3)I7(3).
switch# show version
Cisco Nexus Operating System (NX-OS) Software
TAC support: http://www.cisco.com/tac
Copyright (C) 2002-2018, Cisco and/or its affiliates.
All rights reserved.
The copyrights to certain works contained in this software are
owned by other third parties and used and distributed under their own
licenses, such as open source.  This software is provided "as is," and unless
otherwise stated, there is no warranty, express or implied, including but not
limited to warranties of merchantability and fitness for a particular purpose.
Certain components of this software are licensed under
the GNU General Public License (GPL) version 2.0 or
GNU General Public License (GPL) version 3.0  or the GNU
Lesser General Public License (LGPL) Version 2.1 or
Lesser General Public License (LGPL) Version 2.0.
A copy of each such license is available at
http://www.opensource.org/licenses/gpl-2.0.php and
http://opensource.org/licenses/gpl-3.0.html and
http://www.opensource.org/licenses/lgpl-2.1.php and
http://www.gnu.org/licenses/old-licenses/library.txt.

Software
  BIOS: version 4.5.0
  NXOS: version 7.0(3)I7(3)
  BIOS compile time:  11/09/2017
  NXOS image file is: bootflash:///nxos.7.0.3.I7.3.bin
  NXOS compile time:  2/12/2018 13:00:00 [02/12/2018 19:13:48]


Hardware
  cisco Nexus3000 C3064PQ Chassis
  Intel(R) Celeron(R) CPU        P4505  @ 1.87GHz with 3902884 kB of memory.
  Processor Board ID FOC18340FJ7

  Device name: switch
  bootflash:    1838592 kB
  usb1:               0 kB (expansion flash)

Kernel uptime is 0 day(s), 0 hour(s), 11 minute(s), 34 second(s)

Last reset at 465890 usecs after Wed Nov 16 02:00:56 2022
  Reason: Reset Requested by CLI command reload
  System version: 7.0(3)I7(3)
  Service:

plugin
  Core Plugin, Ethernet Plugin

Active Package(s):
Sau khi chắc chắn 2 thiết bị đã đồng bộ, chúng ta qua phần tiếp theo.
2. Cài đặt đồng bộ thời gian (áp dụng cả 2 thiết bị).
Cài đặt timezone trên 2 thiết bị bằng các câu lệnh dưới.
configure terminal
clock protocol none vdc 1
clock timezone UTC 0 0
no clock timezone
end
Cài đặt thời gian.
$ clock set 10:13:40 16 Nov 2022
Wed Nov 16 10:13:40 UTC 2022
Verify lại kết quả sau khi cài đặt.
$ show clock
10:13:54.188 UTC Wed Nov 16 2022
Time source is Hardware Calendar
3. Cấu hình cơ bản cho thiết bị (áp dụng cho cả 2 thiết bị)
Đặt hostname, cài đặt không hiển thi logs trong console, tắt lookup domain để không bị dính console khi gõ sai lệnh.
+ Với thiết bị 1.
switch# configure terminal
switch(config)# hostname StorageCA-SW01
StorageCA-SW01(config)# no ip domain-lookup
StorageCA-SW01(config)#no logging console
+ Với thiết bị 2.
switch# configure terminal
switch(config)# hostname StorageCA-SW02
StorageCA-SW01(config)# no ip domain-lookup
StorageCA-SW01(config)#no logging console
Cài đặt username và mật khẩu login.
StorageCA-SW01(config)# username admin password Hoanghd164 role network-adminTuỳ nhu cầu của bạn, bạn có thể config thay đổi portmode cho thiết bị, nếu không có nhu cầu thì bạn có thể bỏ qua bước này.
StorageCA-SW01(config)# hardware profile portmode 48x10G+4x40G
Warning: This command will take effect only after saving the configuration and reload! Port configurations could get lost when port mode is changed! We suggest you clean up the impacted interfaces config and redo them after boot up!
Sau khi thay đổi portmode hãy lưu config lại để tiến hành reboot thiết bị.
StorageCA-SW01(config)# copy running-config startup-config
[########################################] 100%
Copy complete, now saving to disk (please wait)...
Copy complete.
Reboot thiết bị bằng lệnh sau.
StorageCA-SW01(config)# reload
This command will reboot the system. (y/n)?  [n] y
Sau khi thiết bị khởi động xong, hãy login vào thiết bị bằng username và mật khẩu mới.
StorageCA-SW01 login: admin
Password:

Cisco Nexus Operating System (NX-OS) Software
TAC support: http://www.cisco.com/tac
Copyright (C) 2002-2018, Cisco and/or its affiliates.
All rights reserved.
The copyrights to certain works contained in this software are
owned by other third parties and used and distributed under their own
licenses, such as open source.  This software is provided "as is," and unless
otherwise stated, there is no warranty, express or implied, including but not
limited to warranties of merchantability and fitness for a particular purpose.
Certain components of this software are licensed under
the GNU General Public License (GPL) version 2.0 or
GNU General Public License (GPL) version 3.0  or the GNU
Lesser General Public License (LGPL) Version 2.1 or
Lesser General Public License (LGPL) Version 2.0.
A copy of each such license is available at
http://www.opensource.org/licenses/gpl-2.0.php and
http://opensource.org/licenses/gpl-3.0.html and
http://www.opensource.org/licenses/lgpl-2.1.php and
http://www.gnu.org/licenses/old-licenses/library.txt.
StorageCA-SW01#
Bạn có thể verify lại portmode bằng lệnh dưới.
StorageCA-SW01# show running-config | include 'hardware profile portmode'
hardware profile portmode 48x10G+4x40G
4. Cấu hình interface keepalive và peerlink (áp dụng cho cả 2 thiết bị)
Vì thiết bị có sử dụng layer 3 và lacp nên mình sẽ enable tính năng interface-vlan và lacp trên thiết bị.
feature interface-vlan
feature lacp
Mình tạo vlan 301 cho server kết nối vào và đặt tên cho vlan này là vz-storage-ca.
vlan 301
  name vz-storage-ca
Cài đặt IP Management để sau này có thể remote từ xa.
+ Với thiết bị 1.
interface mgmt0
  description Management IP Address
  no shutdown
  vrf member management
  ip address 192.168.89.247/25
+ Với thiết bị 2.
interface mgmt0
  description Management IP Address
  no shutdown
  vrf member management
  ip address 192.168.89.248/25
Cấu hình interface để làm keepalive, mình sử dụng lacp để có dự phòng. Ở switch 1 mình đặt ip keepalive là 10.0.0.1/30 và trên switch 02 là 10.0.0.2/30.
interface Ethernet1/47
  description keepalive link 01
  no shutdown
  switchport
  no switchport
  channel-group 101 mode active

interface Ethernet1/48
  description keepalive link 02
  no shutdown
  switchport
  no switchport
  channel-group 101 mode active
+ Với thiết bị 1.
interface port-channel101
  description keepalive check
  no shutdown
  no switchport
  ip address 10.0.0.1/30
+ Với thiết bị 2.
interface port-channel101
  description keepalive check
  no shutdown
  no switchport
  ip address 10.0.0.2/30
Cấu hình interface để làm peerlink, mình cũng sử dụng lacp để có dự phòng. Ở interface này mình sẽ chạy port mode trunk.
interface Ethernet1/49
  description Peerlink Data 01
  no shutdown
  switchport
  switchport mode trunk
  channel-group 100 mode active

interface Ethernet1/50
  description Peerlink Data 02
  no shutdown
  switchport
  switchport mode trunk
  channel-group 100 mode active

interface port-channel100
  description LACP Peerlink Switch
  no shutdown
  switchport
  switchport mode trunk
  spanning-tree port type network
Bạn hãy thực hiện nối các port mạng Eth1/47, Eth1/48, Eth1/49, Eth1/50 của 2 thiết bị để các port có liên kết với nhau.
StorageCA-SW01(config)# show interface brief | grep 'Eth1/47\|Eth1/48\|Eth1/49\|Eth1/50'
Eth1/47       --      eth  routed up      none                        10G(D) 101
Eth1/48       --      eth  routed up      none                        10G(D) 101
Eth1/49       1       eth  trunk  up      none                        40G(D) 100
Eth1/50       1       eth  trunk  up      none                        40G(D) 100
Như vậy mình đã chuẩn bị xong các config cơ bản, bây giờ hãy verify lại 1 chút. Khi show port-channel summary bạn đã thấy có 2 port channel ở trạng thái up.
StorageCA-SW01(config)# show port-channel summary
Flags:  D - Down        P - Up in port-channel (members)
        I - Individual  H - Hot-standby (LACP only)
        s - Suspended   r - Module-removed
        b - BFD Session Wait
        S - Switched    R - Routed
        U - Up (port-channel)
        p - Up in delay-lacp mode (member)
        M - Not in use. Min-links not met
--------------------------------------------------------------------------------
Group Port-       Type     Protocol  Member Ports
      Channel
--------------------------------------------------------------------------------
100   Po100(SU)   Eth      LACP      Eth1/49(P)   Eth1/50(P)
101   Po101(RU)   Eth      LACP      Eth1/47(P)   Eth1/48(P)
5. Cấu hình Virtual Port Channel (áp dụng cho cả 2 thiết bị).
Enable tính năng vpc trên thiết bị.
feature vpcCấu hình Virtual Port Channel.
+ Với thiết bị 1.
vpc domain 1
  peer-switch
  role priority 10
  peer-keepalive destination 10.0.0.2 source 10.0.0.1 vrf default
  delay restore 10
  peer-gateway
  auto-recovery
  ip arp synchronize
+ Với thiết bị 2.
vpc domain 1
  peer-switch
  role priority 20
  peer-keepalive destination 10.0.0.1 source 10.0.0.2 vrf default
  delay restore 10
  peer-gateway
  auto-recovery
  ip arp synchronize
Đây là cấu hình của một VPC domain trên switch Cisco Nexus.
Các dòng lệnh có các tác dụng như sau:
vpc domain 1: Định nghĩa một domain vPC với ID là 1. Tất cả các cặp switch vPC phải có cùng domain ID.peer-switch: Cho phép cả hai switch vPC hoạt động như một switch duy nhất từ góc nhìn của Spanning Tree Protocol (STP).role priority 10: Đặt độ ưu tiên cho switch này trong cặp vPC. Giá trị thấp hơn có độ ưu tiên cao hơn.peer-keepalive destination 10.0.0.2 source 10.0.0.1 vrf default: Cấu hình địa chỉ IP đích và nguồn cho gói tin keepalive được sử dụng để giữ kết nối giữa các switch trong VPC domain. Trong trường hợp này, địa chỉ IP đích là 10.0.0.2 và địa chỉ IP nguồn là 10.0.0.1. VRF mặc định được sử dụng.delay restore 10: Tính năng delay restore trong cấu hình vPC của Cisco Nexus cho phép bạn đặt một khoảng thời gian chờ trước khi khôi phục các cổng vPC sau khi switch vPC chính trở lại hoạt động.- Khi một switch vPC chính bị mất kết nối và sau đó trở lại hoạt động, việc khôi phục ngay lập tức các cổng vPC có thể gây ra nhấp nháy hoặc gây ra lỗi trong hệ thống. Đặt một khoảng thời gian chờ giúp hệ thống có thêm thời gian để ổn định trước khi khôi phục các cổng vPC.
- Trong trường hợp trên delay restore 10 đặt thời gian chờ là 10 giây. Điều này có nghĩa là sau khi switch vPC chính trở lại hoạt động, hệ thống sẽ chờ 10 giây trước khi khôi phục các cổng vPC.
- Ví dụ giả sử bạn có một hệ thống mạng với hai switch vPC, Switch A và Switch B, kết nối với một máy chủ Server X thông qua vPC:
- Trường hợp không sử dụng delay restore: Nếu Switch A (switch vPC chính) bị mất kết nối và sau đó trở lại hoạt động, các cổng vPC sẽ được khôi phục ngay lập tức. Tuy nhiên, việc khôi phục ngay lập tức có thể gây ra nhấp nháy hoặc gây ra lỗi trong hệ thống.
- Trường hợp sử dụng delay restore 10: Nếu Switch A (switch vPC chính) bị mất kết nối và sau đó trở lại hoạt động, hệ thống sẽ chờ 10 giây trước khi khôi phục các cổng vPC. Khoảng thời gian chờ này giúp hệ thống có thêm thời gian để ổn định trước khi khôi phục các cổng vPC, giúp giảm thiểu khả năng xảy ra lỗi.
peer-gateway: Cho phép switch vPC chuyển tiếp các gói dữ liệu có địa chỉ MAC đích là địa chỉ MAC của switch vPC đối tác:- Ví dụ giả sử bạn có hai switch vPC, Switch A và Switch B, và một máy chủ Server X kết nối với cả hai switch thông qua vPC. Server X có địa chỉ MAC là MAC_X, Switch A có địa chỉ MAC là MAC_A và Switch B có địa chỉ MAC là MAC_B.
- Khi Server X gửi một gói dữ liệu đến MAC_B (địa chỉ MAC của Switch B), nhưng gói dữ liệu này lại đi qua Switch A do quyết định của thuật toán load-balancing. Nếu không có tính năng peer-gateway, Switch A sẽ từ chối gói dữ liệu này vì nó có địa chỉ MAC đích không phải của mình. Tuy nhiên, khi peer-gateway được kích hoạt, Switch A sẽ chấp nhận và chuyển tiếp gói dữ liệu này đến Switch B, ngay cả khi địa chỉ MAC đích là MAC_B. Điều này giúp cải thiện hiệu suất và độ tin cậy của hệ thống.
auto-recovery: Cho phép khôi phục tự động sau khi mất kết nối peer-link:- Tính năng auto-recovery trong cấu hình vPC của Cisco Nexus cho phép hệ thống khôi phục tự động sau khi mất kết nối peer-link. Peer-link là kết nối giữa hai switch vPC và nó rất quan trọng để duy trì hoạt động của vPC.
- Khi auto-recovery được kích hoạt, nếu một switch vPC mất kết nối peer-link nhưng vẫn giữ kết nối peer-keepalive, nó sẽ tự động khôi phục lại vPC sau một khoảng thời gian chờ (mặc định là 240 giây).
- Ví dụ giả sử bạn có một hệ thống mạng với hai switch vPC, Switch A và Switch B, kết nối với một máy chủ Server X thông qua vPC:
- Trường hợp không bật auto-recovery: Nếu kết nối peer-link giữa Switch A và Switch B bị mất, cả hai switch sẽ trở thành vPC primary và có thể gây ra lỗi STP hoặc tình trạng split-brain. Trong tình huống này, Server X có thể mất kết nối với một trong hai switch, dẫn đến giảm hiệu suất và độ tin cậy.
- Tuy nhiên, việc bật auto-recovery cũng có thể tạo ra độ trễ do thời gian chờ để khôi phục vPC. Nếu hệ thống của bạn yêu cầu thời gian phản hồi nhanh chóng và không thể chấp nhận bất kỳ độ trễ nào, bạn có thể cần xem xét việc không bật auto-recovery và tìm các phương pháp khác để cải thiện độ tin cậy và khả năng chịu lỗi.
ip arp synchronize: Đồng bộ hóa bảng ARP giữa các switch vPC để cải thiện tính sẵn sàng và độ tin cậy.- Ví dụ giả sử bạn có hai switch vPC, Switch A và Switch B, và một máy chủ Server X kết nối với cả hai switch thông qua vPC. Server X có địa chỉ IP là IP_X và địa chỉ MAC là MAC_X:
- Khi Server X gửi một gói dữ liệu đến Switch A, Switch A sẽ cập nhật bảng ARP của mình với ánh xạ IP_X đến MAC_X. Tuy nhiên, nếu không có tính năng ip arp synchronize, bảng ARP của Switch B sẽ không được cập nhật và không biết về ánh xạ này.
- Khi ip arp synchronize được kích hoạt, sau khi Switch A cập nhật bảng ARP của mình, nó sẽ thông báo cho Switch B để cập nhật bảng ARP tương ứng. Kết quả là, cả hai switch đều biết về ánh xạ từ IP_X đến MAC_X, dù chỉ có Switch A nhận được gói dữ liệu từ Server X. Điều này giúp cải thiện tính sẵn sàng và độ tin cậy của hệ thống.
Enable peerlink cho port-channel100.
Trong cấu hình vPC (Virtual Port-Channel) của Cisco Nexus, vpc peer-link được sử dụng để chỉ định một kết nối peer-link. Peer-link là một kết nối EtherChannel giữa hai switch vPC và nó rất quan trọng để duy trì hoạt động của vPC.
Khi vpc peer-link được bật trên một interface (trong trường hợp này là port-channel100), interface đó sẽ được sử dụng như một kết nối peer-link giữa hai switch vPC.
- Kết nối peer-link thực hiện các chức năng sau:
- Chuyển tiếp các gói dữ liệu giữa hai switch vPC nếu một trong các kết nối vPC đến máy chủ bị mất.
- Đồng bộ hóa các thông tin vPC như CDP, STP, và VLAN giữa hai switch vPC.
- Giúp xác định switch vPC chính và switch vPC phụ.
Vì vậy, việc bật vpc peer-link giúp cải thiện độ tin cậy và khả năng chịu lỗi của hệ thống mạng.
interface port-channel100
vpc peer-link
Bây giờ bạn hãy show vpc, bạn sẽ nhận kết quả vPC đã hoạt động.
StorageCA-SW01# show  vpc
Legend:
                (*) - local vPC is down, forwarding via vPC peer-link

vPC domain id                     : 1
Peer status                       : peer adjacency formed ok
vPC keep-alive status             : peer is alive
Configuration consistency status  : success
Per-vlan consistency status       : success
Type-2 consistency status         : success
vPC role                          : primary
Number of vPCs configured         : 0
Peer Gateway                      : Enabled
Dual-active excluded VLANs        : -
Graceful Consistency Check        : Enabled
Auto-recovery status              : Enabled, timer is off.(timeout = 240s)
Delay-restore status              : Timer is off.(timeout = 10s)
Delay-restore SVI status          : Timer is off.(timeout = 10s)
Operational Layer3 Peer-router    : Disabled

vPC Peer-link status
---------------------------------------------------------------------
id    Port   Status Active vlans
--    ----   ------ -------------------------------------------------
1     Po100  up     1,301
Bây giờ mình sẽ tạo 1 số port vPC để kết nối tới các thiết bị khác ví dụ như server.
interface Ethernet1/31
  description Node 01
  no shutdown
  channel-group 31 mode active

interface Ethernet1/32
  description Node 02
  no shutdown
  channel-group 32 mode active

interface Ethernet1/33
  description Node 03
  no shutdown
  channel-group 33 mode active

interface Ethernet1/34
  description Node 04
  no shutdown
  channel-group 34 mode active

interface Ethernet1/35
  description Node 05
  no shutdown
  channel-group 35 mode active
Join port channel này vào vPC.
Sau khi đã tạo xong các port channel, bạn hãy join port channel này vào vPC cú pháp như dưới.
interface port-channel31
  description Node 01
  no shutdown
  switchport access vlan 301
  vpc 31

interface port-channel32
  description Node 02
  no shutdown
  switchport access vlan 301
  vpc 32

interface port-channel33
  description Node 03
  no shutdown
  switchport access vlan 301
  vpc 33

interface port-channel34
  description Node 04
  no shutdown
  switchport access vlan 301
  vpc 34

interface port-channel35
  description Node 05
  no shutdown
  switchport access vlan 301
  vpc 35
Trong cấu hình vPC (Virtual Port-Channel) của Cisco Nexus, vpc 35 được sử dụng để chỉ định rằng interface port-channel35 sẽ là một phần của vPC có ID là 35.
- Cụ thể, dòng cấu hình vpc 35 có các ý nghĩa sau:
- port-channel35 sẽ được cấu hình như một phần của vPC. vPC cho phép bạn cấu hình một EtherChannel trên hai thiết bị Nexus, giúp cải thiện độ tin cậy và băng thông của hệ thống.
- port-channel35 sẽ được cấu hình như một phần của vPC có ID là 35. ID vPC (trong trường hợp này là 35) được sử dụng để phân biệt các vPC khác nhau trong cùng một hệ thống mạng.
- Các gói dữ liệu được gửi đến port-channel35 sẽ được chuyển tiếp theo cấu hình của vPC 35.
Vì vậy, việc thêm vpc 35 vào cấu hình của port-channel35 giúp cải thiện độ tin cậy và băng thông của hệ thống mạng, đồng thời cho phép bạn quản lý cấu hình của port-channel35 thông qua cấu hình của vPC 35.
Hãy show lại vPC, ở cột vPC status bạn thấy các port channel sau khi join vào vPC đã xuất hiện.
StorageCA-SW01# show vpc
Legend:
                (*) - local vPC is down, forwarding via vPC peer-link

vPC domain id                     : 1
Peer status                       : peer adjacency formed ok
vPC keep-alive status             : peer is alive
Configuration consistency status  : success
Per-vlan consistency status       : success
Type-2 consistency status         : success
vPC role                          : primary
Number of vPCs configured         : 10
Peer Gateway                      : Enabled
Dual-active excluded VLANs        : -
Graceful Consistency Check        : Enabled
Auto-recovery status              : Enabled, timer is off.(timeout = 240s)
Delay-restore status              : Timer is off.(timeout = 10s)
Delay-restore SVI status          : Timer is off.(timeout = 10s)
Operational Layer3 Peer-router    : Disabled

vPC Peer-link status
---------------------------------------------------------------------
id    Port   Status Active vlans
--    ----   ------ -------------------------------------------------
1     Po100  up     1,301


vPC status
----------------------------------------------------------------------------
Id    Port          Status Consistency Reason                Active vlans
--    ------------  ------ ----------- ------                ---------------
31    Po31          down*  Not         Consistency Check Not -

                           Applicable   Performed

32    Po32          down*  Not         Consistency Check Not -

                           Applicable   Performed

33    Po33          down*  Not         Consistency Check Not -

                           Applicable   Performed

34    Po34          down*  Not         Consistency Check Not -

                           Applicable   Performed

35    Po35          down*  Not         Consistency Check Not -

                           Applicable   Performed

Please check "show vpc consistency-parameters vpc <vpc-num>" for the
consistency reason of down vpc and for type-2 consistency reasons for
any vpc.
Các bạn thấy trạng thái của port channel khi show vpc đang là Not Consistency Check Not – Applicable Performed. Các bạn chỉ cần tạo xong các port channel và join port channel này vào vPC cho switch còn lại thì chúng sẽ tự động chuyển qua trạng thái success như dưới.
StorageCA-SW01# show vpc
Legend:
                (*) - local vPC is down, forwarding via vPC peer-link

vPC domain id                     : 1
Peer status                       : peer adjacency formed ok
vPC keep-alive status             : peer is alive
Configuration consistency status  : success
Per-vlan consistency status       : success
Type-2 consistency status         : success
vPC role                          : primary
Number of vPCs configured         : 10
Peer Gateway                      : Enabled
Dual-active excluded VLANs        : -
Graceful Consistency Check        : Enabled
Auto-recovery status              : Enabled, timer is off.(timeout = 240s)
Delay-restore status              : Timer is off.(timeout = 10s)
Delay-restore SVI status          : Timer is off.(timeout = 10s)
Operational Layer3 Peer-router    : Disabled

vPC Peer-link status
---------------------------------------------------------------------
id    Port   Status Active vlans
--    ----   ------ -------------------------------------------------
1     Po100  up     1,301


vPC status
----------------------------------------------------------------------------
Id    Port          Status Consistency Reason                Active vlans
--    ------------  ------ ----------- ------                ---------------
31    Po31          down*  success     success               -


32    Po32          down*  success     success               -


33    Po33          down*  success     success               -


34    Po34          down*  success     success               -


35    Po35          down*  success     success               -


Please check "show vpc consistency-parameters vpc <vpc-num>" for the
consistency reason of down vpc and for type-2 consistency reasons for
any vpc.
Sau khi hoàn thành, bạn hãy cấu hình block ssh để tăng bảo mật cho thiết bị của bạn.
# Access list block SSH
ip access-list vty-acl-in
  statistics per-entry
  30 permit tcp 192.168.0.0/16 any eq 22
  70 permit tcp 10.0.0.0/30 any eq 22
  80 deny ip any any

line vty
  access-class vty-acl-in in
Mình thực hiện routing vrf management để sử dụng cho việc quản lý.
vrf context management
  ip route 0.0.0.0/0 192.168.89.129
Sau khi hoàn thành hãy lưu lại config.
StorageCA-SW01# copy running-config  startup-config
[########################################] 100%
Copy complete, now saving to disk (please wait)...
