Trong hướng dẫn hôm nay, chúng ta sẽ theo dõi Jenkins bằng Prometheus và Grafana. Chúng ta sẽ chạy Jenkins, Prometheus và Grafana bằng docker và sẽ định cấu hình các chỉ số cho Jenkins được đẩy tới Prometheus và cuối cùng là bảng dashboard trong Grafana.
1. Cài đặt plugin Prometheus Jenkins
Trước tiên bạn hãy vào Manage Jenkins -> Manage Plugins
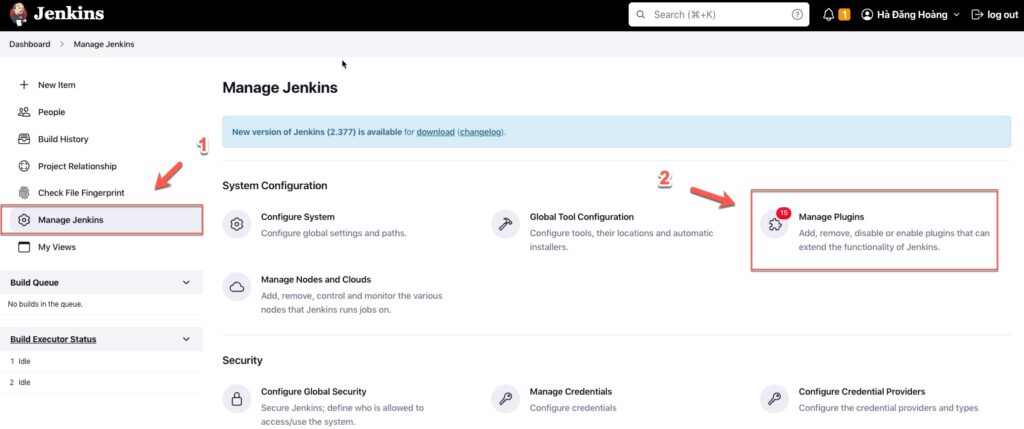
Vào Available plugins tìm plugin prometheus và tiến hành download nó.

Bấm vào Restart Jenkins when installation is complete and no jobs are running để sau khi cài đặt xong plugins Jenkins sẽ tự khởi động lại nếu không có job nào đang chạy.

Sau khi cài đặt xong plugins và khởi động lại, chúng ta vào lại Manage Plugins -> Available plugins để xác nhận lại quá plugins prometheus đã cài đặt thành công.

Nếu plugins prometheus đã cài đặt thành công bạn có thể sử dụng url http://<jenkins_ipaddr>:8080/prometheus login vào trình duyệt web bạn sẽ thấy các metric đã xuất hiện.
http://192.168.13.205:8080/prometheus/Hình ảnh metric khi chúng ta login vào http://192.168.13.205:8080/prometheus/

2. Triển khai Prometheus
Hãy tạo thư mục lưu file config của Promtheus.
mkdir /home/prometheusTiếp theo bạn hãy tạo file config Promtheus /home/prometheus/prometheus.yml với nội dung như dưới. Chúng ta sẽ có 2 job prometheus và jenkins, với 192.168.13.205:8080 là ip address của jenkins và 8080 là port của nó.
global:
  scrape_interval: 15s
  evaluation_interval: 15s

scrape_configs:
  - job_name: 'prometheus'
    static_configs:
      - targets: [192.168.13.205:9090]

  - job_name: 'jenkins'
    metrics_path: /prometheus
    static_configs:
      - targets: [192.168.13.205:8080]
Sau khi hoàn thành tạo các thu mục và file, bạn sẽ có cây thư mục như dưới.
.
├── prometheus
    └── prometheus.yml
Chúng ta chạy lệnh dưới để triển khai Prometheus, nhớ mount file config prometheus.yml vào container.
docker run -d -u root --name prometheus -p 9090:9090 -v /home/prometheus/prometheus.yml:/etc/prometheus/prometheus.yml prom/prometheusKết quả sau khi khởi tạo xong chúng ta có kết quả, ở đây mình có thêm container gitlab được triển khai chung host với prometheus.
$ docker ps
CONTAINER ID   IMAGE                     COMMAND                  CREATED          STATUS                PORTS                                                                                                               NAMES
03c5619941de   prom/prometheus           "/bin/prometheus --c…"   49 seconds ago   Up 47 seconds         0.0.0.0:9090->9090/tcp, :::9090->9090/tcp                                                                           prometheus
845e4b3315db   jenkins/jenkins:latest    "/usr/bin/tini -- /u…"   2 minutes ago    Up 9 minutes          0.0.0.0:8080->8080/tcp, :::8080->8080/tcp, 0.0.0.0:50000->50000/tcp, :::50000->50000/tcp                            jenkins
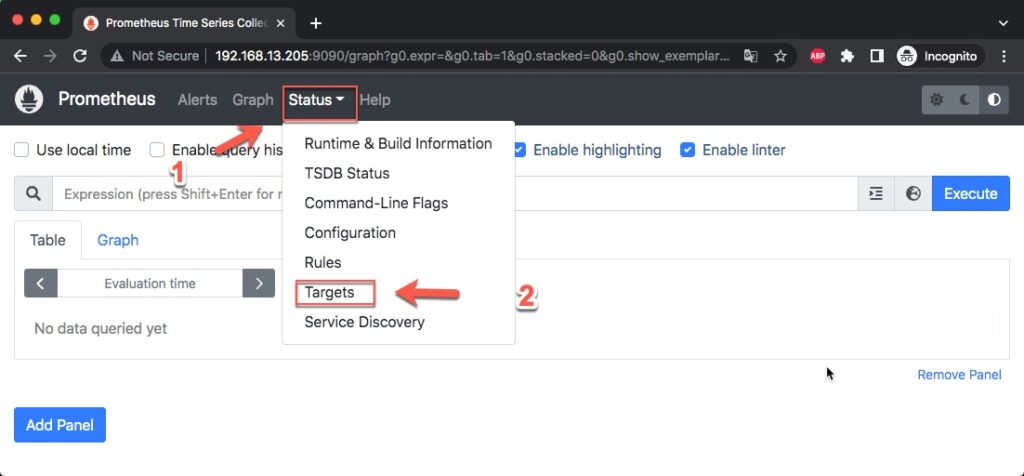
Sau khi container prometheus đã được tạo, bạn sử dụng url http://<prometheus_ipaddr>:9090 để login trên trình duyệt web. Sau khi vào được console của prometheus hãy vào Status -> Targets.
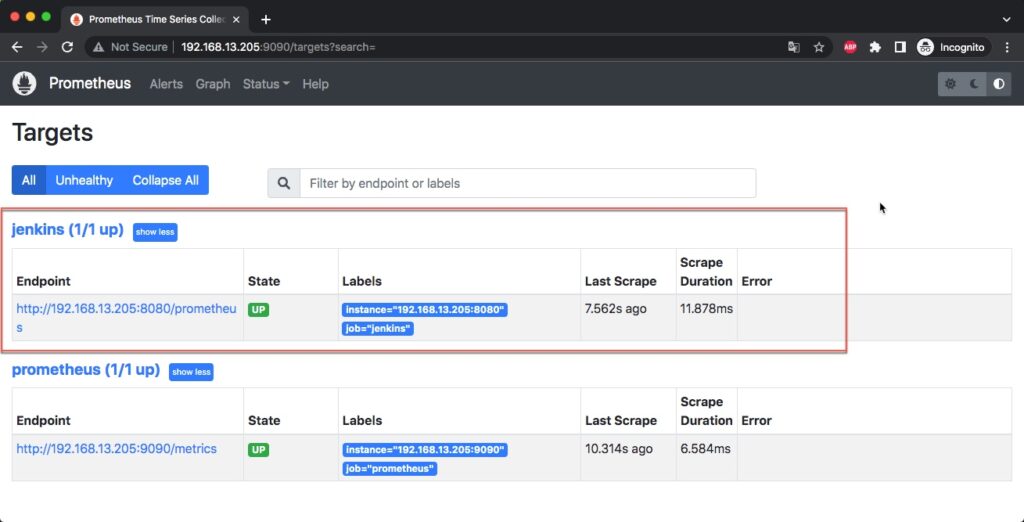
Bạn sẽ thấy có 2 job và trong đó có 1 job của Jenkins mà trước đó bạn đã khai báo trong prometheus.yml.
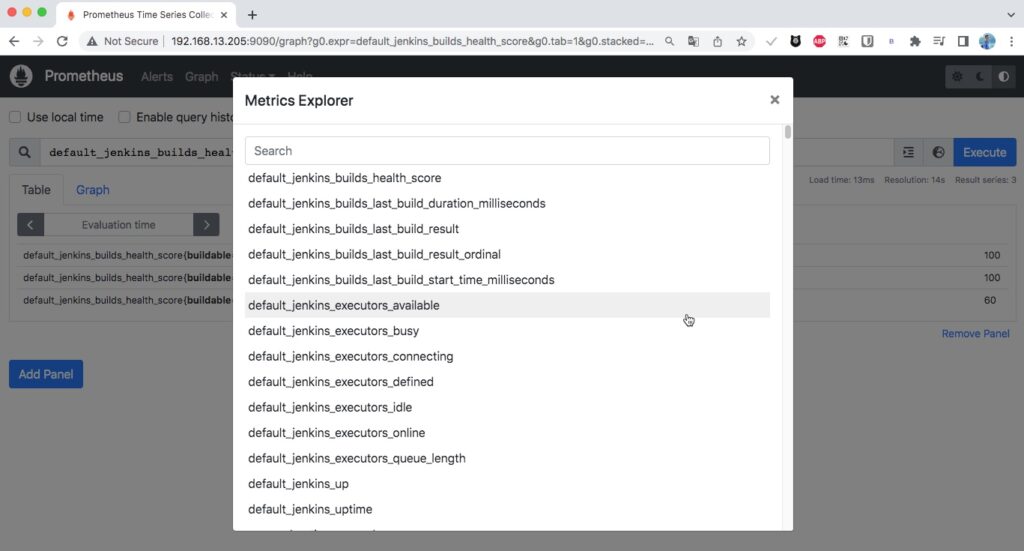
Vào Metics Explorer bạn sẽ thấy các metric của Jenkins đã xuất hiện.
3. Triển khai Grafana
Bước tiếp theo chúng ta triển khai Grafana để đưa thông tin metric đã lấy được từ Jenkins lên dashboard.
Hãy chạy lệnh dưới để tạo 1 container Grafana.
docker run -d -u root --name grafana -p 3000:3000 grafana/grafanaKết quả sau khi triển khai Grafana
$ docker ps
CONTAINER ID   IMAGE                     COMMAND                  CREATED          STATUS                PORTS                                                                                                               NAMES
744c9ab6dc1d   grafana/grafana           "/run.sh"                12 seconds ago   Up 10 seconds         0.0.0.0:3000->3000/tcp, :::3000->3000/tcp                                                                           grafana
03c5619941de   prom/prometheus           "/bin/prometheus --c…"   10 minutes ago   Up 10 minutes         0.0.0.0:9090->9090/tcp, :::9090->9090/tcp                                                                           prometheus
845e4b3315db   jenkins/jenkins:latest    "/usr/bin/tini -- /u…"   19 minutes ago   Up 19 minutes         0.0.0.0:8080->8080/tcp, :::8080->8080/tcp, 0.0.0.0:50000->50000/tcp, :::50000->50000/tcp                            jenkins
Dùng trình duyệt login vào url theo cú pháp http://<grafana_ipaddr>:3000
http://192.168.13.205:3000/Bạn sẽ có kết quả như dưới, hãy thực hiện tiếp các bước như hình để chúng ta thêm data source của Prometheus.
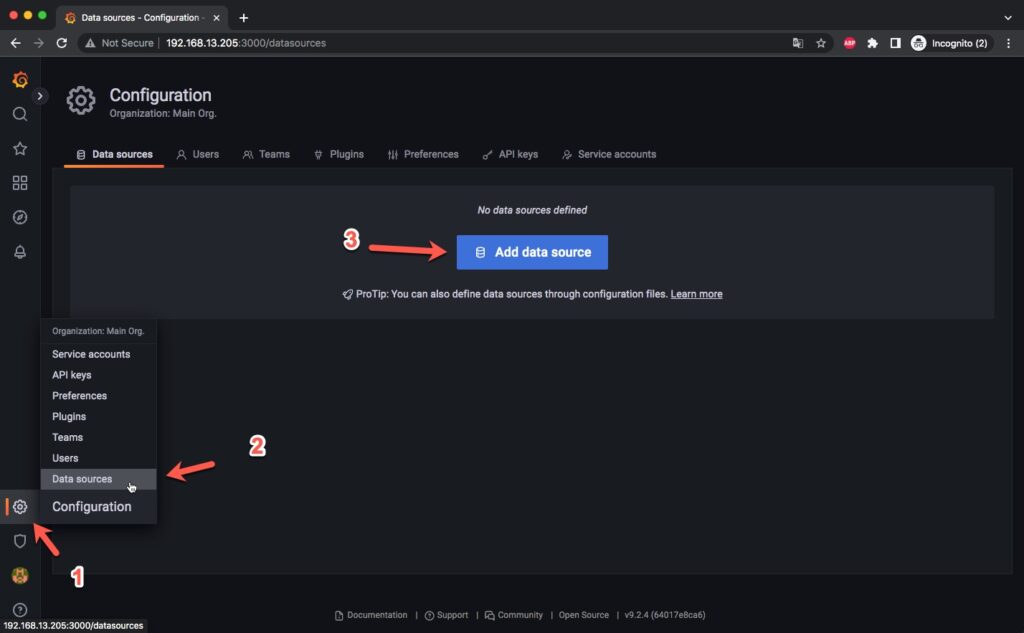
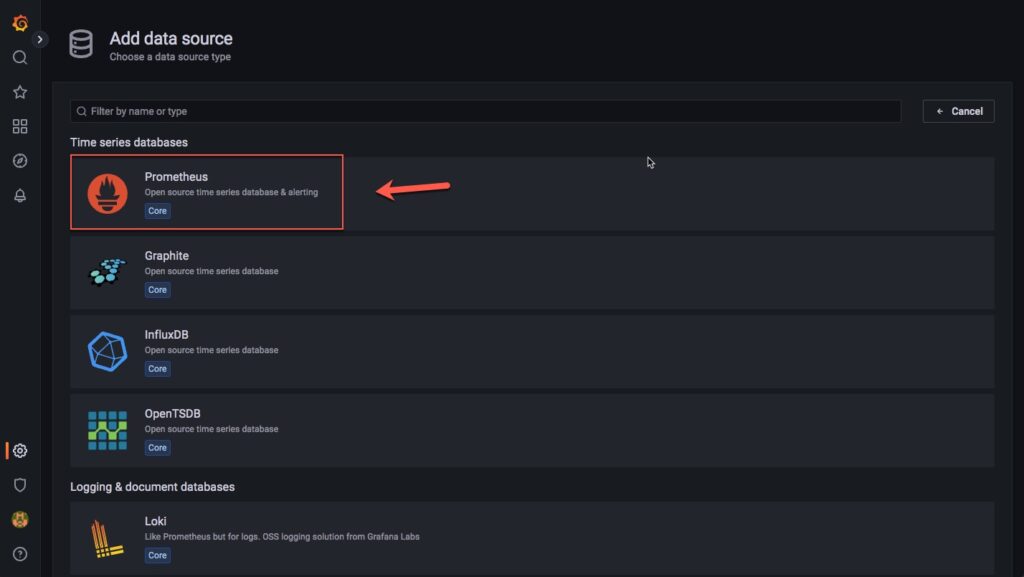
Chọn data source là Prometheus
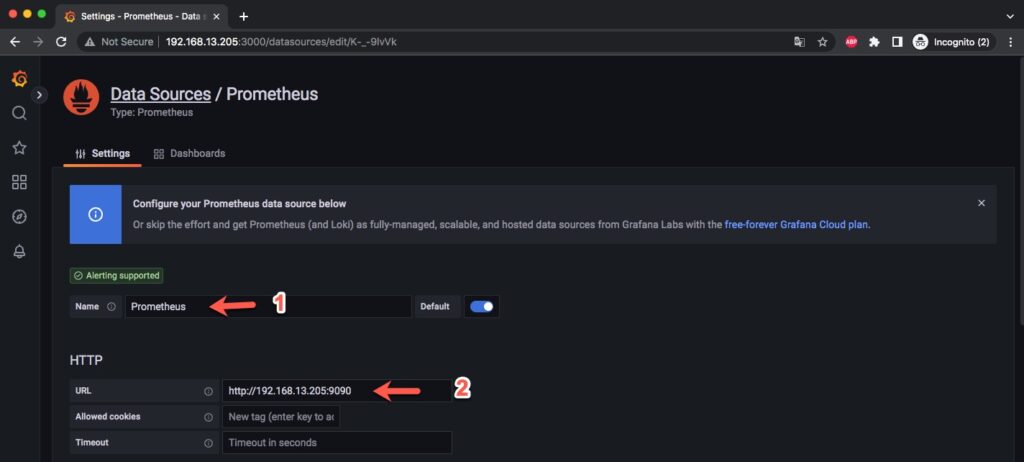
Tại mục name bạn hãy đặt tên bất kỳ cho nó, tại URL bạn điền url console của Prometheus.
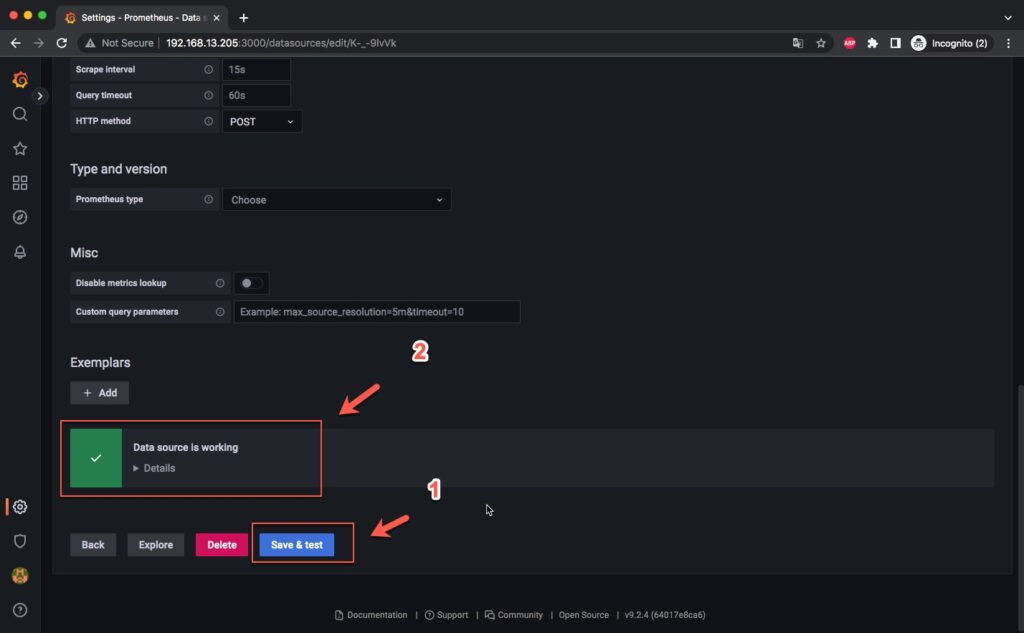
Sau khi hoàn thành 2 bước trên hãy kéo xuống dưới cùng và bấm Save & test. Nếu kết quả trả về Data source is working có nghĩ là data source đã được thêm thành công.
Sau khi thêm xong bạn sẽ có 1 data source Prometheus như dưới.

Nếu bạn tự tạo dashboard sẽ mất khá nhiều thời gian, vì vậy bạn hãy vào link dưới để tải cho mình 1 template dashboard có sẵn và sau đó chúng ta có thể import vào và chỉnh sửa theo sở thích.
https://grafana.com/grafana/dashboards/306Hãy copy id của dashboard hoặc download file dạng json về rồi import cũng được. Mình sẽ import bằng file json nên mình sẽ sử dụng phương pháp download file json về máy.

Sau khi download xong file json thì bạn quay lại Dashboard của Grafana, bấm New -> Import
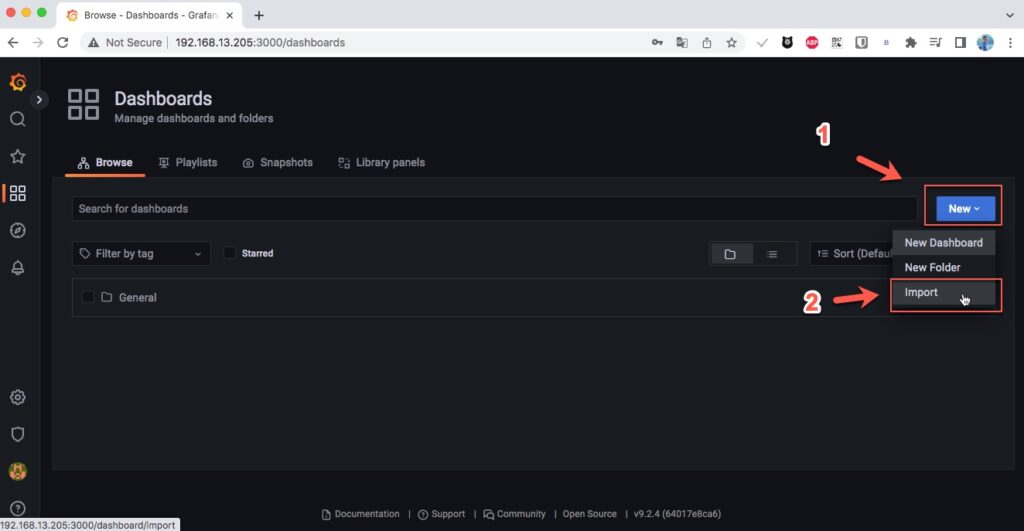
Bấm vào Upload Json file và trỏ tới file json bạn đã tải về ở bước trên.

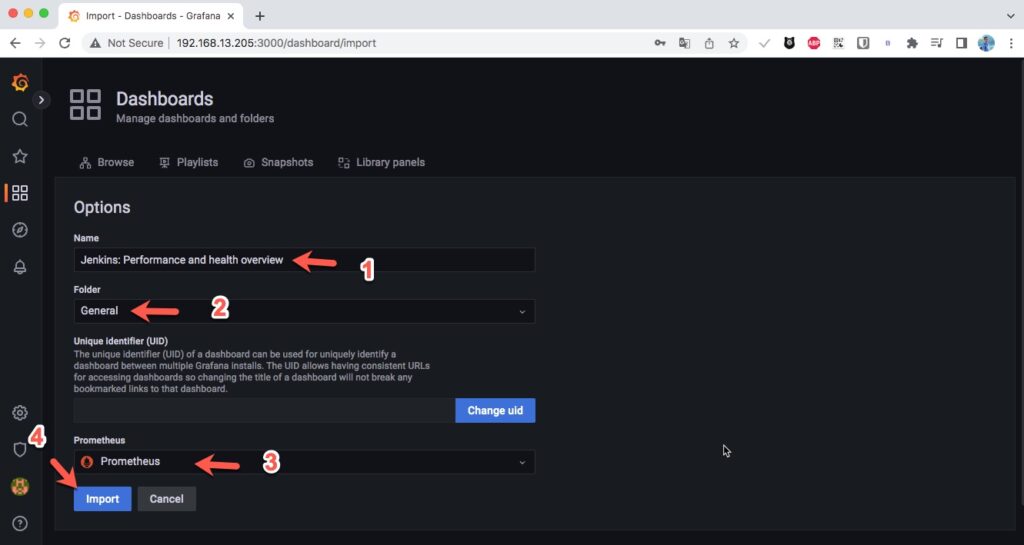
Kết quả sau khi import xong file json bạn sẽ thấy 1 số thông tin như hình dưới. Ở mục số 3 hình dưới bạn hãy chọn data source là Prometheus đã thêm trước đó rồi bấm Import.
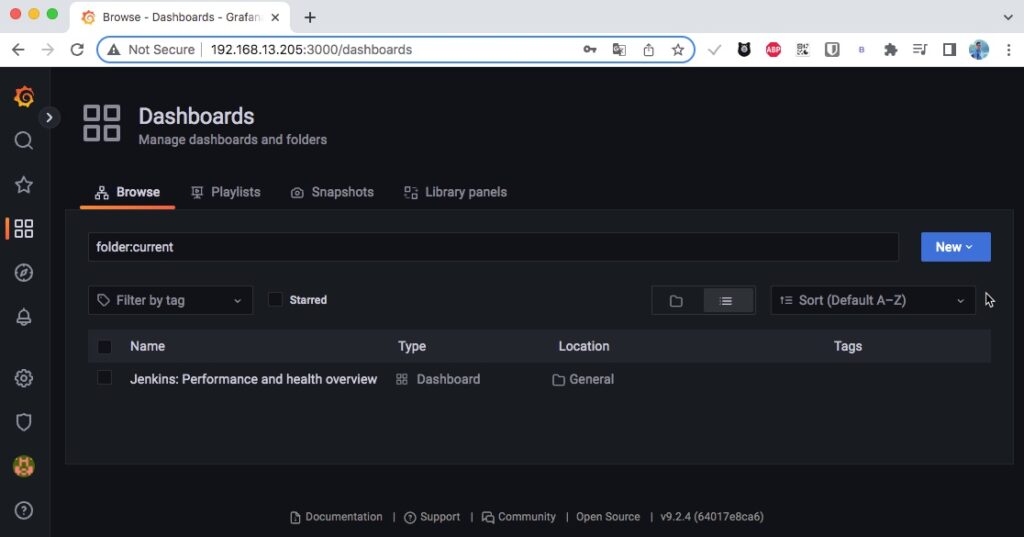
Sau khi import xong bạn sẽ có 1 dashboard mới như dưới.
Kết quả khi truy cập dashboard, bạn có thể chỉnh sửa theo sở thích nếu muốn nhé.

Chúc các bạn thành công.
