Mình sẽ tạo 2 PVC và 2 pod sử dụng 2 PVC này, mỗi PVC dùng một storage class của longhorn:
- Tạo file longhorn-pvc-delete.yaml
echo '''
apiVersion: v1
kind: PersistentVolumeClaim
metadata:
  name: longhorn-pvc-delete
spec:
  accessModes:
    #- ReadWriteOnce
    - ReadWriteMany
  storageClassName: longhorn-storage-delete
  resources:
    requests:
      storage: 2Gi
''' > longhorn-pvc-delete.yaml
Triển khai longhorn-pvc-delete.yaml
$ kubectl apply -f longhorn-pvc-delete.yaml
persistentvolumeclaim/longhorn-pvc-delete created
Verify kết quả pvc/longhorn-pvc-delete
$ kubectl get pvc/longhorn-pvc-delete
NAME                  STATUS   VOLUME                                     CAPACITY   ACCESS MODES   STORAGECLASS              AGE
longhorn-pvc-delete   Bound    pvc-55160799-bbb1-4661-8c98-1deb9a729788   2Gi        RWX            longhorn-storage-delete   3m38s
– longhorn-pvc-retain.yaml
echo '''
apiVersion: v1
kind: PersistentVolumeClaim
metadata:
  name: longhorn-pvc-retain
spec:
  accessModes:
    - ReadWriteOnce
  storageClassName: longhorn-storage-retain
  resources:
    requests:
      storage: 2Gi
''' > longhorn-pvc-retain.yaml
Triển khai longhorn-pvc-retain.yaml
$ kubectl apply -f longhorn-pvc-retain.yaml
persistentvolumeclaim/longhorn-pvc-retain created
Verify kết quả pvc/longhorn-pvc-retain
$ kubectl get pvc/longhorn-pvc-retain
NAME                  STATUS   VOLUME                                     CAPACITY   ACCESS MODES   STORAGECLASS              AGE
longhorn-pvc-retain   Bound    pvc-490aa0ab-1920-4520-accd-2316169d667c   2Gi        RWO            longhorn-storage-retain   116s
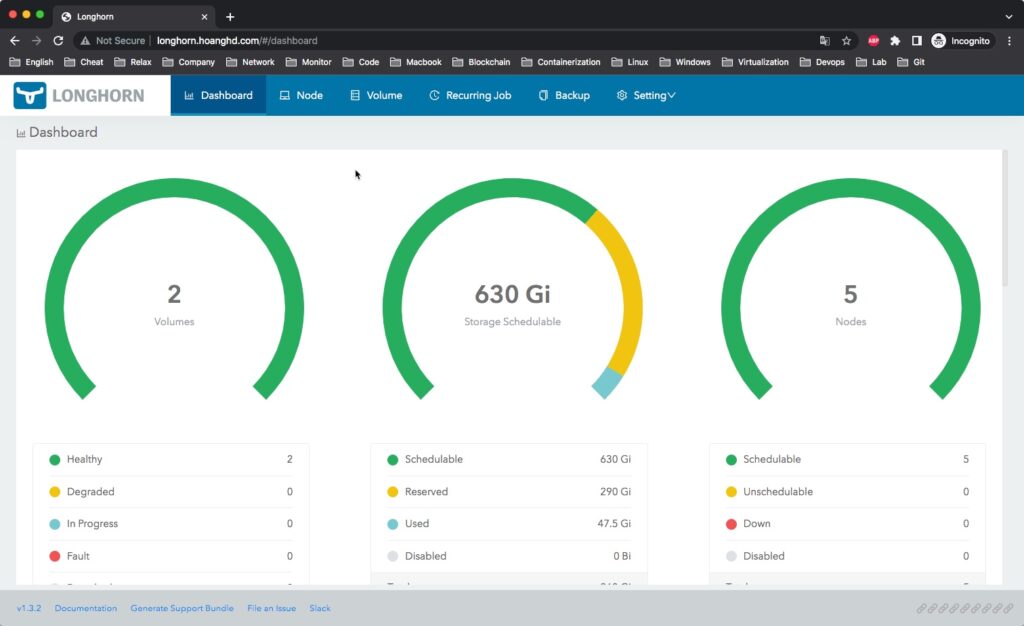
Lúc này trên UI cũng hiển thị cho bạn thấy 2 pvc đã được tạo.

– Tạo file test-pod-longhorn-delete.yaml với nội dung dưới.
cat > ./test-pod-longhorn-delete.yaml << OEF
kind: Pod
apiVersion: v1
metadata:
  name: pod-longhorn-delete
spec:
  volumes:
        - name: longhorn-pvc-delete
          persistentVolumeClaim:
            claimName: longhorn-pvc-delete
  containers:
    - name: my-container
      volumeMounts:
        - name: longhorn-pvc-delete # This is the name of the volume we set at the pod level
          mountPath: /var/simple # Where to mount this directory in our container

      # Now that we have a directory mounted at /var/simple, let's
      # write to a file inside it!
      image: alpine
      command: ["/bin/sh"]
      args: ["-c", "while true; do date >> /var/simple/file.txt; sleep 5; done"]
OEF
Triển khai file test-pod-longhorn-delete.yaml
$ kubectl apply -f test-pod-longhorn-delete.yaml
pod/pod-longhorn-delete created
– test-pod-longhorn-retain.yaml
cat > ./test-pod-longhorn-retain.yaml << OEF
kind: Pod
apiVersion: v1
metadata:
  name: pod-longhorn-retain
spec:
  volumes:
        - name: longhorn-pvc-retain
          persistentVolumeClaim:
            claimName: longhorn-pvc-retain
  containers:
    - name: my-container
      volumeMounts:
        - name: longhorn-pvc-retain # This is the name of the volume we set at the pod level
          mountPath: /var/simple # Where to mount this directory in our container

      # Now that we have a directory mounted at /var/simple, let's
      # write to a file inside it!
      image: alpine
      command: ["/bin/sh"]
      args: ["-c", "while true; do date >> /var/simple/file.txt; sleep 5; done"]
OEF
Triển khai file test-pod-longhorn-retain.yaml
$ kubectl apply -f test-pod-longhorn-retain.yaml
pod/pod-longhorn-retain created
Tạo xong các file yaml thì tạo trước 2 PVC và xem kết quả
$ kubectl get pods
NAME                  READY   STATUS              RESTARTS   AGE
pod-longhorn-delete   1/1     Running             0          10m
pod-longhorn-retain   1/1     Running             0          9m57s
Trên UI bạn thấy đã có 2 volume được hiển thị.

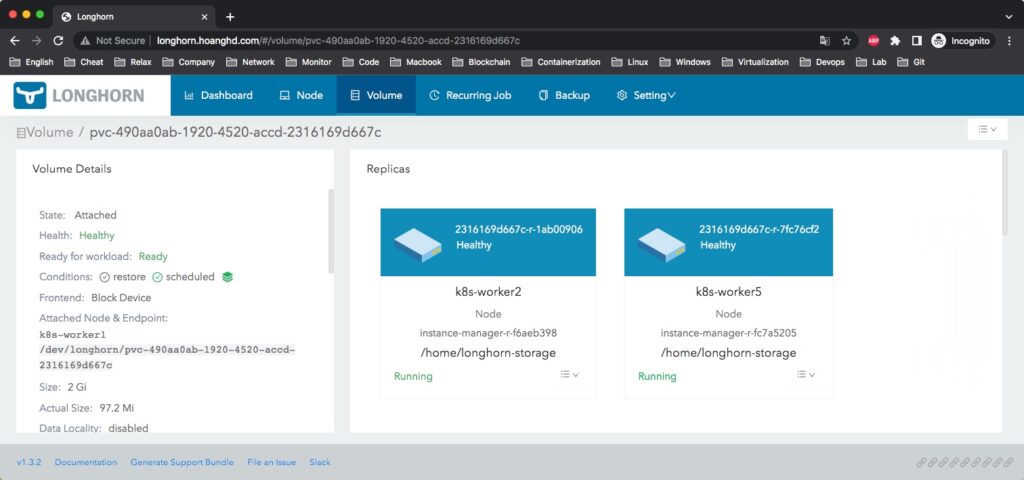
Kiểm tra trên giao diện của Longhorn để thấy phân vùng được tạo và được replicas theo cấu hình đã tạo (2 replicas):

Tới đây mình đã hoàn thành cài đặt longhorn storage trên Kubernetes Cluster và tạo các longhorn storage class. Trong phần tiếp theo mình sẽ tiếp tục chia sẻ hướng dẫn cài đặt các thành phần khác của Kubernetes như Monitoring, Logging.. Cảm ơn bạn đã đọc tới đây và hẹn gặp lại ở phần tiếp theo!
