1. Tổng quan.
Để tạo một cluster trong Proxmox mà không cần dùng WebGUI, bạn có thể sử dụng dòng lệnh. Proxmox cung cấp các công cụ và lệnh để quản lý và tự động hóa hầu hết các tác vụ. Dưới đây là các bước chính để tạo một cluster và có thể tích hợp vào script automation nếu cần.

2. Tạo Cluster.
Trên node master sử dụng lệnh pvecm create <cluster_name> để tạo cluster với tên mà bạn chọn (ví dụ: mycluster):
shell> pvecm create mycluster
Corosync Cluster Engine Authentication key generator.
Gathering 2048 bits for key from /dev/urandom.
Writing corosync key to /etc/corosync/authkey.
Writing corosync config to /etc/pve/corosync.conf
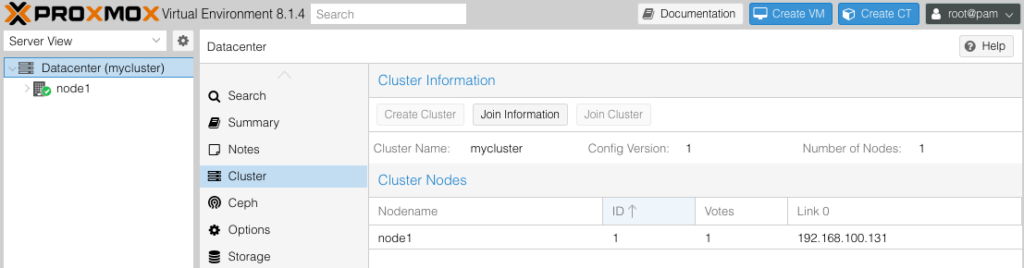
Restart corosync and cluster filesystemSau khi tạo trên CLI bạn cũng có thể verify lại bằng GUI.
2. Thêm các nodes vào Cluster.
Sau khi tạo cluster trên node master, trên các node thành viên mà bạn muốn thêm vào cluster, chạy lệnh pvecm add <IP_address_of_master_node> để tham gia cluster:
shell> pvecm add 192.168.100.131
Please enter superuser (root) password for '192.168.100.131': *********
Establishing API connection with host '192.168.100.131'
The authenticity of host '192.168.100.131' can't be established.
X509 SHA256 key fingerprint is 51:34:EE:CE:7C:8B:37:4B:31:A6:8D:E0:B8:7E:04:B8:D2:19:C9:2B:8A:D8:50:8F:13:AD:E0:1C:07:F9:25:96.
Are you sure you want to continue connecting (yes/no)? yes
Login succeeded.
check cluster join API version
No cluster network links passed explicitly, fallback to local node IP '192.168.100.132'
Request addition of this node
Join request OK, finishing setup locally
stopping pve-cluster service
backup old database to '/var/lib/pve-cluster/backup/config-1727716517.sql.gz'
waiting for quorum...OK
(re)generate node files
generate new node certificate
merge authorized SSH keys and known hosts
generated new node certificate, restart pveproxy and pvedaemon services
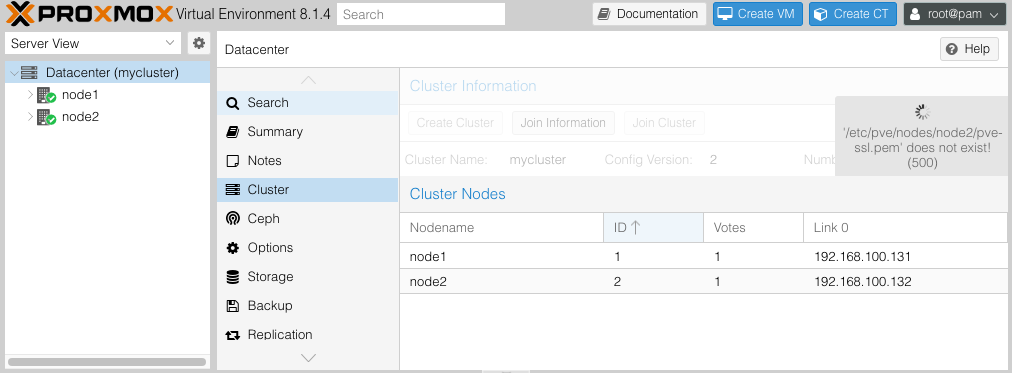
successfully added node 'node2' to cluster.IP_address_of_master_node là địa chỉ IP của node master (node bạn vừa tạo cluster).Bạn sẽ được yêu cầu nhập root password của node master.
Sau khi join node2 vào cluster bằng CLI bạn cũng có thể verify lại bằng GUI.
3. Tự động hóa bằng Script.
Để tự động hóa việc thêm node vào cluster Proxmox bạn có thể sử dụng kết hợp các phương pháp sau:
3.1. SSH Key-Based Authentication.
Thiết lập SSH không cần mật khẩu giữa các node bằng cách sử dụng SSH keys. Điều này sẽ giúp bỏ qua yêu cầu nhập mật khẩu khi thực hiện lệnh pvecm add.
Thông thường sau khi cài đặt Proxmox, hệ thống có thể đã tạo một cặp SSH key để sử dụng cho việc quản lý nội bộ và kết nối giữa các node trong cluster. Thay vì tạo mới cặp SSH key, bạn có thể sử dụng cặp khóa đã tồn tại. Bạn chỉ cần copy public key hiện có tới các node mà bạn muốn kết nối.
Để xem và sử dụng khóa công khai hiện có, bạn có thể kiểm tra file public key:
shell> cat ~/.ssh/id_rsa.pub
ssh-rsa AAAAB3NzaC1yc2EAAAADAQABAAABAQCuKm4/DV40iv8EzNMHNMRasHHc95JWwEAGB+PXkM1BhZIt07kQ21UlS7tsCUnWVicxpfbabkTsSRCIKUd84dC+gmXiW7axo6AH1NykXr1bxzBAHGX4CbCgiIrnLhmKIhu72605O+L4rMxHf2DwRrT9g7i1o9ONyZym3dPDqZmQD9vwRhmMBlAV/d4sRvRVSGc8m6XlGb58osguQglwvIM9VlM5Faj4KtMShl0RdtrwmFebj45XhVlVtEYDYcrrd1jASuEQXPuhcEXyN/3a5WZ9lpYq8MqxcsuVGEfWabxuRbdmGq7KBgSpjZ9owKao5I8nmxKUJizbyxf4zlf30e6L root@node3
Sau đó, sao chép khóa này sang các node ví dụ mình sao chép từ node 3 sang node1 (node master):
shell> ssh-copy-id root@192.168.100.131
/usr/bin/ssh-copy-id: INFO: Source of key(s) to be installed: "/root/.ssh/id_rsa.pub"
The authenticity of host '192.168.100.131 (192.168.100.131)' can't be established.
ED25519 key fingerprint is SHA256:vtIyTa7zBsS0Ppd25vJcwh2BXSPJbCQNKqBQQp28uJ0.
This key is not known by any other names.
Are you sure you want to continue connecting (yes/no/[fingerprint])? yes
/usr/bin/ssh-copy-id: INFO: attempting to log in with the new key(s), to filter out any that are already installed

/usr/bin/ssh-copy-id: WARNING: All keys were skipped because they already exist on the remote system.
                (if you think this is a mistake, you may want to use -f option)
Sau khi sao chép, bạn có thể SSH vào node node1 (node master) mà không cần mật khẩu:
shell> ssh root@192.168.100.131
Linux node1 6.5.11-8-pve #1 SMP PREEMPT_DYNAMIC PMX 6.5.11-8 (2024-01-30T12:27Z) x86_64

The programs included with the Debian GNU/Linux system are free software;
the exact distribution terms for each program are described in the
individual files in /usr/share/doc/*/copyright.

Debian GNU/Linux comes with ABSOLUTELY NO WARRANTY, to the extent
permitted by applicable law.
Last login: Tue Oct  1 00:12:21 2024
3.2. Bỏ qua Prompt “yes/no” cho xác thực SSH.
Để tự động xác nhận kết nối với máy chủ mà không cần nhập “yes”, bạn có thể thêm tùy chọn này vào lệnh SSH:
ssh -o StrictHostKeyChecking=no root@192.168.100.131Trong trường hợp muốn triển khai trên nhiều node, bạn có thể sử dụng Ansible hoặc các công cụ quản lý cấu hình để quản lý SSH key và tự động hóa quá trình thêm node vào cluster mà không cần xác nhận thủ công.
Nếu bạn muốn tự động hóa quá trình mà không cần nhập mật khẩu mỗi lần, bạn có thể sử dụng một script với expect.
#!/usr/bin/expect

set timeout 10
set password "Password@123"

spawn ssh root@192.168.100.131 "pvecm add $(hostname -I | awk '{print $1}')"
expect "password:"
send "$password\r"
interact
3.3. Mã hóa mật khẩu.
Bạn có thể bảo vệ mật khẩu của mình bằng một số phương pháp khác để tránh việc lưu trực tiếp dưới dạng plaintext trong script, dưới đây là một số giải pháp:
Sử dụng OpenSSL để mã hóa mật khẩu.
Bạn có thể mã hóa mật khẩu bằng OpenSSL và sau đó giải mã trong script khi cần sử dụng.
Bước 1: Mã hóa mật khẩu bằng OpenSSL.
Sử dụng lệnh OpenSSL để mã hóa mật khẩu:
shell> echo "Password@123" | openssl enc -aes-256-cbc -a -salt -pbkdf2 -pass pass:your_secret_key > encrypted_password.txt- your_password: mật khẩu bạn muốn mã hóa.
- your_secret_key: một khóa bí mật mà bạn sử dụng để mã hóa (nên giữ bí mật khóa này).
Cùng xem nội dung mật khẩu sau khi mã hóa.
shell> cat encrypted_password.txt
U2FsdGVkX18GnipYdHi/cGCzHxcfg1EOYHQFPxeW4C8=
Bước 2: Giải mã và sử dụng trong script.
Khi sử dụng, bạn có thể giải mã mật khẩu trong script và cung cấp cho sshpass như sau:
password=$(openssl enc -aes-256-cbc -d -a -salt -pbkdf2 -pass pass:your_secret_key -in encrypted_password.txt)
Thử xem kết quả giải mã password.
shell> echo $password
Password@123
Sử dụng biến password để ssh-copy-id thử nhé.
shell> sshpass -p "$password" ssh-copy-id -o StrictHostKeyChecking=no root@192.168.100.131
/usr/bin/ssh-copy-id: INFO: Source of key(s) to be installed: "/root/.ssh/id_rsa.pub"
/usr/bin/ssh-copy-id: INFO: attempting to log in with the new key(s), to filter out any that are already installed

/usr/bin/ssh-copy-id: WARNING: All keys were skipped because they already exist on the remote system.
                (if you think this is a mistake, you may want to use -f option)
Sử dụng Biến Môi Trường.
Bạn có thể lưu mật khẩu trong một biến môi trường để không cần viết trực tiếp trong script. Điều này bảo mật tốt hơn là lưu plaintext.
Bước 1: Đặt biến môi trường.
export MY_PASSWORD='Password@123'Bước 2: Sử dụng trong script.
Trong script, sử dụng biến môi trường này:
sshpass -p "$MY_PASSWORD" ssh-copy-id -o StrictHostKeyChecking=no root@192.168.100.131Sử dụng Ansible với Ansible Vault.
Nếu bạn đang sử dụng Ansible để tự động hóa các tác vụ, bạn có thể sử dụng Ansible Vault để mã hóa mật khẩu và lưu trữ chúng một cách an toàn.
Bước 1: Mã hóa mật khẩu với Ansible Vault.
ansible-vault encrypt_string 'Password@123' --name 'ansible_password'Bước 2: Sử dụng mật khẩu trong Playbook.
Bạn có thể giải mã và sử dụng mật khẩu trong các playbook của Ansible mà không cần tiết lộ mật khẩu.
Sử dụng HashiCorp Vault hoặc Các Công Cụ Quản Lý Bí Mật.
Bạn cũng có thể sử dụng các công cụ quản lý bí mật như HashiCorp Vault, AWS Secrets Manager, hoặc Azure Key Vault để lưu trữ và truy xuất mật khẩu trong các script của mình.
Mặc dù việc mã hóa mật khẩu trong sshpass không có sẵn trực tiếp, các phương pháp trên sẽ giúp bạn bảo vệ mật khẩu một cách an toàn hơn khi tự động hóa các tác vụ liên quan đến SSH.
3.4. Tự động xác thực mật khẩu.
Để tự động hóa quá trình xác thực mật khẩu khi sử dụng ssh-copy-id hoặc khi thực hiện lệnh SSH mà không cần nhập mật khẩu thủ công, bạn có thể sử dụng công cụ sshpass để tự động cung cấp mật khẩu.
Trên hệ điều hành dựa trên Debian/Ubuntu, bạn có thể cài đặt sshpass bằng lệnh:
apt-get install sshpassSử dụng sshpass để tự động cung cấp mật khẩu:
Sau khi cài đặt sshpass, bạn có thể sử dụng nó để tự động cung cấp mật khẩu khi chạy lệnh ssh-copy-id. Cú pháp như sau:
sshpass -p 'Password@123' ssh-copy-id -o StrictHostKeyChecking=no root@192.168.100.131Lưu ý về bảo mật:
Việc lưu mật khẩu trong script có thể gây rủi ro bảo mật. Để cải thiện bảo mật, bạn có thể:
- Sử dụng các công cụ quản lý bí mật như Ansible Vault, HashiCorp Vault để lưu trữ và truy xuất mật khẩu an toàn.
- Hoặc sử dụng SSH key-based authentication như đã đề cập để tránh cần dùng mật khẩu.
Giải pháp này sẽ giúp bạn tự động hóa hoàn toàn quá trình xác thực mật khẩu khi thêm SSH key mà không cần nhập thủ công.
Giờ sử dụng cú pháp pvecm add <ipaddr_master_node> –use_ssh –link0 <ipaddr_member_node> để thêm node3 vào cluster thử nhé.
shell> pvecm add 192.168.100.131 --use_ssh --link0 192.168.100.133
copy corosync auth key
stopping pve-cluster service
backup old database to '/var/lib/pve-cluster/backup/config-1727717575.sql.gz'
waiting for quorum...OK
(re)generate node files
generate new node certificate
merge authorized SSH keys and known hosts
generated new node certificate, restart pveproxy and pvedaemon services
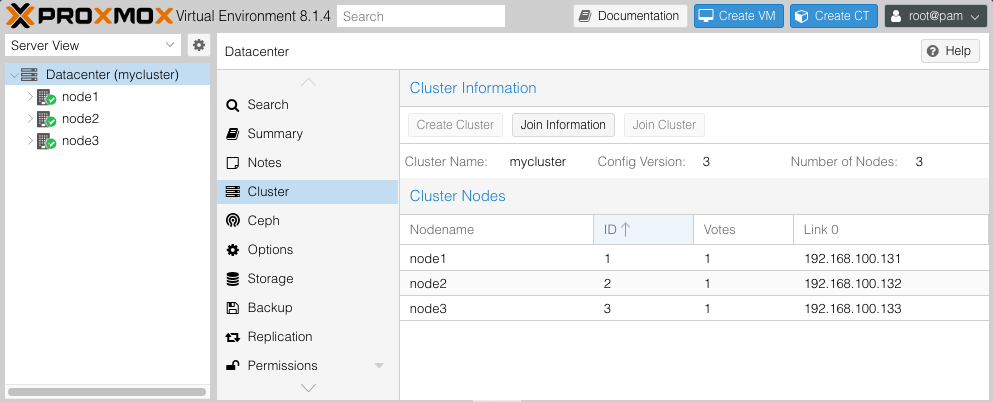
successfully added node 'node3' to cluster.Kết quả.
4. Sử dụng automation join node 4.
Qua các bước trên, mình thu gọn lại 1 script nhỏ để automation join node 4 thử nhé. Sử dụng vi join_node4.sh để tạo file join_node4.sh, nhập vào nội dung dưới và lưu lại.
#!/bin/bash
# This script is used to add a new node to the Proxmox cluster
apt install sshpass
echo "Password@123" | openssl enc -aes-256-cbc -a -salt -pbkdf2 -pass pass:your_secret_key > encrypted_password.txt
password=$(openssl enc -aes-256-cbc -d -a -salt -pbkdf2 -pass pass:your_secret_key -in encrypted_password.txt)

sshpass -p "$password" ssh-copy-id -o StrictHostKeyChecking=no root@192.168.100.131
pvecm add 192.168.100.131 --use_ssh --link0 192.168.100.134
Phân quyền script.
chmod +x join_node4.shChạy Script.
shell>./join_node4.sh
Reading package lists... Done
Building dependency tree... Done
Reading state information... Done
The following NEW packages will be installed:
sshpass
0 upgraded, 1 newly installed, 0 to remove and 34 not upgraded.
Need to get 13.0 kB of archives.
After this operation, 38.9 kB of additional disk space will be used.
Get:1 http://ftp.debian.org/debian bookworm/main amd64 sshpass amd64 1.09-1+b1 [13.0 kB]
Fetched 13.0 kB in 0s (68.0 kB/s)
Selecting previously unselected package sshpass.
(Reading database ... 45698 files and directories currently installed.)
Preparing to unpack .../sshpass_1.09-1+b1_amd64.deb ...
Unpacking sshpass (1.09-1+b1) ...
Setting up sshpass (1.09-1+b1) ...
Processing triggers for man-db (2.11.2-2) ...
/usr/bin/ssh-copy-id: INFO: Source of key(s) to be installed: "/root/.ssh/id_rsa.pub"
/usr/bin/ssh-copy-id: INFO: attempting to log in with the new key(s), to filter out any that are already installed
/usr/bin/ssh-copy-id: WARNING: All keys were skipped because they already exist on the remote system.
(if you think this is a mistake, you may want to use -f option)
copy corosync auth key
stopping pve-cluster service
backup old database to '/var/lib/pve-cluster/backup/config-1727718705.sql.gz'
waiting for quorum...OK
(re)generate node files
generate new node certificate
merge authorized SSH keys and known hosts
generated new node certificate, restart pveproxy and pvedaemon services
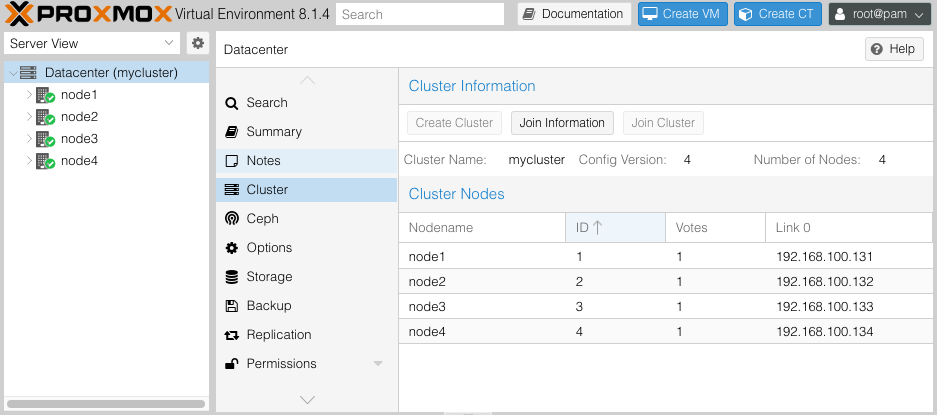
successfully added node 'node4' to cluster.Kết quả trên CLI.
shell> pvecm status
Cluster information
-------------------
Name:             mycluster
Config Version:   4
Transport:        knet
Secure auth:      on

Quorum information
------------------
Date:             Tue Oct  1 00:54:21 2024
Quorum provider:  corosync_votequorum
Nodes:            4
Node ID:          0x00000004
Ring ID:          1.11
Quorate:          Yes

Votequorum information
----------------------
Expected votes:   4
Highest expected: 4
Total votes:      4
Quorum:           3
Flags:            Quorate

Membership information
----------------------
    Nodeid      Votes Name
0x00000001          1 192.168.100.131
0x00000002          1 192.168.100.132
0x00000003          1 192.168.100.133
0x00000004          1 192.168.100.134 (local)
Kết quả trên GUI.
5. Một số gợi ý cho Automation.
- Ansible có thể giúp bạn tự động hóa quá trình cài đặt và cấu hình cluster với các module điều khiển SSH và quản lý dịch vụ.
- Sử dụng
cronhoặc hệ thống quản lý tác vụ khác để tự động chạy script nếu cần cluster được cài đặt định kỳ hoặc trên môi trường CI/CD.
Giải pháp này sẽ loại bỏ việc phải thực hiện qua giao diện WebGUI, giúp bạn hoàn toàn tự động hóa việc tạo cluster Proxmox.
